There are several reasons why someone may want to completely wipe or format a USB drive in Windows 10. Some key reasons include:
- To remove all data and restore the drive to its factory settings if selling or giving away the drive
- To resolve data corruption or file system errors on the drive
- To eliminate viruses or malware that may have infected the drive
- To permanently delete sensitive files and prevent data recovery
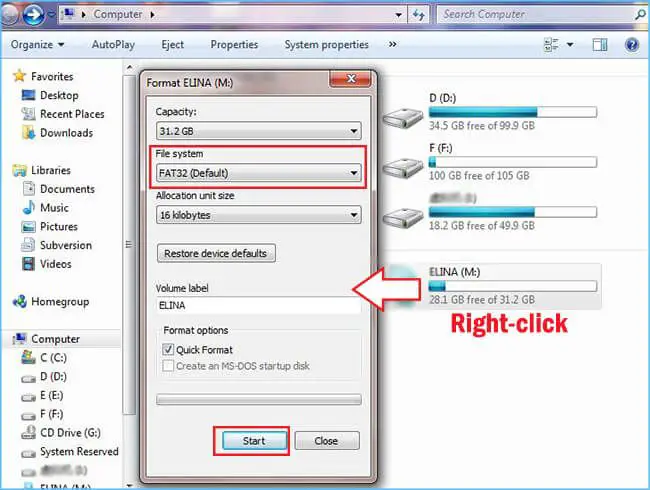
- To reformat the drive to work with a different file system or OS
- To free up space on the drive by deleting unnecessary files
Completely wiping a USB drive erases all of its data, restoring it to a fresh, blank, formatted state. This guide will walk through the different methods to securely and permanently delete everything off a USB flash drive in Windows 10.
Back Up Important Files First
Before deleting everything on your USB drive, it is crucial that you back up any important files and data stored on the drive. Once you delete the files and empty the recycle bin, the files will be permanently erased and non-recoverable. According to an article on g2.com, “Local backups offer great protection from virus attacks, hard drive failures, and accidental or deliberate deletion of data. This type of backup allows you to restore a previous version of a file or recover a deleted file.” (Source).
Backing up your data provides protection in case of data loss or corruption. As Morgan Stanley advises, “Data backups are a key part of any cybersecurity strategy. Backups provide an essential way to recover data if it is lost, corrupted or made inaccessible” (Source). Before deleting the contents of your USB drive, take the time to identify any important personal files, documents, photos or other data that you want to keep. Copy these files to another secure location like an external hard drive, cloud storage, or another USB drive.
Once you have safely backed up your important files, you can proceed with deleting the contents of the USB drive knowing your data is protected.
Use Windows Explorer
To delete files from a USB drive in Windows 10, you will need to first open Windows Explorer. Windows Explorer allows you to view and manage files and folders on your computer and connected devices.
To open Windows Explorer in Windows 10:
- Press the Windows key + E on your keyboard. This is the shortcut to launch a new Windows Explorer window.
- Alternatively, click on the File Explorer icon in the taskbar, or search for “File Explorer” in the Windows search bar and select it from the results.
- You can also right-click on the Start menu and select “File Explorer” from the context menu.
Once Windows Explorer is open, you will see a left pane showing different drives and folders. Locate the connected USB drive in the left pane – it will likely be named after the volume label or manufacturer.
Click on the USB drive to view its contents in the right pane. Now you can proceed with selecting and deleting files on the drive.
(Source: https://www.wikihow.com/Open-Windows-Explorer, https://www.digitalcitizen.life/open-file-explorer-windows/)
Select All Files
One of the easiest ways to select all the files and folders within a USB drive in Windows 10 is to use the Ctrl + A keyboard shortcut in Windows Explorer. This will highlight every file and folder at once, allowing you to then delete them together.
To select all files using Ctrl + A:
- Open Windows Explorer and navigate to the USB drive.
- Press and hold the Ctrl key on your keyboard.
- While holding Ctrl, press the A key.
This will instantly select every file and folder within the open USB drive window. The selections will be highlighted in blue. With all files and folders selected, you can then delete them.
According to MakeUseOf, the Ctrl + A shortcut to select all files works reliably in Windows 10 and 11 File Explorer. It’s a quick and easy way to highlight everything in the current open folder before deleting.
Delete Files
With the USB drive open in Windows Explorer, you can select and delete all the files to clear out the drive. To delete files, you simply need to right-click on them and choose ‘Delete’ from the menu. This will send the selected files to the Recycle Bin.
Some tips for deleting files in Windows Explorer:
- To select multiple files, hold down the Ctrl key and click on each file you want to delete. You can also click and drag to select a group of files.
- Right-click on any selected file and choose ‘Delete’ to delete all the selected files at once.
- If you want to bypass the Recycle Bin, hold down Shift while right-clicking and choose ‘Delete’ from the menu.
- Make sure any files you want to keep are deselected. Check the USB drive contents carefully before clicking ‘Delete’.
Once the files are deleted, the USB drive space will be freed up. However, the files will still be recoverable from the Recycle Bin unless that is emptied next.
Empty Recycle Bin
When you delete a file on your Windows 10 computer, it gets sent to the Recycle Bin instead of being permanently erased. The Recycle Bin basically functions as a temporary holding spot for recently deleted files.
To permanently delete all items in the Recycle Bin in Windows 10:
- Open up File Explorer and click on the Recycle Bin icon, usually located on the bottom left of the window.
- With the Recycle Bin window open, go to the top menu bar and click on Empty Recycle Bin.
- A confirmation prompt will appear asking if you want to permanently delete all items. Click Yes.
- The Recycle Bin will now be emptied of all files and folders. They cannot be recovered.
Emptying the Recycle Bin is useful when you need to completely erase files or free up hard drive space on your computer. Just be careful, as once deleted from the Recycle Bin, files are gone for good. Make sure to back up anything important before emptying the Recycle Bin.
Use Diskpart in Command Prompt
Another way to delete everything on a USB drive in Windows 10 is by using the diskpart command in Command Prompt. Here are the steps:
- Open Command Prompt as administrator. To do this, type “Command Prompt” in the Windows search bar, right-click on the top result, and select “Run as administrator”.
- In Command Prompt, type
diskpartand press Enter. This will open the DiskPart utility. - Type
list diskand press Enter. This lists all the disks on your computer. - Identify the disk number for your USB drive and type
select disk X(replace X with your disk number) and press Enter. This selects the USB disk. - Type
cleanand press Enter. This will completely erase all data on the USB drive. - Close Command Prompt when finished.
The clean command in diskpart will delete all partitions and format the disk, erasing everything on the USB drive (Microsoft). This method doesn’t require using Windows Explorer at all.
Select USB Drive
The first step is to identify the drive letter or disk number assigned to the USB drive you want to wipe. This can be done using the select disk command in Diskpart.
To open Diskpart, search for “Diskpart” in the Windows search box and launch it. This will open the command prompt window with Diskpart already running.
Next, type list disk and press Enter. This will show a list of all the disk drives connected to your computer along with their disk numbers.
Identify the disk number for your USB drive from the list. Let’s say it is Disk 2 in our case.
Now type select disk 2 and hit Enter to select the USB disk. You can also select a specific partition on the disk using the select partition # command if you only want to wipe a single partition.
For example: select partition 1 will select the first primary partition on the currently selected disk.
Once you have selected the USB disk or partition to wipe, you can proceed with deleting all data on it.
Use Diskpart in Command Prompt
You can use the Diskpart utility in Command Prompt to completely wipe a USB drive. Diskpart includes a “clean” command that will delete all data and partitions on the drive.
According to TechTarget, “When you have an entire disk to wipe clean, you can use the diskpart clean command to convert all the stored data into unallocated space.”
The Diskpart clean command overwrites all sectors on the drive to ensure no data can be recovered. As Wondershare Recoverit explains, “With the DiskPart Clean command, you can delete all the data within the disk, along with any disk partitions that may be present.”
To use the clean command in Diskpart:
- Open Command Prompt as administrator.
- Type “diskpart” and press enter to start Diskpart.
- Type “list disk” to view available disks.
- Select the USB drive by typing “select disk X” (replace X with the disk number).
- Type “clean” and press enter to wipe the drive.
This will completely erase all data on the USB drive and leave it blank for new use.
Conclusion
In summary, permanently deleting everything from a USB drive in Windows 10 requires either using Windows Explorer to select and delete all files, emptying the Recycle Bin, or using the Diskpart clean command in Command Prompt. It is critical to back up any important files on the USB drive first, as the deletion process will result in permanent data loss. Once deleted and cleaned, the files cannot be recovered. Always be certain you have backups before proceeding with fully wiping a USB drive.