The cloud refers to online storage that allows you to access your files from any device. With iCloud Photos, Apple provides cloud storage specifically for your photos and videos. When you take a photo or video on your iPhone or iPad, it gets automatically uploaded and synced with iCloud so the photo is also available on your other devices logged into the same iCloud account like your Mac or PC. This lets you access your entire photo library from all your devices using the cloud.
iCloud Photos works by automatically uploading new photos and videos from your iPhone or iPad camera roll to iCloud servers. This syncing process happens in the background as long as you’re connected to WiFi, so you don’t have to manually upload anything. Once your photos are uploaded, they stay in your iCloud storage until you decide to delete them.
Check your cloud photo settings
The first step is to check your iCloud photo settings to understand how photos are currently being handled. To find your iCloud photo settings on an iPhone or iPad, go to Settings > [your name] > iCloud > Photos. Here you can see if you have iCloud Photos turned on, which enables automatic syncing to iCloud.
On a Mac, you can find your iCloud photo settings by going to System Preferences > Apple ID > iCloud > Photos. This will show you whether iCloud Photos is enabled and which devices are set to sync photos.
With Google Photos, you can view your sync settings by opening the Google Photos app or going to photos.google.com. In Settings, look for backup & sync to see which folders are set to automatically back up to the cloud.
Knowing your current photo sync settings is key to managing what gets uploaded and deleted from the cloud. You may want to temporarily pause auto-syncing while deleting cloud content.
Turn off automatic uploads
Most cloud services like Google Photos, iCloud, and OneDrive have automatic photo upload features enabled by default. This uploads any new photos you take with your device’s camera directly to the cloud storage. To stop your photos from automatically syncing, you need to disable this feature.
To turn off automatic uploads in Google Photos on an iPhone or iPad:https://support.google.com/photos/thread/223637278/to-stop-auto-sync-iphone-photos-google-photos?hl=en
- Open the Google Photos app.
- Tap your profile photo in the top right.
- Tap Photos Settings.
- Tap Backup & Sync.
- Turn off Back up & Sync.
This will prevent any new photos you take from automatically saving to your Google Photos cloud storage. Any previously uploaded photos will remain in the cloud unless you manually delete them.
Delete photos from the cloud
To delete photos from your cloud storage, you’ll need to access your cloud service’s website or app. The main cloud services that store photos are iCloud for iPhone users and Google Photos for Android users.
To delete photos from iCloud, go to iCloud.com and sign in. Click on Photos, then select the photos you want to remove and click Delete. This will delete the photos from iCloud but keep them stored locally on your iPhone. Just be aware that any future backups to iCloud will add those photos back if you don’t delete them from your Camera Roll as well (source).
For Google Photos, open the Google Photos app or go to photos.google.com. Find the photos you want to remove and click on the trash icon. Then empty your trash to permanently delete. This will remove the photos from Google Photos storage but keep them on your Android device (source).
Keep in mind, deleting from the cloud won’t remove photos from your phone’s local storage. To free up space, you’ll need to manage the photos on your camera roll separately.
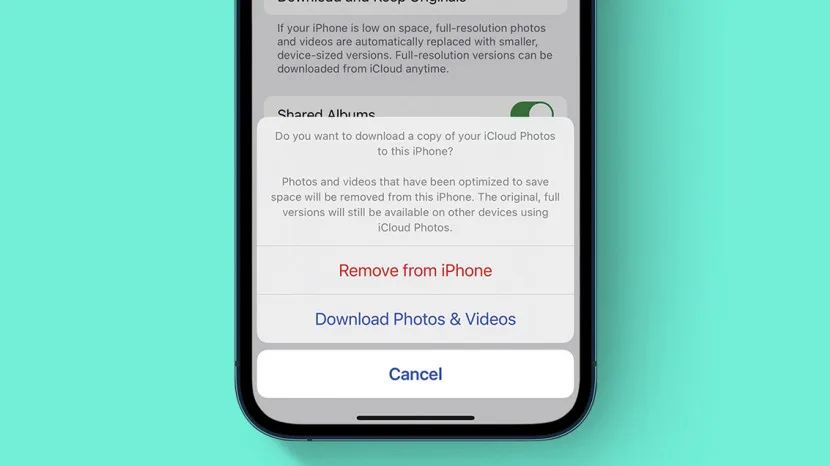
Keep copies on your device
The easiest way to delete photos from the cloud while keeping them on your iPhone is to use the Apple Photos app. First, make sure automatic photo uploads to the cloud are disabled. Then, open the Photos app and browse to the photos you want to delete from the cloud. Swipe left on a photo and tap the “Delete” button. This will delete the photo from iCloud but keep it on your device. You can also select multiple photos, tap the share icon, scroll down and select “Delete” to remove them from the cloud in bulk.
According to Google’s help article, photos and videos older than 30 days can be deleted from your Google Photos cloud storage while still being backed up on your device. Simply use the Free Up Space tool in the Google Photos app to delete cloud copies of photos you want to keep locally on your iPhone [1].
Just be careful not to enable automatic syncing again or those deleted photos could be re-uploaded. Always double check the cloud photo service to confirm the images were removed. Keep your local photo library or camera roll backup up regularly as well.
Manage your camera roll
One of the best ways to free up storage space on your phone is to manage the photos and videos in your camera roll. Here are some tips:
First, go through your camera roll and delete any blurry photos, accidental screenshots, or duplicate images you don’t need. You can usually find these by sorting your photos by size or date. Be ruthless and delete anything you don’t have an emotional attachment to or need for the future.
You can also offload full-resolution photos and videos to cloud storage to save space. Services like iCloud and Google Photos let you store high-quality versions in the cloud while keeping smaller, device-optimized versions on your phone. This frees up a lot of local storage.
If you have a lot of videos taking up space, consider using a video compression tool to make them take up less storage. Apps like Video Dieter can compress videos without losing too much visual quality.
Finally, set your camera app to save photos in a smaller size or resolution. On an iPhone, go to Settings > Camera > Formats and select High Efficiency. On Android, check your camera app’s settings for a photo size or quality option.
Regularly managing your camera roll by deleting, offloading, and compressing can help keep your phone storage optimized over time.
Back up your photos
It’s important to have a backup of the photos stored locally on your device, in case you delete them from the cloud. There are a few options for backing up your local photo library:
You can use the built-in backup options in Android or iOS. On Android, open the Google Photos app, go to your profile icon, and turn on backup & sync [1]. On iOS, enable iCloud photo backup in your Settings app.
Another option is using a third party cloud storage service like Dropbox, Microsoft OneDrive or Google Drive. These services have mobile apps that can automatically upload your camera photos and videos – just enable this feature in the app’s settings [2].
You can also manually back up your photos by connecting your phone to a computer and copying the image files over. Or use a dedicated photo backup service like Flickr or Photobucket to upload copies of your photos.
Backing up locally provides a safety net in case you ever need to access photos that you’ve deleted from the cloud.
Recover deleted photos
If you accidentally delete photos from your device or the cloud, there are ways you can try to retrieve them. Here’s how to recover deleted photos:
If you recently deleted photos from your iPhone’s camera roll, go to the Photos app and tap on the Albums tab. Scroll down and tap on ‘Recently Deleted’ to view photos that have been deleted in the past 30 days. Tap ‘Recover’ next to any photos you want to restore. They will be moved back to your camera roll.
For photos deleted longer than 30 days ago, you’ll need to use data recovery software (source). A program like EaseUS MobiSaver for iOS can scan your device and find deleted photos to restore. Connect your iPhone to your computer and run the software to scan for recoverable photos.
On Android, try an app like DiskDigger Photo Recovery to rescue deleted images from the phone’s memory. First, don’t take any new photos or install apps, as this could overwrite the deleted data. Install DiskDigger and grant it root access if prompted. Select where you want to search for photos and start the scan. Preview and recover any deleted photos found.
You can also recover deleted photos from a computer by using data recovery software designed for the specific operating system (like EaseUS Data Recovery Wizard). Connect the device and scan it for recoverable photo files. This method can help retrieve photos long after they were deleted.
Alternative cloud services
In addition to iCloud and Google Photos, there are other popular cloud storage services for photos such as Amazon Photos, Dropbox, and Microsoft OneDrive. Each service has its own pros and cons to consider when deciding where to store your photos.
Amazon Photos offers unlimited full-resolution photo storage like Google Photos if you have an Amazon Prime membership. It also provides facial recognition and automatic backups. However, the mobile app and editing features are not as robust as Google Photos or iCloud. Amazon Photos may be a good option for Prime members who want unlimited storage.
Dropbox provides 2GB of free storage and paid plans for more storage. It allows easy sharing and syncing across devices. However, there is no free unlimited storage option. Dropbox may appeal to those who want an easy to use file syncing service.
Microsoft OneDrive provides 5GB of free storage for photos and integrates with Windows PCs. The photo editing and searching capabilities are basic compared to other services though. OneDrive is best suited for Windows/Microsoft ecosystem users.
When deciding between cloud photo services, consider how much storage you need, what devices you use, whether you want basic syncing or more advanced features like facial recognition, and your budget. Evaluate each service’s strengths and limitations in relation to your specific needs and preferences.
[See article here for a comparison of cloud photo storage options](https://www.pinterest.com/pin/youtube–287526757450587529/)
Conclusion
In summary, the key steps to delete photos from the cloud while keeping local copies on your device are:
- Go into your cloud account settings and disable automatic uploads.
- Open the cloud service’s app or website and browse to the photos you want to delete.
- Select the photos, then delete them from the cloud service.
- Double check that the photos no longer appear in your cloud account.
- Open your device’s photo gallery app to verify the photos still exist locally.
- Consider backing up your local photos to another location like an external hard drive.
Following these steps allows you to free up cloud storage space while retaining your photos safely on your device. Just be mindful that the photos will no longer have offsite cloud backups. Manage your camera roll regularly and maintain your own backups to avoid losing any cherished photos.