Doing a system restore on a Dell computer can help recover your PC and reset it back to a previous working state if you’ve recently had issues like system crashes, error messages, or problems after installing software updates. A system restore essentially rewinds your PC back in time to when it was working properly. Here’s a step-by-step guide on how to do a system restore on a Dell computer.
When should you do a system restore?
A system restore is useful if your Dell computer starts having issues or becomes unstable after you’ve installed new software, drivers, Windows updates, or made system changes. Some common signs your PC may need a system restore include:
- Frequent crashes or blue screen errors
- Getting repeated error messages
- Programs freezing or responding slowly
- Failing to boot properly into Windows
- General system instability or sluggish performance
Reverting back to an earlier restore point can help resolve these kinds of issues by undoing recent system changes that may be causing problems. System restore does not affect your personal files, documents, photos, music, or emails.
Check if system restore is enabled
Before using system restore, check that it’s enabled on your Dell PC. System restore is normally turned on by default in Windows, but you may have disabled it.
To verify system restore is turned on:
- Open the Start menu and search for “Create a restore point” and select it
- In the System Protection window, ensure “Turn on system protection” is ticked for your C drive
- If it’s not enabled, tick the box and press Apply
This will switch on creating restore points on your main system drive. Having system restore enabled regularly creates restore points whenever you install software or drivers, allowing you to revert back to those points if problems develop.
Create a system restore point manually
Before doing a system restore, it’s also a good idea to manually create a new restore point as a precaution in case you want to undo the restore process. Here’s how to manually make a restore point:
- Open the Start menu and search for “Create a restore point” and select it
- In the System Protection window, press Create
- Give your restore point a name, like “Before System Restore”
- Press Create and a new restore point will be made
Now if you run into issues after the restore, you can revert back to this newly created point.
Identify a recent restore point to use
Next, determine when your system last worked properly without issues. You’ll want to restore back to a point after that time. You can view your available restore points by:
- Open the Start menu and search for “Create a restore point” and select it
- In the System Protection window, select System Restore
- On the next screen, you’ll see a list of your recent restore points
Browse through and identify a suitable restore point to use based on the date. If you’re unsure, revert back to a point 3-5 days ago just to be safe.
Run system restore via Safe Mode
It’s recommended to run a system restore from Windows Safe Mode, which loads a minimal version of Windows without any third-party startup programs or drivers. This helps avoid any potential conflicts:
- Restart your Dell PC and press the F8 key as it boots to access the Advanced Boot Options menu
- Select Safe Mode and press Enter
- Log into your PC in Safe Mode using your account password
You should now be at the Windows desktop but running in limited Safe Mode.
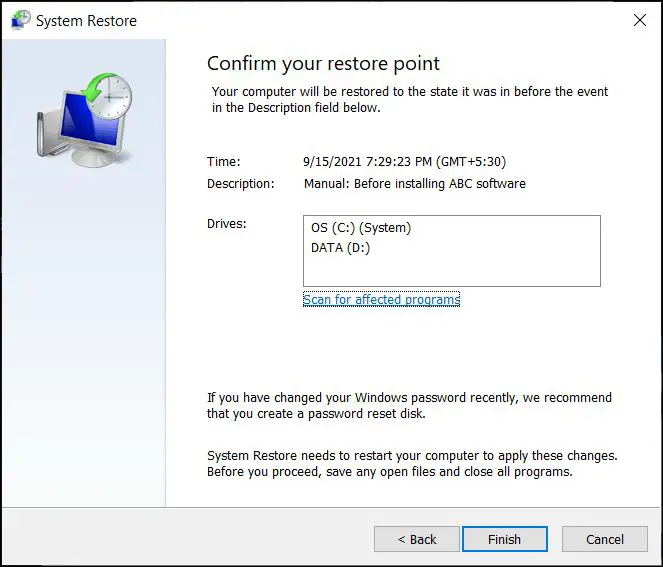
Run the system restore process
While in Safe Mode, run the system restore process:
- Open the Start menu and search for “Create a restore point” and select it
- In the System Protection window, click System Restore
- On the next screen, select the restore point you identified earlier
- Press Scan for affected programs to see what programs and drivers will be reverted
- Press Close and then press Next to start the actual system restore
The system restore will now run. Your PC will restart a few times during the process. The entire restore operation may take 10-20 minutes to complete depending on your system. Be patient and let it finish.
Check if issues are resolved
Once done, your Dell computer should boot back up normally but now in the restored state from the earlier point you selected. Hopefully your problems have been resolved!
Run some checks like:
- Open programs that were having issues before
- Visit system areas that were giving errors
- Check overall system stability and performance
If everything now seems fine again, the system restore resolved your issues. You can now try reinstalling any updates or new software that may have originally caused the problems now that your PC is stable again.
Troubleshooting tips
If your computer still has issues after the system restore, here are some troubleshooting tips:
- Try running the system restore again and select a different, earlier restore point
- Boot into Safe Mode normally and run the system restore from there
- Create a new restore point in Safe Mode before doing the restore
- Check that system restore is enabled on your C drive
- Remove any newly installed hardware or devices
- Do a startup repair or SFC scan
- Refresh or reset your PC as a last resort
Running system restore 2-3 times can help resolve more stubborn issues caused by multiple faulty drivers or system changes.
Conclusion
Following this process should help you successfully complete a system restore on your Dell PC. System restore is a useful recovery tool to quickly rollback your computer to a previous good state when experiencing stability issues or problems after changes. Just be sure system protection is enabled, identify a valid restore point, run the restore in Safe Mode, and check that your issues are resolved.
Doing routine system restores periodically or before major system changes can help prevent future problems and keep your Dell computer running smoothly.
