Partitioning your Mac’s hard drive allows you to divide the available storage space into separate volumes that function independently. This can be useful for a variety of reasons, like keeping your data separate or installing multiple operating systems. Enabling partitioning on a Mac is not too difficult, but does require erasing the existing drive, so make sure to back up your data first.
Why Would I Want to Partition My Mac’s Hard Drive?
There are several reasons you may want to partition your Mac’s hard drive:
- Install multiple operating systems – Partitioning lets you install different OS versions on separate volumes, like macOS, Windows, and Linux.
- Separate data – Create dedicated volumes for work, personal, or time machine backups to keep things organized.
- Test new software – Test beta software on a separate volume without risking your main OS installation.
- Increase security – If one volume gets corrupted, the others should still work.
- Format flexibility – Format separate volumes with different file systems based on needs.
How Partitioning Works
Partitioning divides the hard drive into chunks called volumes. Each volume gets formatted with a file system and assigned a drive name. Volumes function separately, with their own files and operating systems if desired. The volumes appear as individual drives when viewing disk utility and finder.
Partitioning reformats the entire drive, so all existing data is erased. Make sure to back up your data before partitioning. The number and size of volumes is customizable when initial partitioning is set up.
Requirements for Partitioning a Mac
Here are the requirements for partitioning a Mac:
- Backup data – Partitioning erases the entire drive, so backup all important files first.
- Intel-based Mac – Only Intel models can run Windows via Boot Camp. M1 Macs don’t support Boot Camp.
- Unpartitioned drive – Can’t repartition without erasing. External drives can be partitioned.
- macOS installer – The macOS installer is required to reinstall macOS after partitioning.
- Free space – Partitioning requires free space on the drive to divide into volumes.
Preparing to Partition a Mac
Follow these steps before partitioning:
- Backup data – Use Time Machine or clone drive. Backups critical in case anything goes wrong.
- Check drive health – Use Disk Utility First Aid to check drive for errors.
- Download macOS – Get the macOS installer from App Store for reinstall after partitioning.
- Plan partitions – Decide how many partitions and their sizes based on needs.
How to Partition a Mac in Disk Utility
The easiest way to partition a Mac is using Disk Utility. Follow these steps:
- Open Disk Utility – Find in Applications > Utilities
- Select internal drive – Choose the drive you want to partition
- Click Erase – Erases all data on drive
- Choose APFS format
- Set partition scheme – Select GUI, APFS, or Map for different partitioning options
- Add partitions – Set name, format, and size for each partition
- Click Apply – Applies the partitioning scheme
That’s the basic process for partitioning with Disk Utility. Now the original drive will be divided into the specified volumes.
Selecting a Partition Scheme
There are a few partition scheme options when erasing the drive in Disk Utility:
- GUID Partition Map – Standard partitioning scheme for Intel Macs. Offers the most flexibility for partitions.
- Apple Partition Map – Legacy partition style for PowerPC Macs. Only supports 8 partitions.
- Master Boot Record – Standard BIOS partitioning. Typically used for Windows dual boot.
For most Mac users, GUID Partition Map is the best option as it supports unlimited partitions and works with all recent macOS versions.
Choosing Partition Size
The optimal size for each partition depends on the intended use case:
- OS volumes – Minimum of 25-40GB for macOS. More for additional OS installs.
- Data volumes – Size based on your data storage needs.
- Boot Camp – Minimum of 55GB for Windows via Boot Camp.
Allocate enough space for each OS and files. The remaining free space can be left as its own partition.
Formatting Partition Volumes
Each partition volume must be formatted with a file system. The options in Disk Utility are:
- APFS – Modern file system for macOS. Choose for most partitions.
- Mac OS Extended (Journaled) – Legacy HFS+ format. Still works but outdated.
- MS-DOS (FAT) – Compatible with Windows and Boot Camp.
- ExFAT – Cross-platform file system. Works on both Mac and Windows.
For macOS volumes, use APFS format. For Windows via Boot Camp, format as MS-DOS (FAT). ExFAT can share files between macOS and Windows on the same drive.
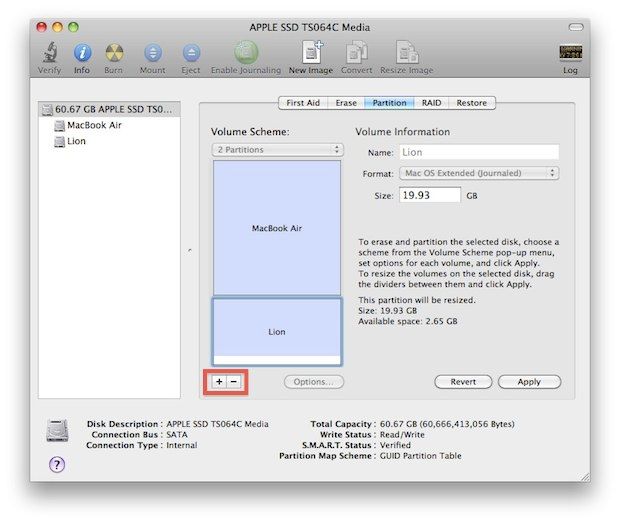
Adding Partitions
To add partitions on an already partitioned drive:
- Open Disk Utility and select the partitioned drive
- Click the Partition tab
- Click + button to add a new partition volume
- Adjust size of other volumes if needed
- Name and format the new volume
- Click Apply to add the partition
This will add a new partition volume to the existing scheme without erasing data on other volumes.
Reinstalling macOS After Partitioning
Once the drive is partitioned, macOS will need to be reinstalled on one of the volumes:
- Boot to macOS Recovery – Hold Command + R at startup
- Open Disk Utility – Erase & format chosen partition
- Click Done to close Disk Utility
- Choose Reinstall macOS from Recovery menu
- Follow prompts to install macOS on partition
- Set partition as startup disk once install complete
With macOS installed on a partition volume, the Mac can boot again. Any other partitions can then be used as data volumes or for additional OS installs.
Dual Booting macOS and Windows
One common reason to partition a Mac is to dual boot macOS and Windows. This can be done via Boot Camp:
- Create a Windows partition – At least 55GB, MS-DOS format
- Install Windows – Use Boot Camp Assistant to install Windows version
- Hold Option at startup – Choose macOS or Windows partition to boot to
The Boot Camp Assistant handles most of the process automatically, allowing seamless dual booting.
Tips for Partitioning
Here are some useful tips for partitioning your Mac:
- Leave free space partition – Having an unused partition allows resizing others later.
- Don’t over allocate space – Start smaller, you can always make partitions bigger if needed.
- Separate data and OS – Store data on a separate non-OS partition for flexibility.
- Use multiple backup destinations – Partitioning allows separating Time Machine and clone backups.
- Test extensively before deleting – Verify partitions work before removing old ones.
Potential Issues When Partitioning
While partitioning is generally safe when done properly, there are some potential issues to be aware of:
- Data loss – Partitioning erases all data so backups are critical.
- Failed drive – Don’t partition a drive that is corrupt or failing.
- Stuck in Recovery – If macOS won’t install on the partition, you may need to repartition from Recovery.
- Incompatible formats – Volumes may not mount correctly if format incompatible with OS.
- Boot issues – OS may fail to boot from new partition without modifying startup disk.
Take precautions and have backups to avoid data loss. Seek professional help if you encounter any issues during or after partitioning.
Conclusion
Partitioning allows flexible storage configuration and separation of operating systems and data on a Mac. The process involves erasing the existing drive and reinstalling macOS onto a partition volume. Careful planning is required for partition sizes and formats. Dual booting Windows through Boot Camp is a common use case for partitioning.
When done properly, partitioning can be a useful way to organize your Mac’s storage based on specific needs. Just be sure to backup all data beforehand and research the process fully to avoid potential issues.