There are a few main reasons why you may want to erase your Intel-based Mac and reformat the drive. The most common reasons are if you are planning to sell or give away your Mac, if you are trying to fix software issues or problems by completely resetting the device, or if you want to securely wipe your data before disposing of the device.
Erasing and reformatting a Mac completely wipes the hard drive by overwriting all of the existing data. This restores the Mac to its original factory settings, as if it was brand new out of the box. The process completely erases all of your files, applications, accounts, settings and other data from the hard drive. This ensures no personal data or software remnants are left behind if you sell or dispose of the device.
Reformatting the drive also helps fix many software issues, as it provides a clean slate if you were experiencing crashes, slowdowns, or other problems with an existing macOS installation. Overall, wiping and reformatting the Mac is a simple process using the Disk Utility application, and gives you a fresh start if you plan to pass on or troubleshoot your Intel-based Mac.
Back Up Your Data
Before erasing your Mac’s drive, it is crucially important to back up your files, photos, music, documents and other data. This ensures you have a copy of your important information in case anything goes wrong during the erase process.
The easiest way to back up a Mac is by using Time Machine. Time Machine is Apple’s built-in backup software that automatically saves copies of your files onto an external hard drive or network storage location. To back up immediately with Time Machine, choose “Back Up Now” from the Time Machine menu in the menu bar 1. Time Machine will create hourly backups for 24 hours, daily backups for the past month, and weekly backups for everything older than a month.
If you don’t want to use Time Machine, you can manually copy important files to an external hard drive or cloud storage. Be sure to backup your photos, music, documents, desktop, downloads folder, and any other important data. Double check that your files copied over properly before erasing your Mac.
No matter which backup method you choose, it is essential to have a complete backup before erasing. This will allow you to recover your files and settings should anything unexpected occur.
Start Up in Recovery Mode
To erase your Intel-based Mac, you first need to start it up in Recovery Mode. Recovery Mode is a special mode that allows you to access certain tools before macOS starts up, such as Disk Utility which we’ll use to erase the drive.
To enter Recovery Mode, restart your Mac and immediately hold down the Command (⌘) + R keys. Keep holding the keys until you see the Apple logo or a spinning globe appear on screen. This indicates your Mac has successfully booted into Recovery Mode.
Recovery Mode provides access to several useful utilities, including restoring from a Time Machine backup, reinstalling macOS, running diagnostics, and accessing Disk Utility to manage your drives. For our purposes, we just need Disk Utility to erase the drive. 1
Launch Disk Utility
Disk Utility is an application included with macOS that allows you to manage internal and external disks and storage devices. It can be used to format, partition, repair, and erase drives.
To launch Disk Utility when erasing your Mac, you will need to start up in macOS Recovery mode. To do this, turn on your Mac and immediately press and hold Command + R. Keep holding until you see the macOS Utilities window. You can also press and hold Option + Command + R to start up from macOS Recovery over the internet.
In the macOS Utilities window, select “Disk Utility” and click “Continue”. This will open the Disk Utility app, where you can view all available storage devices and volumes. Disk Utility should automatically select your startup drive, which is the one you will want to erase.
For more details, see Apple’s guide on how to start up in macOS Recovery and how to open Disk Utility from there.
Select Your Drive
It is crucial to identify the correct internal drive to erase. Disk Utility will display all connected drives, including any external drives. Be very careful not to accidentally select an external drive for erasing.
To identify the internal drive, click on the internal drive item in the left sidebar of Disk Utility. The internal drive name generally includes the name of the Mac model, such as “Macintosh HD” or “MacBook Pro SSD.” You can also identify the internal drive by its size, which should match the factory storage capacity of your Mac.
As an additional precaution, physically disconnect any external drives before erasing. This will prevent any chance of selecting the wrong drive.
Once you have carefully identified the internal drive, click on its name in the sidebar to select it for erasing in the next step.
Erase the Drive
In Disk Utility, select the drive that you want to erase from the list on the left. This will be your Mac’s main internal drive that contains the operating system and your data. Click the “Erase” button at the top of the Disk Utility window.
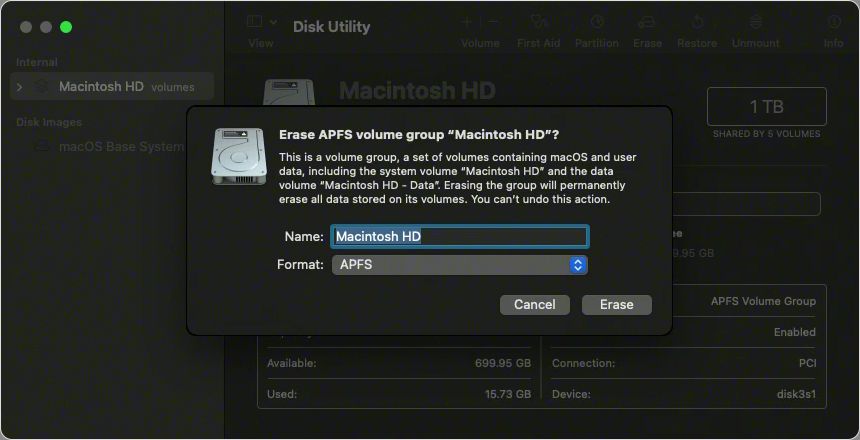
You will be presented with some options for erasing the drive. Give the drive a name if you want, like “Macintosh HD.” For the format, it’s best to choose “APFS” for modern Intel-based Macs running macOS 10.13 or later. For scheme, choose “GUID Partition Map” for Intel Macs.
Once you have set the name, format, and scheme, click the “Erase” button at the bottom-right. This will start the process of erasing your drive. An alert dialog will appear to confirm the erase – click “Erase” again in this dialog box. The erase process may take several minutes depending on your drive size.
Do not stop the erase process once it begins. Let it fully complete. When finished, the drive will be formatted and empty, ready for you to reinstall macOS or restore your data.
Reinstall macOS
After erasing your Mac’s drive, you’ll need to reinstall the macOS operating system. There are a few options for doing this:
One option is to use Internet Recovery. When you boot into Recovery Mode, your Mac will automatically connect to Apple’s servers and download the latest compatible version of the macOS that originally came with your Mac (Erase and reinstall macOS – Apple Support). This allows you to reinstall the OS without needing a local copy.
Alternatively, you can reinstall macOS from a Time Machine backup. Boot into Recovery Mode and select “Restore From Time Machine Backup” to retrieve the operating system files from your backup (How to reinstall macOS – Apple Support). This will restore your Mac to the state it was in when you made the backup.
Finally, you can reinstall from a bootable installer drive. This requires downloading the macOS installer from the App Store and creating a bootable USB or external drive. Then boot from that drive to begin the installation process. This option gives you more control over which version of macOS you want to install.
Follow the onscreen instructions to complete the reinstallation. Be sure to customize settings for your specific needs. Once finished, you’ll have a fresh macOS environment.
Restore Your Data
After erasing your Mac and reinstalling macOS, you’ll want to restore your personal data and files. The easiest way is to restore from a backup.
If you backed up your Mac to iCloud or Time Machine before erasing, you can restore your files by signing in to iCloud after reinstalling macOS. Your apps, settings, photos, documents and more will download automatically. See Apple’s guide on restoring your Mac from an iCloud backup.
For a Time Machine backup stored locally or on an external drive, launch Time Machine after reinstalling macOS to enter restore mode. Navigate the timeline to find previous backups of your files. Select the files/folders you want to restore and click the Restore button. Time Machine will copy them back to your Mac.
When deciding what data to restore, prioritize your user-generated files – documents, photos, music, downloads, etc. You may not need to restore certain applications if you plan to redownload them from the App Store later. Focus on restoring your personal data first.
If you did not have a full backup before erasing, you can attempt to recover deleted files using data recovery software. But without a backup, any files not recovered will be lost.
Troubleshooting
Erasing and reinstalling macOS can sometimes run into issues. Here are some common problems and potential fixes:
Disk Utility Won’t Erase the Disk
If Disk Utility shows the erase button is grayed out or won’t let you select your main drive to erase, this typically means the disk is mounted and in use by the system. To fix this, restart into Recovery Mode which will unmount the drive and allow Disk Utility to erase it. You can also try forcing an unmount from Terminal using the “diskutil unmount” command [1].
Erase Process Fails
An erase failure usually indicates either a damaged drive or corrupted file system. First try rerunning First Aid from Disk Utility, then attempt the erase again. If it continues to fail, you may need to erase the disk using Terminal with the “diskutil eraseDisk” command [2]. This will force a low-level erase.
Can’t Reinstall macOS
If the macOS installer encounters issues or doesn’t see the erased disk, try restarting back to Recovery Mode and running First Aid again. Also ensure internet recovery mode is being used to reinstall the version of macOS that originally came with your Mac. If problems persist, it may indicate drive hardware failure.
For advanced troubleshooting, Apple provides detailed guides on erasing and reinstalling macOS using Recovery Mode and Disk Utility.
Summary
In summary, erasing and reinstalling macOS using Disk Utility and Recovery Mode can provide several benefits. The process involves backing up your data, booting to Recovery Mode, launching Disk Utility, selecting your drive, erasing it, reinstalling macOS, and finally restoring your data.
Doing a clean install like this helps remove any clutter, unnecessary files, or corrupted software on your system. It resets everything to a fresh, clean state which can resolve performance issues, crashes, or other problems caused by a bloated system.
After the reinstall, your Mac will run faster and smoother, almost like new again. Apps and features will work more reliably. You’ll also start fresh without any legacy junk built up over months or years of use.
With your freshly erased and reinstalled system, you can start using your Mac productively again. Reinstall any applications you need and restore your files from your backup. Your Mac is now optimized and ready to reliably serve your needs.