Resetting your Mac to factory settings, also known as erasing your Mac, can be useful for a few different reasons. It helps wipe your Mac clean and start fresh if you’re selling or giving away your computer. It can also help improve performance if your Mac is running slowly. And if you can’t remember your account password, a factory reset allows you to bypass it and set up a new account.
The process involves erasing your Mac’s hard drive and reinstalling the macOS operating system. This guide will walk through all the necessary steps to completely erase your Mac and reset it to its original factory settings. We’ll cover backing up your data, signing out of your Apple ID, erasing the hard drive, reinstalling macOS, setting up a new account, restoring your files, and redownloading apps. By the end, your Mac will be like new again.
Back Up Your Data
Before erasing your Mac, it is crucial to back up your data first. This ensures you have a copy of all your files, settings, and configurations that can be restored after erasing the Mac. The built-in Time Machine feature in macOS provides an easy way to regularly back up everything on your Mac.
Time Machine makes hourly backups of files that have changed in the past 24 hours. It also makes daily backups for the past month and weekly backups for older files. By default, Time Machine backs up to an external drive connected to your Mac, but it can also back up wirelessly to supported network storage devices (Apple Support).
When setting up Time Machine, make sure you have an external drive with enough storage capacity to hold all the backups. The initial full backup may take hours depending on your Mac’s storage size. After the initial backup, incremental hourly and daily backups will be much faster.
With regular Time Machine backups, you’ll have peace of mind knowing your important files, documents, photos, and other data are continuously saved in case anything happens to your Mac. This makes it much safer to erase your Mac and reinstall macOS.
Sign Out of Your Apple ID
Before erasing your Mac, it is crucial to sign out of your Apple ID. This prevents your device from becoming activation locked after the reset. An activation lock happens when the Mac is still signed into an Apple ID after being erased. This prevents someone else from accessing and using the device without your Apple ID credentials.
To sign out of your Apple ID on your Mac, go to System Preferences > Apple ID > Overview and click the “Sign Out” button. You’ll need to confirm by clicking “Sign Out” again. This completely removes your Apple ID from the device [1].
You’ll also want to make sure Find My Mac is turned off before erasing. You can toggle this off in System Preferences > Apple ID > Find My. With Find My still on, your erased Mac could still become activation locked [2].
Signing out this way prevents any accidental lock out from happening during the erase process. It ensures you’ll be able to freshly setup the Mac after resetting [3].
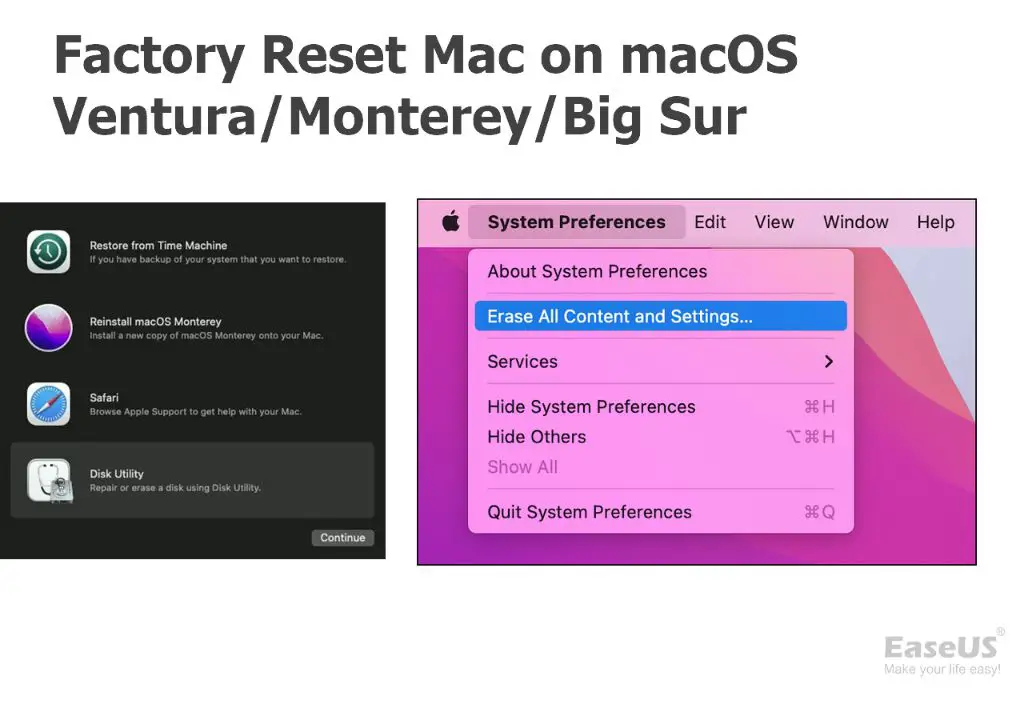
Erase Your Mac
The next step is to erase your Mac’s hard drive using Disk Utility. Disk Utility allows you to erase and reformat the drive, removing all data and restoring it to a clean state. This is an important step before reinstalling macOS.
To erase the drive, restart your Mac and hold down the Command and R keys to boot into Recovery Mode. Then select Disk Utility from the macOS Utilities window. In Disk Utility, select your Mac’s main internal drive from the sidebar. It is often called “Macintosh HD.” Click the “Erase” button at the top of the Disk Utility window.
You’ll be asked to confirm erasing the drive. Select a format like “APFS” and scheme “GUID Partition Map.” You can also name the erased volume if desired. Then click “Erase” to permanently delete all data on the drive (Source: https://support.apple.com/en-us/HT208496). The erase process may take a while depending on your drive size.
Once completed, the Mac’s drive will be empty and prepared for the next step of reinstalling macOS. This erase step is crucial to ensure you have a clean slate before reinstalling the operating system.
Reinstall macOS
The next step is to reinstall a fresh copy of the macOS Big Sur operating system. To do this, you will need to download the Big Sur installer and create a bootable USB installer drive.
Go to the Mac App Store and search for “macOS Big Sur” to download the latest installer app. Be sure to download the version compatible with your Mac’s chipset – either Intel or Apple silicon.
Once the Big Sur installer is downloaded, you will need to create a bootable USB drive. The easiest way is to use the createinstallmedia command in Terminal. Connect an empty USB drive with at least 12GB of available storage. Then launch Terminal and enter:
sudo /Applications/Install\ macOS\ Big\ Sur.app/Contents/Resources/createinstallmedia --volume /Volumes/MyVolume
Replace “MyVolume” with the name of your USB drive. This will erase the drive and install the bootable Big Sur installer.
With the bootable USB drive ready, restart your Mac and hold the Option key during boot to select the drive. This will launch the macOS installer. Follow the onscreen prompts to install a fresh copy of Big Sur and overwrite your previous system.
Set Up Your Mac
After you reinstall macOS and your Mac restarts, you’ll be greeted by the Setup Assistant. The Setup Assistant walks you through the initial settings to start using your newly erased Mac.
First, you’ll be prompted to select your country or region. This sets the language and formatting preferences for your Mac. Next, you’ll need to connect to a wireless network so your Mac can activate and complete the setup process.
One of the most important steps is signing in with your Apple ID. Your Apple ID is the account you use for Apple services like the App Store, iCloud, FaceTime, and more. Signing in with your Apple ID restores settings like your contacts, calendars, and synced documents. It also reinstalls any apps you previously downloaded from the App Store.
According to Apple Support, “Setup Assistant walks you through the settings needed to start using your Mac” (https://support.apple.com/guide/macbook-air/set-up-your-mac-apd831707cb3/mac). Completing all the steps in Setup Assistant ensures your erased Mac is ready to use with your data and settings.
Restore Your Data
After reinstalling macOS and setting up your Mac, you’ll want to restore your personal data from a backup. The easiest way is to restore from a Time Machine backup if you have one.
To restore from Time Machine:
- Connect the external hard drive you used for Time Machine backups.
- Open Migration Assistant from your Applications folder or from the Utilities folder within the Applications folder.
- Follow the onscreen steps to transfer data from your Time Machine backup to your Mac.
Migration Assistant will restore your user accounts, network settings, files, and applications. If you don’t have a Time Machine backup, you can restore files manually from another backup external drive.
Reinstall Apps
After erasing your Mac and reinstalling macOS, you’ll need to redownload your apps. The easiest way is to reinstall apps you previously purchased from the App Store. To do this:
Open the App Store on your Mac and click on your name in the bottom left corner. This will show you a list of all the apps you’ve previously downloaded. Find the app you want to reinstall and click the cloud download icon next to it [1]. The app will begin downloading again.
For apps you originally installed outside of the App Store, you’ll need to redownload them from the developer’s website. Common apps like Google Chrome, Visual Studio Code, Slack, and Microsoft 365 can all be downloaded again for free [2].
Once your downloads are complete, you can customize your settings and preferences for each app.
Customize Settings
After reinstalling macOS and restoring your data, you’ll want to customize your settings and preferences. The System Preferences app allows you to modify various settings to personalize your Mac.
Some preferences you may want to adjust include:
– Appearance: Change the look of menus, windows, and buttons.
– Desktop & Screen Saver: Customize your desktop background image and screen saver.
– Dock: Adjust the size, location, and behavior of your Dock.
– Mission Control: Set how Mission Control displays open windows.
– Security & Privacy: Manage settings for FileVault, Firewall, privacy, and more.
To restore your System Preferences to their defaults, you can delete the relevant .plist files located in ~/Library/Preferences/ (citing: https://discussions.apple.com/thread/2619229). Then restart your Mac for the changes to take effect.
Take time to explore each System Preferences pane and customize your Mac to suit your needs and preferences. This will help make your Mac feel like your own again after erasing it.
Conclusion
Resetting your Mac to factory settings can be a straightforward process if you follow the right steps. The key things to remember are to back up your data, erase your Mac entirely, reinstall macOS, and then restore your files and settings. Taking the time to erase and reset your Mac can help improve performance, eliminate problematic files or settings, and give you a fresh start.
Some additional tips when resetting your Mac:
– Make sure you have backups of any important documents, photos, or other files you want to keep. The erase process will delete everything.
– If you use an Apple ID, sign out before erasing to avoid any activation lock issues.
– After reinstalling macOS, update to the latest version of macOS and apps to maximize compatibility.
– Personalize your reset Mac by reconfiguring settings, wallpapers, and other preferences to your liking.
Resetting a Mac takes time but can breathe new life into your computer. With the right precautions, you can erase your Mac smoothly and start fresh.