What is Device Manager?
Device Manager is a utility in Windows that provides users with a centralized interface to view and manage all the hardware devices installed on their computer. It allows you to view device properties, update drivers, enable/disable devices, and troubleshoot hardware problems from one location.
According to Wikipedia, “Device Manager is a component of the Microsoft Windows operating system. It allows users to view and control the hardware attached to the computer.” [1] Essentially, it acts as a hub to monitor and configure hardware like sound cards, graphics cards, keyboards, hard drives, etc.
Some key capabilities offered by Device Manager include:
- View all installed hardware devices
- Check status of devices (working properly or not)
- Update device drivers
- Enable/disable devices
- Uninstall devices
- Scan for hardware changes
Overall, Device Manager aims to provide a centralized tool to manage all hardware components in a Windows system. It is useful for troubleshooting issues, modifying device settings, updating drivers and more.
Why Find the SSD in Device Manager?
There are several important reasons why you may want to locate your SSD in Device Manager:
To update the drivers – Having the latest SSD drivers can resolve performance issues, fix bugs, and improve compatibility. Device Manager allows you to quickly identify the SSD and update its drivers.
To troubleshoot problems – If your SSD is having issues like crashes or slow speeds, Device Manager can help you diagnose the problem. You can check for error codes, ensure the SSD is being detected properly, etc.
To view drive details – Device Manager provides key info about your SSD like the make/model, interface type, driver version, and more. This can be useful for confirming specs or compatibility.
To change settings – You may want to alter SSD settings like enable/disable write caching or change the drive letter. Device Manager gives you access to those options.
To uninstall the SSD – If needed, you can use Device Manager to uninstall an SSD before removing it from your system.
Overall, Device Manager is the go-to place for managing drives like SSDs in Windows. Finding the SSD there allows you to optimize, configure, troubleshoot, and control the device.
Open Device Manager
To open Device Manager in Windows 10, there are a few methods you can use:
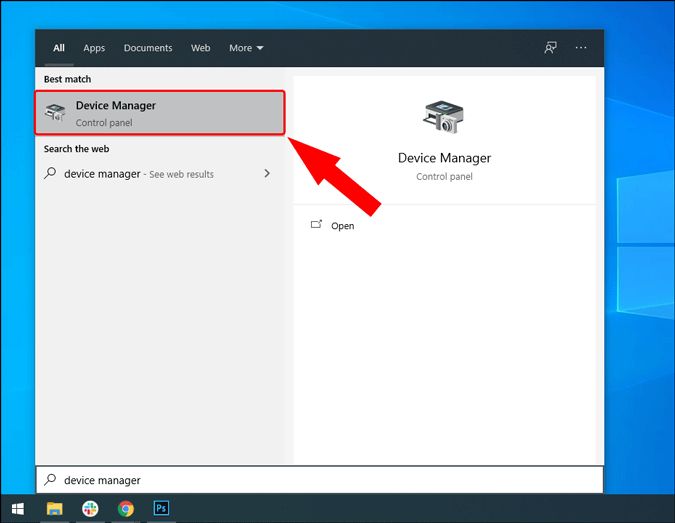
1. Type “device manager” into the Windows search bar and select “Device Manager” from the results.
2. Right click the Start button and select “Device Manager” from the context menu.
3. Press Windows Key + X to open the Power User menu and select “Device Manager.”
4. Open the Control Panel, select “Hardware and Sound”, then click “Device Manager” under Devices and Printers.
5. Open the Run dialog by pressing Windows Key + R, type “devmgmt.msc” and hit Enter.
For Windows 8/8.1, swipe from the right edge of the screen to open the Charms bar. Select “Search” and type “Device Manager.”
On Windows 7, click Start, right-click Computer and choose Manage. In the Computer Management window select Device Manager in the left pane.
These steps will open the Device Manager utility on Windows 10, 8, and 7 so you can view all installed hardware devices and their properties (Source: Open Device Manager – Microsoft Support).
Locate the Disk Drives Category
The first step in finding your SSD in Device Manager is to open the Disk Drives category. Here’s how:
- Open Device Manager by right-clicking the Start button and selecting “Device Manager”. You can also search for it.
- In Device Manager, scroll down and expand the category labeled “Disk drives” by clicking the arrow icon next to it.
- This will display all the disk drives connected to your system, including internal and external hard drives and SSDs.
The Disk Drives category lists all storage drives detected by Windows. This is where your SSD will be located once you identify it.
For more details, see this Super User post on finding disk drives in Device Manager: https://superuser.com/questions/139130/where-to-find-cd-dvd-driver-inside-device-manager
Identify the SSD
Once in the Disk Drives category, look for disk drives labeled as “Disk Drive” along with a model number and storage capacity. The SSD will likely have a model name from a common SSD manufacturer like Samsung, Intel, Crucial, etc.
There are a few ways to differentiate the SSD from a traditional hard disk drive (HDD):
- The SSD will have a much lower storage capacity, often 256GB – 1TB for consumer SSDs. HDDs typically have higher capacities of 1TB or more.
- The SSD model name will include “SSD” or “Solid State Drive”, while HDDs will not.
- SSDs will have faster transfer rates and speeds listed in the properties.
- If you open the SSD properties, you may see details like “NVMe” or “PCI Express” which indicate a high-performance SSD.
Double checking these details will help positively identify which disk drive is the SSD. The SSD is often, but not always, listed first under the Disk Drives category.
Update SSD Drivers
It’s important to keep your SSD drivers up-to-date to ensure optimal performance and reliability. Here are the steps to update SSD drivers in Windows:
- Open Device Manager by right-clicking the Start menu and selecting Device Manager.
- Expand the Disk drives section.
- Right-click on the SSD device and select Update driver.
- Windows will automatically search for updated driver software. Choose Search automatically for updated driver software.
- If an updated driver is available, Windows will install it. Restart your computer to complete the installation if prompted.
- You can also visit the SSD manufacturer’s website and download the latest driver manually. Make sure to choose the correct driver for your specific SSD model.
- Unzip the downloaded driver file and follow the instructions to update the driver in Device Manager.
Updating to the latest SSD drivers can resolve performance issues, add new features, and improve compatibility. It’s recommended to periodically check for driver updates through Device Manager or your SSD manufacturer’s website.
Troubleshoot SSD Issues
Device Manager can be a useful tool for fixing common SSD problems. Here are some tips for troubleshooting SSD issues using Device Manager:
If your SSD is not detected or showing up at all in Windows, first open Device Manager and expand the Disk drives category. If you see your SSD listed with a yellow exclamation point or warning sign, this typically indicates a driver issue.
To fix this, right-click on the SSD and select Update driver software. This will search for and install the latest driver for your SSD which should resolve detection issues. You can also try uninstalling the SSD completely in Device Manager, rebooting your PC, and letting Windows reinstall the SSD driver automatically upon restart.
If your SSD is detected in Device Manager but is not accessible or showing its full storage capacity, the drive may need to be initialized. In the Disk Management utility, locate the SSD, right-click on it, and choose Initialize Disk. This will allow Windows to access the full capacity of a new SSD.
Slow SSD performance can also indicate a driver problem. Updating to the latest SSD driver using Device Manager is recommended. You can also try changing the SATA mode in BIOS from AHCI to IDE or vice versa as an additional troubleshooting step for SSD speed issues.
Device Manager allows updating, uninstalling, and reinstalling SSD drivers which are useful steps for resolving multiple common SSD problems. Along with Disk Management, it provides necessary tools within Windows itself for SSD troubleshooting.
Change Settings
There are a few settings you may want to adjust for your SSD in Device Manager to optimize performance and configure power management.
To change settings for your SSD in Device Manager on Windows 11:
- Open Device Manager and locate your SSD under Disk Drives as covered above.
- Right-click on the SSD and select Properties.
- Go to the Policies tab. Here you can enable or disable the following settings:
- Turn off Windows write-cache buffer flushing on the device – Enabling this can improve SSD performance by reducing writes.
- Turn off power management for the device – This prevents the SSD from going into a low power state, keeping it ready for fastest access.
- Switch to the Power Management tab. Configure options like:
- Allow the computer to turn off this device to save power
- Allow this device to wake the computer
- Power saving settings when running on batteries
Adjusting these settings can optimize your SSD’s speed and responsiveness. However, the default settings are generally fine for most users and situations. Change advanced settings carefully if your needs demand it.
Some third-party SSD optimization tools also allow changing additional settings not available in Device Manager. Use these advanced tools with caution.
Uninstall the SSD
If you need to completely remove your SSD from your system, you can uninstall it in Device Manager using the following steps:
1. Open Device Manager (right-click the Start button and select Device Manager).
2. Expand the Disk drives section.
3. Right-click on the SSD you want to uninstall and select Uninstall device.
4. Check the box to delete the driver software for this device and then click Uninstall.
5. Restart your computer to complete the uninstall process. The SSD will no longer be recognized by Windows after restarting.
Uninstalling the SSD will remove it fully from Device Manager. If you want to use the SSD again later, you’ll need to reinstall it and update the drivers. Be cautious when uninstalling storage devices like an SSD as it could result in data loss if not done properly (Source).
FAQs
Here are some common questions and answers about finding and managing SSDs in Device Manager:
Why can’t I see my SSD in Device Manager?
If your SSD is not showing up in Device Manager, here are some things to try:
- Make sure the SSD is properly connected and powered on. Disconnect and reconnect the SATA/power cables.
- Try updating the SSD driver. In Device Manager, right-click the SSD, choose Update Driver, and search automatically for updated driver software.
- If the SSD is new, you may need to initialize it first before it will show up. Open Disk Management and initialize the disk.
- The SSD may not be compatible with your system. Check the SSD and motherboard documentation for compatibility.
If the SSD still does not appear, you may need to contact the manufacturer for further troubleshooting (Samsung SSD Troubleshooting FAQs).
How do I update the driver for my SSD?
To update the driver for your SSD in Device Manager:
- Open Device Manager.
- Expand the Disk drives category.
- Right click on the SSD device and select Update driver.
- Choose Search automatically for updated driver software.
- Restart your computer after the driver update completes.
Updating to the latest SSD driver from the manufacturer may resolve issues like the SSD not being detected. Check the manufacturer’s website for the latest available drivers.
Why does my SSD show up as an unknown device?
If your SSD is displaying as an unknown device in Device Manager, it typically means the driver is not properly installed. To resolve this:
- Right click the unknown device and select Properties.
- Go to the Details tab and look for the hardware IDs.
- Search online for the hardware ID to find the correct driver for your SSD.
- Download and install the driver from the SSD manufacturer’s website.
After installing the correct SSD driver, reboot your PC and check if the unknown device is now detected properly as your SSD.
