The “no bootable medium found” error in VirtualBox indicates that the virtual machine is unable to boot from a bootable disk or ISO image. This prevents the guest operating system from starting up and leaves the virtual machine stuck at the VirtualBox boot screen with the error message. Some common causes for this error include an invalid or corrupted ISO file, incorrect VM settings, damaged virtual disks, host boot issues, and hardware virtualization requirements not being met. This guide will provide an overview of the various factors that can lead to this problem along with troubleshooting steps to resolve it.
What Causes This Error
One of the most common causes of the “No bootable medium found” error in VirtualBox is a missing or corrupted bootable ISO/disc image. VirtualBox requires a bootable ISO, such as an operating system installation disc image, to start up the virtual machine. Without a working ISO, VirtualBox will be unable to find a bootable medium to start the VM.
This could happen for several reasons:
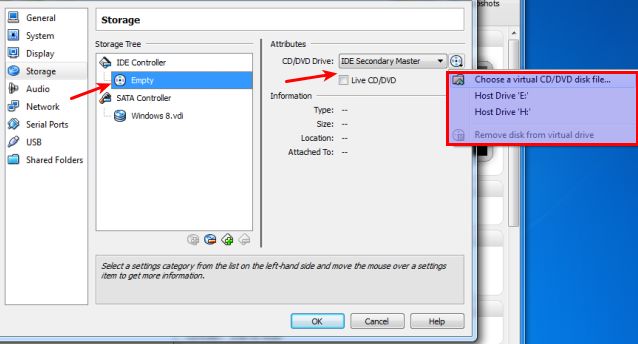
- You haven’t attached an ISO file to the virtual CD/DVD drive in the VM settings.
- The ISO file you attached is not bootable or is corrupted.
- The ISO file is not in the correct folder location.
- There is no hard drive attached to the VM.
To fix this, you’ll need to locate a valid, bootable ISO file for your operating system and correctly attach it to the VM. Make sure the ISO file is not corrupted by testing it on another system first if possible. After attaching the ISO, make sure the virtual CD/DVD drive is set as the first boot device in the VM settings.[1]
Check VirtualBox Settings
One common reason for the “no bootable medium found” error in VirtualBox is having the boot order configured incorrectly. VirtualBox allows you to set the boot order for your virtual machine to determine the sequence of bootable devices to check on startup.
To check and set the proper boot order in VirtualBox:
- Open VirtualBox and make sure the virtual machine is powered off.
- Right click on the virtual machine and select “Settings”.
- Go to the “System” tab and select the “Motherboard” section.
- Under “Boot Order”, make sure the hard drive and/or correct ISO is listed first. Floppy and optical drives should be lower in the boot order if enabled.
- Click “Ok” to save the settings.
Setting the boot order correctly in VirtualBox ensures that the virtual machine boots from the intended hard drive or ISO first instead of trying to boot from other unsupported devices. This can resolve the “no bootable medium found” error in many cases.
Recreate the Virtual Machine
Sometimes simply deleting the virtual machine and recreating it from scratch can resolve the “no bootable medium found” error in VirtualBox. When you recreate the VM, VirtualBox will build a new virtual hard drive and install a fresh copy of the guest OS. This can clear up any corruption issues with the existing VM configuration that may be preventing it from booting properly.
To recreate the virtual machine in VirtualBox, first open the VirtualBox Manager and locate the problematic VM. Right click on the VM name and select “Remove” to delete it. Then click “New” in the toolbar to launch the wizard for creating a new VM. Reconfigure the settings as needed, choosing the same OS and hardware specs. Lastly, install the operating system again by mounting the ISO or attaching the disk image.
After completing these steps to rebuild the VM, try starting it again. Often, recreating from scratch will resolve the “no bootable medium” error by resetting the virtual hard drive and OS installation (source).
Check the ISO/Disc Image
One common cause of the “no bootable medium found” error in VirtualBox is a corrupt or incorrect ISO file. An ISO file contains the disk image of the operating system you want to run in the virtual machine. If this ISO file becomes corrupted or you select the wrong one, VirtualBox will not be able to boot from it.
To troubleshoot, first check that you have the correct ISO file for the operating system you want to run. The file name should clearly indicate the OS (for example ubuntu-22.04.iso). If you have the right ISO file, it could be corrupted. Download the file again from the official source and try again. Also make sure the ISO file is meant for the platform you want – 32 bit or 64 bit. Using the wrong architecture ISO can also lead to this boot error.
You can verify the integrity of the ISO file by checking the MD5 or SHA1 hash. Compare the hash of your downloaded file to the official value provided on the download page. If the hashes do not match, your ISO file is corrupted. Delete it and re-download a fresh copy. With the proper ISO file selected in your virtual machine settings, VirtualBox should now be able to boot successfully.
Update VirtualBox
One potential cause of the “no bootable medium found” error is having an outdated version of VirtualBox installed. As VirtualBox releases new versions, bugs get fixed and improvements are made that can help resolve boot issues like this one. According to the VirtualBox Changelog, recent updates have included “general improvements for booting VMs” as well as fixes for specific boot problems.
If you haven’t updated VirtualBox in a while, it’s a good idea to download and install the newest version. Major VirtualBox releases add support for new operating systems, hardware, and features that can improve performance and compatibility. For example, VirtualBox 6.1 fixed TPM crashes, graphical issues on Windows 11, and performance problems on Mac.
To update VirtualBox, go to the VirtualBox download page and get the newest version for your platform. The VirtualBox manual provides instructions on updating VirtualBox without having to reinstall VMs. After updating, try rebooting your virtual machine to see if the “no bootable medium” error is resolved.
Check Host Boot Settings
One potential cause of the “no bootable medium found” error is a conflict between the boot mode settings on the virtual machine and the host computer. VirtualBox supports both BIOS and UEFI boot modes. If the VM is configured for UEFI boot but the host computer boots in legacy BIOS mode (or vice versa), it can prevent the VM from booting properly.
To check the boot mode settings:
- On the VM, open the Settings and go to System > Motherboard. Verify whether UEFI or BIOS is selected as the boot mode.
- On the host computer, check the BIOS settings (typically by pressing F2 or Delete at startup) to see if UEFI or legacy BIOS is enabled as the boot mode.
The boot modes must match between the VM and host. If they are mismatched, change the setting on either the VM or host so both use the same boot mode. UEFI is recommended for newer operating systems like Windows 10/11. Legacy BIOS mode can be used for older OSes like Windows 7.
Additionally, for UEFI boot, make sure the VM settings have EFI enabled as the firmware type under Motherboard. After matching the boot modes, reboot the VM and host computer to apply the changes.
Enable VT-x in BIOS
One possible cause of the “No bootable medium found” error is that virtualization is not enabled in your computer’s BIOS settings. Most computers have virtualization capabilities such as VT-x (Intel) or AMD-V (AMD) that need to be turned on to allow VirtualBox to run virtual machines properly.
To enable VT-x or AMD-V:
- Restart your computer and enter the BIOS settings, usually by pressing F2, F10 or Delete during startup.
- Navigate to the configuration page for CPU or processor settings.
- Look for an option called VT-x, AMD-V, SVM or Virtualization Technology and ensure it is enabled.
- Save changes and exit BIOS.
With virtualization enabled in BIOS, VirtualBox should now be able to boot virtual machines properly. If the error persists, there may be other factors causing the “No bootable medium found” problem.
Repair the Virtual Disk
If the VDI file for your virtual machine has become corrupted or damaged, you may be able to repair it using the VBoxManage utility. VBoxManage provides a repairhd command that can fix certain types of corruption in VDI files.
To use the repairhd command (from https://forums.virtualbox.org/viewtopic.php?t=83565):
- Make a backup copy of your corrupted VDI file before attempting any repairs.
- Open a command prompt and navigate to your VirtualBox installation directory.
- Run the command:
VBoxManage.exe repairhd corrupted.vdi
- This will attempt to repair any corruption in the VDI file. It may take some time to complete.
- After the repair process finishes, try registering the repaired VDI file with VirtualBox again.
The repairhd tool can fix issues like corrupted headers and partition tables. However, it cannot recover data that was already lost due to file system corruption. But it’s worth trying as a first step before more complex data recovery methods.
Conclusion
If you still see the “No bootable medium found!” error after trying all the troubleshooting steps, there may be an issue with the virtual machine configuration, ISO file, or host machine settings.
To summarize, first double check that the VM settings are correct and the ISO is attached. Recreate the VM if needed. Confirm the ISO download is not corrupted. Update VirtualBox to the latest version. Check that VT-x virtualization is enabled in BIOS. Try repairing the virtual disk.
As a final step, completely uninstall and reinstall VirtualBox, create a brand new VM, and test booting again from a known good ISO file. This should resolve any underlying problems.
With patience and systematically working through these tips, you should be able to resolve the “no bootable medium found” error in VirtualBox.