In Windows, hard drives and other storage devices connected to your computer are assigned drive letters to help identify and organize them. The primary hard drive that contains the operating system is typically designated as the C: drive. Additional internal and external drives then follow in alphabetical order, such as D:, E:, F:, and so on.
Drive letters allow you to easily distinguish between the various drives on your system. For example, the C: drive contains the Windows system files, while the D: drive may be a secondary hard drive used for data storage. Drive letters are included as part of the path when accessing files and folders on your computer.
Understanding which drive letter corresponds to each hard drive can help you better organize your data and troubleshoot storage issues. In this guide, we’ll explore the various methods available for mapping drive letters to physical hard drives in Windows.
Viewing Drives in File Explorer
The easiest way to view the drive letters assigned to each drive on your computer is by opening File Explorer. File Explorer shows all the available drives on your computer in an easily accessible interface.
To view drives in File Explorer:
- Open File Explorer by pressing the Windows key + E on your keyboard or by clicking the File Explorer icon in your taskbar.
- In the left pane, click on “This PC.” This will show all the drives available on your computer.
- The different drive letters like C:, D:, etc. represent the different drives on your computer. The C: drive is typically the main hard drive where Windows is installed.
Looking at the drive letters shown under “This PC” in File Explorer gives you a quick overview of the various drives connected to or available on your computer, both internal and external drives. Each drive letter maps to a specific drive.
The drives listed could include your internal hard drives, disc drives, USB drives, memory cards, network drives, CD/DVD drives, and more. This makes it easy to see at a glance what drive letters match up to which drive on your computer.
For more details like drive label, file system, and space usage, you can click on a drive letter to open it. But for a simple view of the drive letters, opening This PC in File Explorer is the fastest way.
[View Drives in File Explorer](https://answers.microsoft.com/en-us/windows/forum/all/show-local-disks-under-this-pc-in-file-explorer/454fca52-15fe-4652-baab-d653a92e3255)
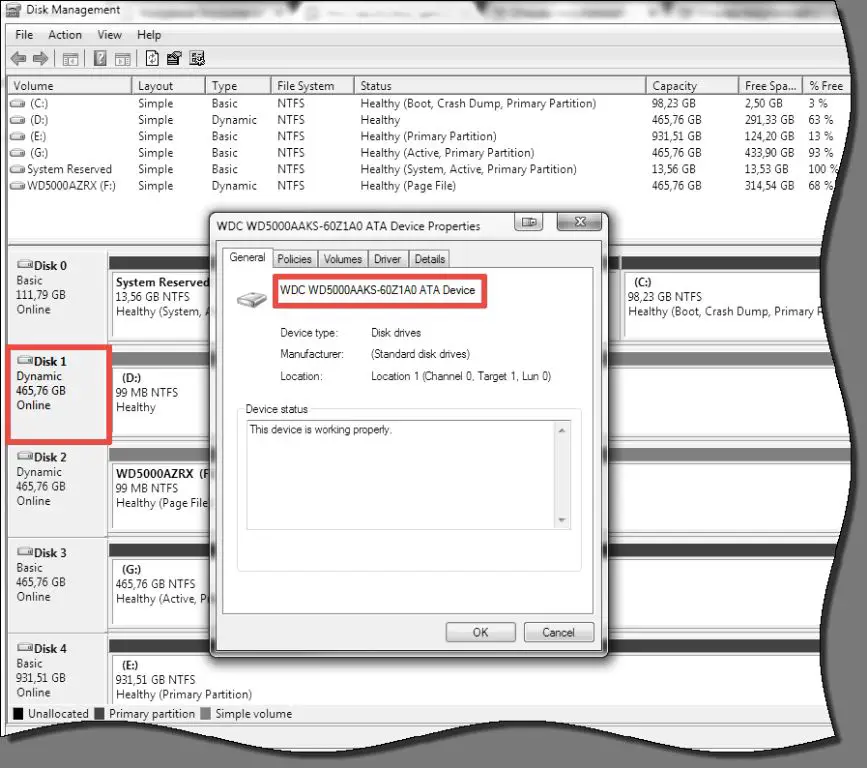
Using Disk Management
The easiest way to identify hard drive letters in Windows is to use the built-in Disk Management utility. To open Disk Management:
Press the Windows key + R to open the Run dialog box. Type “diskmgmt.msc” and click OK or press Enter (Source).
This will launch the Disk Management console. Here you can see a graphical view of all connected hard drives and their assigned drive letters. You can also see the drive model, capacity, partition style, and more. Simply match the drive letters shown here to your physical drives to identify them.
Disk Management provides the most straightforward way to correlate drive letters with physical drives. It shows the complete hard drive information all in one centralized console. Just remember to open it by typing “diskmgmt.msc” in the Run prompt or search bar. This makes it easy to view drive letter assignments at a glance.
Identifying the Drive Model
One way to identify which physical hard drive is assigned to each drive letter is to check the drive’s properties and look at the model or serial number. In File Explorer, right-click on the drive and select Properties. Under the General tab, the Model section will show details like the drive model, manufacturer, and serial number.
For example, if you see “WDC WD10EZEX-00BN5A0” as the drive Model, you can look up that specific model online and determine which physical hard drive it corresponds to in your computer. The serial number can also help match the Windows drive letter to your actual physical disk drives, since the serial number is unique to each physical drive.
As per the Super User article “How to find which hard drive represents each drive letter?”, you can check the properties of each drive letter in Windows Explorer to match the model, manufacturer, and serial number to your physical disk drives inside your computer.1
Using Third-Party Tools
Third-party disk management tools like DiskInfo can provide more detailed information about your drives than what is available in Windows natively.
DiskInfo will show the model name and number, firmware version, interface type, and other technical details for each drive. This can help you positively identify which physical drive corresponds to each drive letter in Windows.
The key advantage of using a third-party tool is that they access low-level drive information that Windows doesn’t display. This gives you the most accurate and detailed data to match drives to drive letters.
Checking in Device Manager
Device Manager is a built-in Windows utility that displays all detected hardware devices connected to your computer, including hard drives. To check the drive model and details using Device Manager:
1. Open Device Manager by right-clicking the Start menu and selecting Device Manager.
2. Expand the Disk drives section.
3. Locate the drive you want to identify. The model, manufacturer, and other details will be displayed here.
For example, the model for your C: drive might be listed as “WDC WD10EZEX-00BN5A0”. You can then look up this model online to find the full specs and details of that specific drive.
Device Manager is useful for getting more in-depth information directly from Windows about your connected drives. It can help identify issues if a drive is not being detected properly as well. Look under the Disk Drives section specifically to view all hard drives connected to your system.
Using PowerShell
One of the most useful tools for mapping drive letters to hardware in Windows is PowerShell. PowerShell includes several commands that allow you to view disk information and match drive letters to physical disks.
The main PowerShell command for retrieving disk information is Get-WmiObject. This queries WMI (Windows Management Instrumentation) to get details on hardware devices, including disk drives.
To view all disk drives, you can run:
Get-WmiObject -Class Win32_DiskDrive
This will display information like drive model, size, etc. However it does not include the drive letter. To get the drive letter, you need to look at disk partitions instead:
Get-WmiObject -Class Win32_LogicalDisk | Select-Object -Property DeviceID, VolumeName
The DeviceID property contains the drive letter. By retrieving both Win32_DiskDrive and Win32_LogicalDisk information, you can match physical disks to drive letters.
There are also other PowerShell cmdlets that provide drive letter information, such as Get-Volume and Get-PSDrive. These can be useful alternatives for mapping drive letters to hardware models.
Overall, PowerShell gives you access to detailed storage information and provides powerful ways to identify which drive letters correspond to your physical disks.
Checking Drive Labels
The drive label is essentially the name assigned to a drive and can be used to identify which letter corresponds to which drive. The label is set in Disk Management and ties the drive letter to the given label.
To view or change the label, open Disk Management and locate the drive you want to check. The label will be shown underneath the drive letter and capacity.
For example, your C: drive likely has the label “OS” or “Windows.” To change it, right-click the drive and select “Properties.” In the properties window you can view or edit the label.
The drive label persists even if you change the drive letter, so it provides a way to track drives if letters get reassigned. Checking the label is often the quickest way to identify a drive. Just note that not all drives have a customized label set.
For more details, see this guide: How to change drive volume label on Windows 10
Moving Drive Letters
If you need to reassign drive letters in Windows, you can do so through Disk Management. This allows you to change the default drive letters that are assigned to physical drives and partitions. For example, you may want to move your C: drive to D: and vice versa. To change a drive letter assignment in Windows:
1. Open Disk Management by pressing Windows Key + R and entering “diskmgmt.msc”. You can also search for it in the Start menu.
2. Right-click on the drive or partition you want to change the letter for and select “Change Drive Letter and Paths…”.
3. Click “Change” and select the new drive letter you want from the dropdown menu.
4. Click “OK” to confirm the changes.
The drive letter will now be updated. You may need to restart applications or services that were mapped to the old drive letter path. You can also click “Add” in the same menu to assign a drive letter to an unallocated partition.
This process allows you to rearrange and reassign drive letters as needed in Windows. However, take care when changing the system drive letters like C: as it can lead to boot issues or broken shortcuts. Back up data before making major drive letter changes.
For more details, refer to this guide on changing drive letters in Windows.
Conclusion
Drive letters in Windows represent a quick way to identify which disk or partition a folder is stored on. While drive letters are assigned automatically starting with C:, it is possible to change them as needed. This allows you to organize your drives logically or by type of content.
To find out which physical drive each letter corresponds to, Disk Management provides the model and size details. Device Manager and PowerShell can also reveal the drive identity. Checking drive labels set in Disk Management is another method.
Changing drive letters is simple in Disk Management for partitions and removable drives. For the C: drive, third party tools like Partition Wizard are required. Drive letters can be reassigned as long as there are no conflicts.
For further reading on managing drive letters in Windows, refer to:
Change a Drive Letter on Microsoft Docs and
How to Change a Drive Letter on StarTech.com.