What does a DST failed hard drive mean?
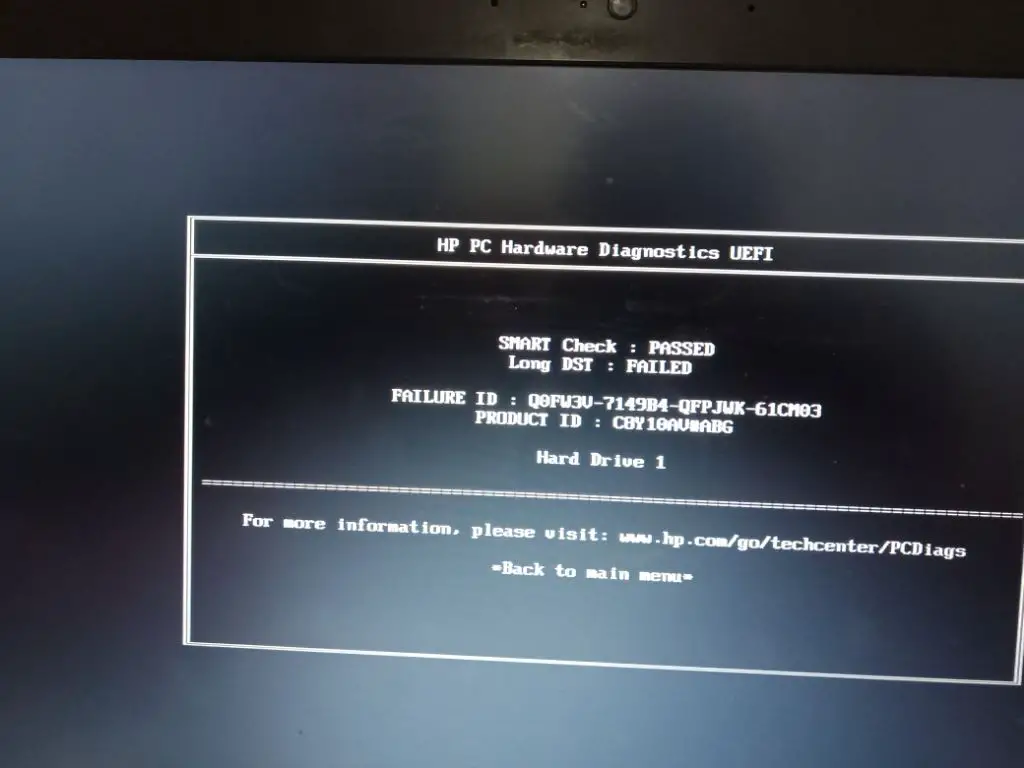
A DST failed hard drive refers to a hard disk drive that is failing its built-in diagnostics test or reporting a Drive Self Test error. DST or Drive Self Test is a diagnostics utility built into most hard drives that tests the drive’s read/write heads, electronics and internal memory. If a hard drive fails this self-test, it usually indicates some type of physical failure that prevents the drive from reliably reading or writing data.
Some common DST error messages include:
– DST Short Test Failed
– DST Extended Test Failed
– SMART Hard Drive Detect Imminent Failure
A DST failure typically means there is a mechanical or physical problem with the hard drive. This could include read/write head failures, motor issues, damaged platters, or firmware problems. The drive is usually still partially functioning but has trouble accurately reading or writing data without errors. The more serious the DST failure, the less reliable the drive has become.
What are the main causes of a DST hard drive failure?
There are several potential causes of a DST failed hard drive:
– Mechanical failure – This is one of the most common reasons for a DST error. Problems with the mechanical components like the read/write heads, platters, motor or bearings will cause the drive to start failing tests.
– Logical failure – Corrupted firmware, viruses, bad sectors or other logical damage can also trigger DST errors as the drive has trouble reliably accessing data.
– Component failure – If components like the onboard processor, memory chips or PCB components start to fail, it can interfere with the drive’s self-diagnostic tests.
– Age/Wear and tear – Hard drives are mechanical devices with a finite lifespan. Older drives that have seen heavy use are more prone to mechanical failures. The average age of a failed drive is 3-5 years.
– Overheating – Excessive drive heat causes expansion and contraction of drive parts leading to eventual mechanical failure. The cooler a HDD runs, the longer it will typically last.
– Power surge – Unexpected power loss or sudden power spikes can damage electronic HDD components leading to DST errors. Using a surge protector can help prevent this.
– Factory defect – In some cases, a DST error is the result of an inherent manufacturing defect that causes premature failure.
So in summary, the most common factors are mechanical wear, electronic/firmware issues and environmental stress like overheating or power problems. Performing regular backups and monitoring drive health can help avoid catastrophic failures.
How to confirm if a hard drive is really failing the DST test?
There are a few ways to confirm if a hard drive is definitely failing its internal Drive Self Test:
– Check S.M.A.R.T. status – S.M.A.R.T. (Self-Monitoring, Analysis and Reporting Technology) is a monitoring system built into drives. S.M.A.R.T. errors indicate possible hardware problems.
– Run the manufacturer’s diagnostic software – Most HDD brands like Seagate, WD and Hitachi have free bootable tools to test drives. If these tools also fail, it’s a strong sign of DST failure.
– Check Disk Management in Windows – Open the Disk Management utility and see if the drive has any read/write errors, bad sectors or shows up as failing or offline.
– Listen for unusual noises – Failing drives may make grinding, clicking or buzzing noises as mechanical parts deteriorate. These are telltale signs of hardware problems.
– Monitor HDD Sentinel – HDD Sentinel is a great drive monitoring tool for Windows. It provides detailed drive health stats and clear warnings for impending failure.
– Try a different SATA/USB cable – Sometimes cable problems can mimic drive failures. Swap cables to eliminate this possibility. Also try a different power cable if applicable.
– Test the drive in another machine – If the drive also fails DST in a different PC, motherboard etc, it points to a definite hardware problem.
If all these tests indicate a problem, the likelihood of a DST hard drive failure is very high. Take steps to backup data and replace the faulty drive.
How to temporarily fix a DST failed hard drive?
While a DST failed hard drive usually indicates an irreversible hardware problem, there are some temporary steps you can try to potentially recover data and limp it along:
– Update firmware – An outdated drive firmware can sometimes cause intermittent DST errors. Check the manufacturer’s website for any firmware updates.
– Clear S.M.A.R.T. errors – Resetting the S.M.A.R.T. status and error log may buy you some time if the drive is marginally failing.
– Repair bad sectors – Utility like HD Tune can be used to scan and repair reallocated sectors that may be triggering errors.
– Adjust AAM – Lowering or raising the Automatic Acoustic Management setting modifies drive head movement and may resolve minor mechanical issues.
– Try read/write head cleaning – Drive head cleaning kits use special fluid to clear accumulated debris from read/write heads.
– Check cabling – Loose SATA cables can cause connection issues resulting in DST errors. Reseat cables firmly.
– Update chipset drivers – Outdated system chipset drivers can hinder drive connectivity and functions. Install the latest versions.
– Reduce vibration – Excess vibration from cooling fans or proximity to other drives may impact mechanical operation. Isolate the drive if possible.
These methods might provide a temporary workaround to access data on a marginally failing DST drive. But they don’t fix the root problem and imminent complete drive failure is still likely. Consider replacing the drive ASAP.
Is it worth trying to repair a DST failed hard drive?
Generally trying to repair a DST failed hard drive is not worth the cost or effort compared to just replacing the drive. Here are some points to consider:
– Repairs are temporary – Even if you get a DST failed drive working again, it’s very prone to reoccurring failures due to inherent physical damage.
– Data recovery is expensive – Lab recovery of data from a mechanically failing drive starts around $300 and goes up drastically from there. It may be cheaper to simply replace the drive.
– Specialized skills needed – Hard drive repairs require very specialized equipment like a cleanroom and technical expertise. DIY repairs are not realistic for most people.
– Replacement drives are inexpensive – New hard drives can be purchased very cheaply compared to potential repair costs. A 4TB drive often costs less than $100 for example.
– Better performance from new drives – A new hard drive also brings benefits like faster speed, more capacity and updated features.
– Warranty coverage – New drives come with at least a 1-3 year manufacturer warranty versus an out-of-warranty failed drive.
So you need to weigh the high repair costs and uncertainty against just purchasing an affordable replacement drive. In most cases, replacement is more time and cost effective for both consumers and businesses dealing with DST hard drive failures.
Steps to replace a DST failed hard drive
If the DST failed drive is not repairable, here are the general steps to replace it:
1. Check compatibility – Match the new drive’s specifications like interface (SATA, IDE etc), physical size and form factor to your system.
2. Backup data – Try to backup any accessible data from the failing drive to another drive or the cloud.
3. Purchase new drive – Buy a new hard drive from a reputable supplier at the needed capacity and specifications. SSDs provide better performance.
4. Install new drive – Physically install the new drive in your computer by connecting the cables and powering it on.
5. Partition and format – Use Disk Management in Windows or Disk Utility in macOS to setup partitions and format the new drive.
6. Assign drive letter – Assign the new drive a letter like F: that identifies it in your operating system.
7. Transfer data over – Copy any retrieved data from the old drive to the new drive.
8. Reinstall OS (if needed) – If the failed drive held your OS, reinstall it on the new drive and activate it.
9. Verify functionality – Make sure the new drive is recognized properly and data is accessible as expected.
10. Migrate applications – Reinstall applications to the new drive and redirect folders like Documents.
Following this process helps make swapping out a dead drive for a new one as smooth as possible. Take proper precautions when handling older drives to avoid losing data.
Best practices to avoid DST failed drives
You can help minimize the chances of ending up with a DST failed hard drive by following some simple guidelines:
– Perform regular drive health checks using a tool like [CrystalDiskInfo](https://crystalmark.info/en/download/) to get early warning of potential failure.
– Keep drives properly cooled – ensure good case airflow and don’t stack drives tightly together.
– Use surge protectors and high quality power supplies to prevent electrical damage.
– Handle drives gently and avoid excessive vibration from fans or speakers.
– Reduce wear by avoiding excessive drive fragmentation and disabling unnecessary disk checks.
– Upgrade older drives proactively as they approach the 3-5 year expected lifespan.
– Maintain complete backups so you have options in case of failure. The [3-2-1 backup rule](https://www.backblaze.com/blog/the-3-2-1-backup-strategy) helps guard your data.
– Use enterprise class HDDs designed for 24/7 operation in critical systems. Or opt for more durable SSDs.
– Keep firmware, drivers, OS and programs updated to prevent conflicts or incompatibility issues.
With today’s expansive storage needs, recovering from a DST hard drive failure can be extremely disruptive. Following best practices helps safeguard your data and productivity.
Conclusion
DST failed hard drives usually indicate an underlying physical problem that will ultimately result in complete failure. While workarounds may temporarily stabilize the drive, replacement is generally the most cost effective and reliable solution long-term. Careful drive monitoring and maintenance helps avoid unplanned downtime and data loss. Leveraging modern cloud backups alongside new high capacity drives makes recovery from failure far less stressful.