What is an uninitialized disk?
An uninitialized disk is a storage device that does not contain any partition table or file system. This means that the operating system cannot recognize or access the disk until it has been initialized.
A partition table defines where partitions or volumes exist on the disk. Common partition table types include MBR (Master Boot Record) and GPT (GUID Partition Table). Without a partition table, the OS has no information about how the disk space is organized and structured.
The file system manages how data is stored on the disk. Examples include NTFS, HFS+, exFAT, etc. Without a file system, the raw sectors of the disk are inaccessible to the OS.
Some common causes of an uninitialized disk include:
- Brand new hard drive or SSD out of the box
- Connecting an external USB drive for the first time
- Disk corruption that wipes the partition table
- Accidentally deleting all volumes and partitions on a disk
Disk initialization writes a fresh partition table and often formats the disk with a new file system. This allows the operating system to recognize the disk and access its storage capacity. Until the disk is initialized, it remains entirely blank and unusable.
Symptoms of an uninitialized disk
An uninitialized disk refers to a storage drive that Windows cannot access or use because it has not been initialized and formatted. There are a few key symptoms that indicate a disk is uninitialized:
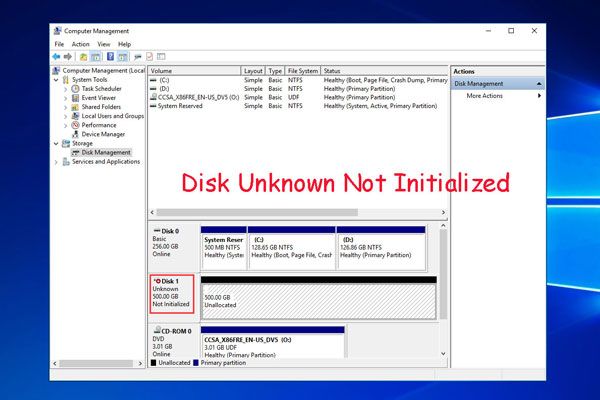
The disk will show up as “Unknown” in Disk Management with a black bar on top and no drive letter assigned. Normally disks display their capacity and file system, so an “Unknown” status points to an initialization issue (Source).
You will be unable to access or store data on the disk. Attempts to open or save files to the disk will fail with errors. The disk space will appear blank or empty even though the full storage capacity is intact (Source).
No drive letter will be assigned to the disk, so it will not show up in Windows File Explorer. Typically, new disks are assigned the next available letter, but uninitialized disks are skipped over.
Overall, an uninitialized disk will be present in the system but behave as if it’s disconnected or corrupted. The symptoms mainly involve an inability to use or even recognize the disk’s storage space until initialization is completed.
Initializing the Disk in Disk Management
One way to initialize a disk in Windows is to use the built-in Disk Management utility. Here are the steps to initialize a disk using Disk Management:
1. Open Disk Management. You can do this by pressing Windows Key + R and typing “diskmgmt.msc” and hitting enter. Disk Management will open.
2. In the lower panel, locate the disk you want to initialize. It will likely show as “Unknown” and “Not Initialized”. Right click on the disk and choose “Initialize Disk”.
3. In the Initialize Disk dialog box, select either MBR (Master Boot Record) or GPT (GUID Partition Table) partition style. MBR is compatible with older operating systems while GPT supports larger disk sizes.[1]
4. Click OK. The disk should now show a partition style and report as “Online”.
5. Right click on the partition and choose “New Simple Volume” to format it and assign a drive letter so you can start using it in Windows.
And that’s it! Following those steps in Disk Management will get your disk initialized and ready to use. Just be careful, as initializing a disk will erase any existing data on it.
Using DiskPart to Initialize
One method to initialize a disk is by using the DiskPart command line utility in Windows.
To use DiskPart to initialize a disk:
-
Open an elevated Command Prompt window as an administrator.
-
Type
diskpartand press Enter to start the DiskPart utility. -
Type
list diskand press Enter. This will display all disks detected by your system. -
Identify the disk number of the uninitialized disk you want to initialize.
-
Type
select disk X(replace X with the disk number) and press Enter to select the target disk. -
Type
cleanand press Enter. This will completely erase and prepare the disk to be initialized. -
Type
create partition primaryand press Enter to create a new primary partition on the disk. -
Type
format quick fs=ntfs label="Disk name"and press Enter to quick format the partition with NTFS.
The disk is now initialized and ready to store data. See this DiskPart reference for more details on using DiskPart to initialize disks.
Initializing During Windows Installation
If you are installing a fresh copy of Windows, you have the option to initialize a new disk during the installation process. This allows you to prepare the disk to be used as the system drive or for data storage.
To initialize a disk during Windows installation:
- Boot from the Windows installation media on a USB flash drive or DVD.
- On the installer screen, select your language preferences and click “Next.”
- When you reach the install screen, click “Repair your computer” in the bottom left corner.
- This will open the recovery options. From here, select “Command Prompt” to open a command line window.
- Type
diskpartand press Enter to launch the DiskPart utility. - Type
list diskto display all disks connected to the computer. - Identify the disk you want to initialize and note the disk number.
- Type
select disk X(replace X with the disk number) and press Enter. - Type
cleanto delete any existing partitions on the disk. - Type
create partition primaryto create a new primary partition. - Type
format quick fs=ntfsto quick format the volume. - Type
activeto mark the partition as active. - Type
exitto close DiskPart. - Close the command prompt window and proceed with the Windows installation normally.
The disk will now be initialized with a fresh NTFS partition ready for use when installation is complete. This method allows initializing disks without needing to initialize them beforehand in another operating system.
Sources:
[Initialize new disks](https://learn.microsoft.com/en-us/windows-server/storage/disk-management/initialize-new-disks)
[Do I need initialise new disk before installing Windows?](https://www.tenforums.com/installation-upgrade/200285-do-i-need-initialise-new-disk-before-installing-windows.html)
Initializing encrypted disks
Encrypted disks like those protected by BitLocker or other full disk encryption require a different approach to initialize. Full disk encryption locks the entire drive, preventing normal disk initialization until the encryption is unlocked.
Here are the steps to initialize an encrypted disk:
- Unlock the encryption using the password or recovery key. For BitLocker, go to the BitLocker settings and turn off encryption temporarily.
- Open Disk Management and find the locked disk. It should show as “Unallocated”.
- Right click the disk and select “Initialize Disk”. Choose a partition style.
- Wait for initialization to complete. The disk will now show as basic disk.
- Re-enable disk encryption if desired. BitLocker can be reactivated to encrypt the disk again.
Sources:
[1] Encrypted hard drives – Windows Security
[2] Windows 10: System encrypt “Disk not initialized” when plugging in
Common errors and solutions
There are several common errors that can occur when trying to initialize a disk in Windows:
Input/Output errors
Input/Output (I/O) errors occur when Windows has trouble communicating with the disk. This is often caused by faulty cabling, controller issues, or physical damage to the disk. To resolve I/O errors, first try replacing the SATA/USB cable connecting the disk. Also check for loose connections or damage to the drive itself. Running CHKDSK can help identify and repair file system errors contributing to I/O issues [1].
Disk read errors
Disk read errors happen when the OS has trouble reading data from the disk during initialization. This is commonly due to file system corruption or bad sectors on the disk. Trying a full format instead of a quick format may help get past disk read errors. If the disk has physical damage causing bad sectors, these tools can help repair it: CHKDSK, SpinRite, HD Tune Pro [2].
Device not ready errors
A “device not ready” error means the disk hardware is not responding properly to initialization commands. First ensure the disk is properly connected and has a steady power supply. If it’s an external drive, try connecting it to a different USB port or cable. Device not ready errors may indicate a failed or failing disk drive. Check the drive health with Disk Management or third-party tools [3].
When to initialize vs format
Initializing and formatting a disk are two different processes that are often confused. While both are required to prepare a new disk for use, they serve different purposes:
Initializing: This process prepares the drive by writing a new master boot record (MBR) or GUID partition table (GPT) to the disk. It defines the partition scheme to be used. Initializing is required before a disk can be formatted.
Formatting: Formatting writes a file system to the disk like NTFS or FAT32, which organizes the drive and defines how data is stored. Formatting erases any previous data on the drive.
You should initialize a brand new drive that is unused. Initialization is only required once in the lifetime of the drive. Formatting should be done to an initialized disk when you want to delete existing data and prepare it for new usage. Reformatting can be done repeatedly on a drive if needed.
In summary:
- Initialize once to prepare the physical disk structure
- Format to create a new logical structure and erase data
Citations:
https://learn.microsoft.com/en-us/windows-server/storage/disk-management/initialize-new-disks
Initializing SSDs vs HDDs
The overall process for initializing both SSDs (solid state drives) and HDDs (hard disk drives) is the same in Windows. You can use either Disk Management or DiskPart to initialize a new drive, whether it is an SSD or HDD.
However, there are some additional considerations when initializing an SSD that can help optimize it for peak performance:1
- Initialize the SSD with the GPT partition style rather than MBR. GPT allows for improved partitioning flexibility and supports larger drives.
- Enable TRIM support, which helps maintain write speeds by clearing invalid data blocks. TRIM is enabled by default in later Windows versions.
- Align partitions correctly – misaligned partitions can hamper SSD performance. Windows typically handles alignment automatically.
- Update the SSD firmware and enable overprovisioning if available, for added performance benefits.
Following SSD best practices when initializing can ensure optimal performance. But the overall initialization process remains straightforward whether setting up a speedy new SSD or a traditional HDD storage drive.
Initializing External Disks
External disks like USB drives and external hard drives need to be initialized before they can be used in Windows. The most common way to initialize an external disk is through Disk Management.
To initialize an external disk in Disk Management, connect the external drive to your computer, right-click This PC and select Manage > Disk Management. The external disk should show up as an “Unknown” disk. Right-click it and select Initialize Disk. Choose MBR or GPT partitioning and click OK.
Some external disks may show up as “Offline” in Disk Management. Right-click the disk and select Online first before initializing it. According to Microsoft, some USB drives cannot be initialized possibly due to damaged partitions or unsupported partition styles.
Third-party disk management tools like MiniTool Partition Wizard can also be used to initialize external disks if you run into issues with Disk Management. These tools provide more options to fix disk issues before initializing.
When initializing external disks, you can choose between MBR and GPT partitioning. MBR is compatible with older operating systems while GPT supports larger partition sizes on newer OS versions like Windows 10 and 11.
