When you get an error while checking your USB drive, it usually means there is some kind of corruption or issue with the drive that needs to be fixed. The good news is that there are several things you can try to resolve the error checking and get your USB drive working again.
Quick Fixes to Try
Here are some quick things to try when you get an error checking your USB drive:
- Unplug the USB drive and plug it back in. This resets the connection and sometimes resolves minor errors.
- Try a different USB port on your computer. The port may be damaged or not making a solid connection.
- Restart your computer. This clears out any software issues that may be interfering with reading the drive.
If the error persists after trying these basic steps, move on to some more advanced fixes.
Check for Physical Damage
One cause of error checking a USB drive is physical damage to the drive itself. Carefully inspect the USB connector and the casing for any signs of damage like the following:
- Bent or broken connector pins
- Cracks or chips in the plastic casing
- Corrosion from liquid or moisture damage
If you see any physical damage, the USB drive may need to be replaced. However, you can first try cleaning the connector pins with isopropyl alcohol and a cotton swab to remove any corrosion.
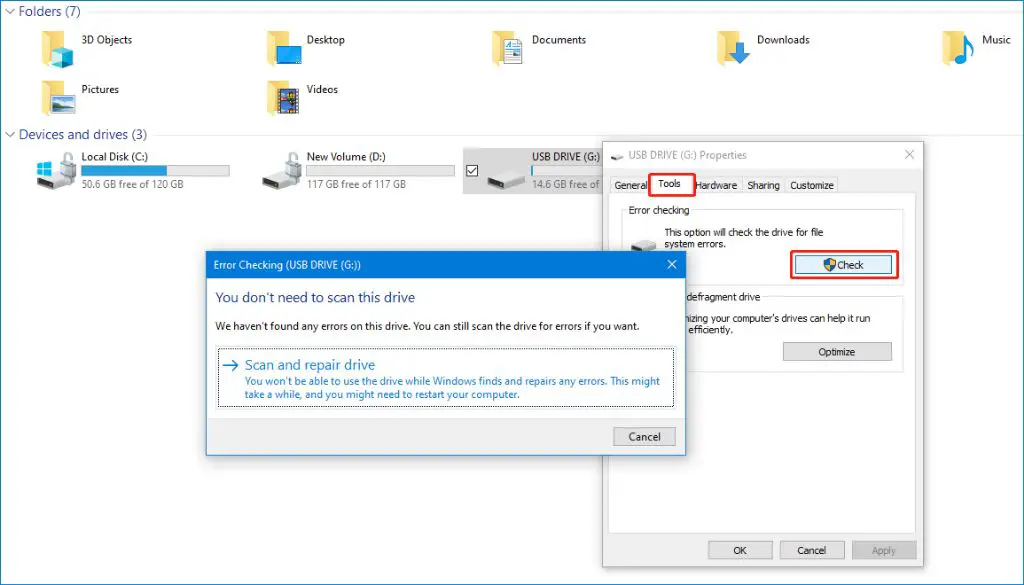
Scan for and Fix Errors
If the USB drive looks okay physically, the next step is to scan for errors on the drive and attempt to repair them. Here are the steps to try:
- Open File Explorer in Windows or Finder on a Mac and right-click on the USB drive letter.
- Select Properties > Tools > Check or Verify depending on your OS.
- This scans the drive for file system errors and attempts to fix them.
- If errors are found, restart your computer and rerun the Check process.
The Check scan will fix the most common errors like bad sectors. If it is unable to fix them, you may need to reformat the drive to fully fix corruption issues (see below).
Reformat the USB Drive
If scanning reports unfixable errors or the USB drive still won’t work properly, reformatting may be necessary. Reformatting completely erases and recreates the file system on the drive to fix major corruption issues. Here’s how to reformat a USB drive:
- Backup any important data on the drive since it will be erased.
- Open Windows File Explorer or Mac Finder and right-click the USB drive.
- Select Format for Windows or Erase for Mac and choose the file system.
- FAT32 or exFAT are the most universal formats to use.
- Start the formatting process. This may take several minutes to complete.
- When done, the drive will be like new again after reformatting.
Device Manager Fixes
You may also be able to fix error checking your USB drive from within Windows Device Manager with these steps:
- Open Windows Device Manager
- Expand the Disk drives section
- Right-click on the USB drive and select Uninstall
- Unplug the USB cable and plug it back in to reinstall the drivers
- Alternatively, use the Scan for hardware changes option to reload the drivers
This will reinstall the USB drivers and may resolve any issues that got corrupted. Make sure you don’t have any open files on the drive when uninstalling it.
Advanced Troubleshooting
If none of those basic fixes resolve the error checking your USB drive, here are a few more advanced troubleshooting steps to try:
- Try Another Computer – Connect the USB drive to a different computer to see if the error persists. This helps rule out any issues with your specific computer.
- Test on Different OS – If possible, check the USB drive on a Windows PC, Mac, or Linux machine. This can determine if the issue is related to a certain platform.
- Third-Party Tools – Programs like HDD Scan or CheckDisk can do more in-depth error checking and repairs on the drive.
- Remove USB Hub – If using a USB hub, connect the drive directly to a USB port to isolate the hub as a possible cause.
If the USB drive fails on multiple computers and operating systems, it likely has physical damage or serious file system corruption. You may have to seek professional data recovery help at that point or replace the drive if it is still under warranty.
Preventing USB Drive Errors
Here are some tips to avoid errors when using USB drives in the future:
- Eject the drive safely before unplugging it
- Don’t remove the drive during reads and writes
- Store and transport the drive carefully to avoid physical damage
- Use high-quality USB drives from reputable manufacturers
- Scan for and fix errors regularly using the steps outlined above
Following best practices for using and handling USB drives goes a long way in preventing frustrating errors or failures down the road!
Recovering Lost Data from USB Drive
If important files on your USB drive were lost or deleted due to corruption, there are still chances to recover them with data recovery software. Here are the basic steps to recover lost data from a USB drive:
- Stop using the USB drive immediately after data loss to avoid overwriting files.
- Install and scan the drive with data recovery software like Recuva or Disk Drill.
- Select a different drive than the USB drive to restore recovered files to.
- Preview found files before recovery to select ones you want to restore.
- Recover files to the safe location you chose. Don’t save them back to the problem USB drive.
Data recovery can successfully retrieve lost documents, photos, and media in many cases as long as the sectors containing them aren’t overwritten. The key is to stop using the USB drive with errors right away to maximize recoverability.
Choosing the Best Data Recovery Software
When selecting data recovery software for a USB drive, look for the following key features:
- Support for USB drives and common file systems like FAT32 and exFAT.
- Ability to preview found files before recovery.
- Recovery of all major file types including documents, images, video, and archives.
- Deep scanning to detect even deleted or lost files.
- Easy-to-use interface for selecting files to recover.
Top-rated options to consider include Photorec, Disk Drill, EaseUS Data Recovery Wizard, Stellar Data Recovery, and R-Studio. Research software reviews and choose one that best fits your needs and budget.
Tips for Maximizing Data Recovery
Follow these tips when attempting data recovery from a corrupted USB drive:
- Recover files to a different healthy drive, not back to the problem USB drive.
- Be extremely careful not to overwrite the USB drive before recovery.
- Scan using multiple data recovery tools for the most complete results.
- Let deep scans run to completion as they can find even hidden files.
- Select a destination with enough disk space for the recovered data.
With care and the right recovery software, you have an excellent chance to get back lost files from even severely corrupted USB drives in many cases.
Conclusion
Error checking a USB drive can certainly be frustrating, but there are many troubleshooting steps you can take to resolve them. Try quick fixes like changing USB ports or restarting your PC first. For persistent errors, you may need to scan for errors, reformat the drive, or reinstall the USB drivers. Recovering lost data is also possible with the right recovery software.
By understanding what causes USB drive errors and learning proper troubleshooting, you can overcome these issues and recover valuable data. Always handle your USB drives with care and proactively fix errors before they become severe. Backing up important data is also crucial to avoid heartache when USB drive problems occur. Following best practices will keep your drives working reliably for many years.