It can be frustrating when your external hard drive is detected by your computer but fails to open or load. An external hard drive not being accessible can be caused by several different issues, ranging from drive errors to problems with connectivity or power.
The good news is that in most cases, you can recover your data and get the external drive working again. This article will provide a step-by-step guide on troubleshooting and resolving the most common errors that lead to external hard drives being detected but not accessible.
Quick Fixes to Try First
Before diving into more complex solutions, attempt these quick fixes which resolve many detected but not accessible external drive issues:
Restart Your Computer and Drive
Shut down your computer completely, disconnect the external hard drive, then restart your PC. After it boots up, reconnect the external drive and see if it now opens as normal. Restarting will clear any software glitches preventing detection and access.
Connect Drive to Another USB Port
Try connecting the problem external hard drive to a different USB port on your computer. Use ports directly on the machine rather than hubs when possible. If it opens on one USB channel but not another, you could have a hardware connectivity issue.
Check USB Cable Connection
Inspect the physical USB cable connecting the external enclosure to your computer. Reconnect both ends securely and try a different cable if available. Faulty cables are a prime cause of drive detection and access troubles.
Update Disk Drivers
Outdated disk drivers can lead to external drive detection problems. Update all storage-related drivers like USB, SATA, RAID, and others to the latest stable versions from your hardware manufacturer’s website.
Run Chkdsk to Check Drive Errors
If your external hard drive is detected but will not open on your PC, it’s possible drive errors are causing the problem. Running Chkdsk scans the drive and attempts to repair file system errors.
To run Chkdsk:
- Open the Windows start menu and search for ‘Command Prompt’
- Right-click Command Prompt and select ‘Run as Administrator’
- Type the command ‘chkdsk X: /f’ where X is the letter of your external drive.
- Allow the scan to run, this could take a while for large drives. Chkdsk will attempt to repair any issues found.
- After completing, restart your PC and reconnect the external drive to see if accessibility improves.
Chkdsk fixes many file system problems that can block access so it should be your first troubleshooting step when an external hard drive is detected but not working.
Make Sure Drive is Formatted NTFS
For external hard drives to operate optimally on Windows PCs, they should be formatted using the NTFS file system. Drives formatted as FAT32 can still be detected but have limited functionality.
You can check if your external hard drive is NTFS formatted by:
- Going to Windows Explorer and right-clicking on the detected but inaccessible drive.
- Select ‘Properties’ and look under File System. Confirm it states NTFS.
If the external drive is FAT32 instead, you will want to back up any data and reformat it to NTFS for proper functionality. The steps are:
- Connect the external hard drive to your computer.
- Backup any data you want to retain from the drive.
- Open Windows Disk Management tool.
- Right-click on the external drive listing and choose ‘Format’.
- Set the file system to NTFS and perform a quick format.
Now test detection and accessibility. The external drive should open and behave normally when formatted as NTFS.
Assign a Drive Letter if Missing
Another potential reason your external drive is detected but not accessible is because it’s missing a drive letter assignment. Windows uses drive letters like C: and D: to identify volumes. Here’s how to add a drive letter if missing:
- Open Windows Disk Management tool.
- Find your external drive in the list without a drive letter.
- Right-click it and choose ‘Change Drive Letter and Paths’.
- Click ‘Add’ to assign a new drive letter.
- Choose an unused letter and click ‘OK’.
The external drive may now auto-mount correctly with a letter assigned. Try access again after this fix.
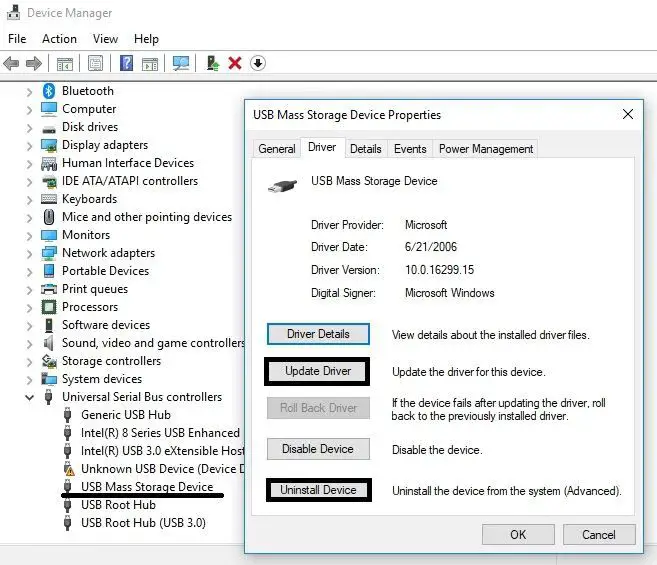
Update or Reinstall Drivers
Your external hard drive connects to Windows through hardware drivers like USB, SATA, RAID, and others. If these become damaged or outdated, your external drive can still be detected but be inaccessible.
Updating drivers should be one of your first steps in fixing a non-responding external HDD. Follow these steps:
- Open Windows Device Manager.
- Expand the Disk drives and Storage controllers sections.
- Right-click on any listed driver > Update driver.
- Search automatically online for driver updates from Windows.
- Repeat for each storage device driver listed.
This will update all of your external hard drive-related drivers. If updates aren’t found, you may need to reinstall drivers manually from your hardware manufacturer’s website. Reinstalling or updating drivers resolves many cryptic Windows hard drive errors.
Test Drive on Another Computer
To determine if the problem stems from your external drive itself or something on your computer, test connecting the drive to another computer.
If the external hard drive also cannot be accessed from a secondary PC, the drive itself has failed in some way. However, if it mounts successfully on another system, then the issue lies with your original machine.
Possible factors on your computer causing problems include:
- Faulty USB port – Try different ports/cables.
- Driver problems – Update or reinstall related drivers.
- Outdated Windows – Update to the latest Windows 10 version.
- Permission issues – Try running as Administrator.
Testing on a secondary computer isolates the cause so you know whether to troubleshoot your PC or external drive.
Open External Drive in Disk Management
Disk Management is a utility built into Windows for configuring drives. If your external HDD isn’t showing up normally, you may still be able to access it here.
Follow these steps:
- Go into Windows Disk Management tool.
- Locate your external drive in the list.
- Right-click and choose ‘Open’.
This will mount the drive so you can access files despite OS detection issues. However, you’ll need to troubleshoot the underlying problem for a permanent fix.
Check for Physical Damage
Detection issues where your external HDD is completely unrecognized may point to physical damage. Possible failure causes include:
- Broken USB connector – Try another cable, check port condition.
- Damaged circuit board – Can prevent proper function.
- Failed hard drive – If drive won’t spin up, it likely failed mechanically.
Carefully inspect your drive casing, connectors, and ports for any signs of damage. Shake the drive while plugged in to feel if the disk spins. If you suspect physical damage, drive recovery services may be needed to extract data before replacing the enclosure or drive.
Scan Drive for Errors with Data Lifeguard
For Western Digital brand external hard drives, you can scan for and repair errors using their Data Lifeguard diagnostic software.
To run the Data Lifeguard test:
- Download and install the Data Lifeguard diagnostic tools.
- Connect only the external drive you want to test.
- Launch the Data Lifeguard application.
- Select your external drive and click ‘Write Test’ to scan for bad sectors.
- If errors are found, attempt repairs.
This tool can fix logical disk errors that cause detection and accessibility issues on Western Digital external hard drives.
Wipe Drive Partition and Format Fresh
If your detected external HDD has no physical problems but remains unresponsive, wiping all existing partitions and performing a full reformat can fix software corruption issues.
Note this will erase all data, so only attempt after backing up:
- Connect the external drive to your computer.
- Open Windows Disk Management.
- Right-click the external drive partition > Delete Volume.
- Right-click again and create a new partition.
- Format the blank partition to NTFS.
Reformatting the drive essentially resets it to a factory state, which resolves many detection and corruption problems.
Replace Circuit Board on Enclosure
The circuit board inside an external hard drive enclosure is responsible for bridging communication between the SATA drive and USB connection. If it fails or gets damaged, your drive can still spin up but won’t mount properly.
Replacing the circuit board module may help:
- Open enclosure and remove existing circuit board.
- Purchase replacement matching circuit board.
- Carefully install new circuit board module.
- Reassemble enclosure and test drive.
Circuit board replacements can be found online for most external drive models if drive access issues persist after software troubleshooting.
Try a Linux Live CD
Booting your computer from a Linux live CD provides an easy way to test whether the external HDD can be accessed normally from an OS other than Windows. Most Linux distributions have tools built in to manage disk problems too.
To use a Linux live CD/USB for testing:
- Download and create a bootable Ubuntu or other Linux distro live CD/USB.
- Connect the external HDD you want to test.
- Boot computer from the Linux live media.
- See if Linux detects the external drive under File Manager.
- You can also use included disk utilities like GParted to check drive health.
If the external disk mounts properly in Linux, it points to a software or driver conflict within Windows. If it still fails to mount, suspect the drive itself has failed.
Send for Professional Data Recovery
If you’ve exhausted all other troubleshooting, your external hard drive is likely physically damaged. Professional data recovery services can repair drives with failed motors, heads, PCBs, and other problems.
Data recovery process:
- Ship external drive to a professional recovery company.
- Engineers will diagnose failure method and attempt repairs.
- Any retrievable data will be copied off to another drive.
- You receive an emergency drive with your recovered files.
Data recovery is the last resort to salvage irreplaceable files from a drive that’s beyond DIY fixes. Expect high service costs but success rates over 90% for mechanical failure recovery.
Replace the External Enclosure
The external disk enclosure houses and connects the actual hard drive mechanism. It facilitates the SATA to USB translation. Sometimes, a damaged enclosure can cause your drive to not mount properly even though the drive itself is fine.
In this case, replacing the external enclosure can allow data recovery:
- Carefully disassemble the external drive casing.
- Remove the bare HDD and install in a brand new enclosure.
- Connect new enclosure to computer via USB.
- See if files can now be accessed from the drive.
Isolating the true drive from a damaged enclosure determines whether the failure is with the SATA disk or external shell. Enclosures can be easily swapped.
Conclusion
An external hard drive not detected by your computer is frustrating, especially when critical data is inaccessible. However, this problem can usually be resolved with careful troubleshooting using the solutions outlined in this article.
Start by trying quick basic fixes like using a new cable or USB port. Then move on to scanning for errors, updating drivers, and reformatting the drive if necessary. Seeking help from professional data recovery is the final option if the hardware has truly failed.
Carefully working through detection and access issues will ensure you can get your external hard drive functioning properly again. Implementing regular backups will also protect your data if a failure occurs.