iTunes syncing allows you to transfer media files between your iTunes library and iOS devices like iPhones, iPads, and iPods. However, sometimes syncing can encounter problems that prevent your devices from syncing properly. The good news is that there are several troubleshooting steps you can take to get iTunes sync working correctly again.
Why Won’t My iPhone Sync With iTunes?
There are a few common reasons why your iPhone may not sync properly with iTunes:
- Corrupt iTunes library – An iTunes library with errors can prevent successful syncing.
- Outdated iOS – Make sure your iPhone is updated to the latest iOS version.
- Not enough storage space – Your iPhone may lack the storage space needed to sync new media.
- Disabled syncing – Check that syncing is enabled on the device itself and in iTunes preferences.
- Connection issues – Faulty or improperly connected USB cables can interfere with syncing.
How to Fix iTunes Sync Problems
If you’re having issues getting iTunes to sync properly with your iPhone, try these troubleshooting tips:
1. Check iOS and iTunes Version
Make sure both your iPhone and the copy of iTunes on your computer are fully up-to-date. Having the latest iOS and iTunes versions ensures maximum compatibility between the two and minimizes potential sync issues:
- On your iPhone, go to Settings > General > Software Update to check for the latest iOS updates.
- In iTunes, click Help > Check for Updates or Download iTunes from Apple’s website.
Updating to the newest versions of iOS and iTunes is an easy first step toward resolving most syncing problems.
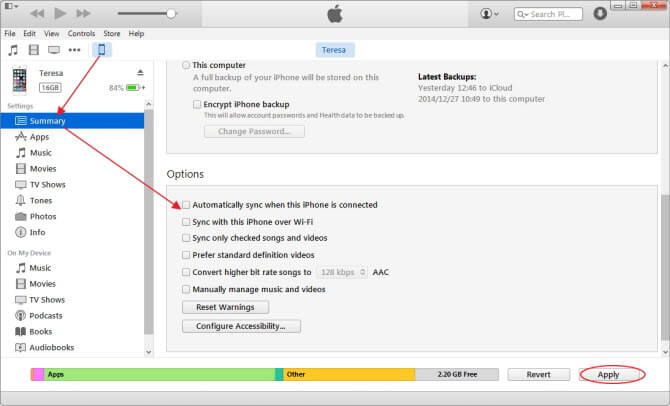
2. Disable and Re-enable Syncing
If your iPhone won’t sync properly, try turning syncing off and back on again. This resets the connection between the iPhone and iTunes library and can fix small glitches that disrupt the syncing process. Here’s how to disable and re-enable syncing:
- Open iTunes and connect your iPhone to your computer via USB.
- Under Playback on the Summary screen, check the box for “Prevent iPods, iPhones, and iPads from syncing automatically.”
- On your iPhone, go to Settings > [your name] and toggle off iTunes Wi-Fi Sync.
- Disconnect your iPhone from your computer.
- Reconnect your iPhone and uncheck “Prevent iPods, iPhones, and iPads from syncing automatically” in iTunes.
- Go back to Settings > [your name] on your iPhone and turn iTunes Wi-Fi Sync back on.
Cycling syncing off and then on again like this will reset the sync connection and overwrite any small errors that could be preventing successful syncing.
3. Authorize Computer
You may need to authorize the computer you’re trying to sync from within your iPhone’s settings:
- Go to Settings > iTunes & App Store.
- Tap your Apple ID and choose View Apple ID.
- Tap Authorizations > Authorize This Computer.
This makes sure your iPhone recognizes the computer and allows full read/write syncing privileges.
4. Check Connection Type
It’s generally best to sync your iPhone to iTunes using a direct wired USB connection. Wireless Wi-Fi syncing can sometimes be unreliable and cause sync issues. Make sure you are using the iPhone’s original sync cable and plugging it directly into a USB port on your computer.
Avoid syncing through any intermediary hubs, docking stations, or USB extension cables which can interfere with the syncing process. USB ports on your keyboard or monitor may also not work reliably.
5. Force a Manual Sync
If your iPhone won’t auto-sync with iTunes when connected, try forcing a manual sync instead:
- Open iTunes with your iPhone connected via USB.
- Click the iPhone icon in the top left corner.
- Under Manually back up and restore, check the box for “Sync [device].”
- Click Apply in the bottom right corner to manually initiate a sync.
Doing a manual sync overrides any auto-sync settings that may be incorrectly configured or malfunctioning.
6. Reset Sync Settings
Resetting all sync settings may help resolve stubborn sync issues that persist even after trying other troubleshooting steps:
- In iTunes on your computer, go to Edit > Preferences.
- Click the Devices tab.
- Select your iPhone and click “Reset Warnings” to reset sync settings.
This will clear any incorrectly configured sync options and restore everything to default settings.
7. Update iTunes Library
Problems with the iTunes library itself can also disrupt syncing. Try refreshing your iTunes library to eliminate any errors:
- Quit iTunes.
- Hold Shift while launching iTunes again to open adialog prompting you to create a new library or choose an existing one.
- Click “Create Library” to build a new iTunes library.
- Import your media back into the new library before syncing.
This will reconstruct your iTunes library from scratch which can fix corrupted data that’s interfering with syncing to your iPhone.
8. Check iPhone Storage Space
Your iPhone may not sync properly if it lacks sufficient storage space for new media files. Check your available space:
- On your iPhone, go to Settings > General > Storage to see available space.
- Or in iTunes, click your iPhone icon then go to Summary > Available Space.
If storage space is almost full, you’ll need to remove apps, photos, or other content before you can sync significant amounts of new media.
9. Disable Automatic Downloads
The Automatic Downloads feature can sometimes conflict with syncing by filling up your iPhone storage prematurely.
Go to Settings > [your name] > iTunes & App Store and disable any automatic downloads for music, apps, or books. This prevents your iPhone from receiving new content before you sync, avoiding storage and sync conflicts.
10. Factory Reset iPhone
For serious sync issues that persist after trying the above steps, a factory reset may be necessary to resolve software glitches preventing proper syncing:
- Backup your iPhone to iCloud or iTunes.
- On your iPhone, go to Settings > General > Reset > Erase All Content and Settings.
- Configure your iPhone again until you reach the Apps & Data screen during setup.
- Tap Restore from iTunes Backup and select your latest backup.
This will wipe your iPhone back to factory settings while preserving your data and settings in the backup. Restore the backup after resetting to return your data while hopefully resolving the underlying software issue.
iPhone Says “iTunes Could Not Connect to This iPhone”
The “iTunes could not connect to this iPhone” error typically appears during syncing and means there is a communication issue between the device and computer:
- Check that you have the latest iOS version installed on your iPhone.
- Be sure you have the most up-to-date version of iTunes.
- Try using a different USB cable, port, and computer if possible.
- Force quit and relaunch iTunes.
- Restart your iPhone and computer.
This resolves basic connectivity issues between the iPhone and iTunes that can prevent them from syncing properly.
How to Fix “iPhone Disabled Connect to iTunes” Error
Seeing an “iPhone disabled connect to iTunes” error after syncing means your iPhone has been locked for security reasons. This can happen after too many failed passcode attempts or when manually disabled in Settings.
To restore functionality you’ll need to:
- Connect your iPhone to iTunes on your computer.
- Force restart your iPhone by pressing and quickly releasing the Volume Up button.
- Immediately press and hold the Volume Down button until you see the recovery mode screen.
- In iTunes, click Restore to restore your device from a backup.
This will wipe and restore your iPhone to regain full access.
iPhone Won’t Sync Pictures to iTunes
If your photos won’t copy from your iPhone to the iTunes library, try these tips:
- Connect with a USB cable instead of Wi-Fi syncing.
- Ensure you have enough free space on your computer’s hard drive.
- Check that sync photos is enabled in iTunes device preferences.
- Click Apply after changing any sync settings.
- Make sure your iPhone photos are not already stored in iTunes.
With photos, syncing can sometimes only go one direction from computer to iPhone. Double check that your iPhone photos are not already stored in your iTunes library before trying to copy them over.
iPhone Not Syncing Contacts with iTunes
If your contacts won’t copy to your iPhone, verify these settings:
- Go to your iPhone Settings > [your name] > iCloud and enable Contacts syncing.
- In iTunes, under device Preferences, click Contacts and check “Sync Contacts” and select a source.
- On your computer, sign into iCloud and enable contact syncing for iTunes.
- Click Apply to execute the sync from the chosen source to your iPhone.
This ensures iTunes is set to sync contacts both from your computer and iCloud so all contact details copy over.
iPhone Apps Not Syncing to iTunes Library
To copy application purchases and data from your iPhone apps to iTunes, make sure:
- You have an iTunes Store account added in iTunes with Apps enabled for syncing.
- The latest version of iTunes is installed.
- You’re syncing using a USB connection, not Wi-Fi.
- You have enough storage space on your computer for the app data.
If some apps still won’t sync properly from your iPhone, you may need to offload or delete those apps and reinstall them through the iTunes App Store.
iPhone Music Not Syncing Properly with iTunes
To add your music library and playlists from iTunes onto your iPhone, double check that:
- The Sync Music option is enabled in iTunes device preferences.
- Music is checked for your iTunes Store account.
- You have enough free space for music on your iPhone.
If missing music and songs after syncing, it may be a metadata issue with iTunes Match, in which case you’ll have to resolve the metadata conflicts or uncheck iTunes Match on your device.
How to Transfer From iPhone to New iPhone
When moving your data from an old iPhone to a new iPhone model, you have a few syncing options:
- iCloud backup – Back up your old iPhone to iCloud, restore the backup to your new iPhone.
- Direct transfer – Use Quick Start while both iPhones are present to transfer data directly between them.
- iTunes backup – Sync your old iPhone to iTunes to create a backup, restore backup to new iPhone.
iCloud backup makes it easy to transfer your data without cables. Quick Start is the fastest option if you have both iPhones together. iTunes works if you don’t use iCloud.
Conclusion
Syncing your iPhone to iTunes allows you to manage media, backups, and software updates through one program. But sync problems can arise on occasion that disrupt the process.
By applying the troubleshooting tips in this guide, you should be able to resolve most common iTunes iPhone sync issues. Just be sure to keep your software updated, reset sync settings when needed, check your connections, and confirm sync settings to maintain smooth iTunes syncing with your iPhone.
