If you are seeing an error message that your drive is not initializing or not showing up, there are several potential causes and solutions to try. In most cases, this issue indicates a problem with the drive itself or the connection rather than your computer. The good news is that in many cases, you can resolve the issue yourself without sending the drive away for professional data recovery.
Quick Fixes to Try
Here are some quick things to check that may help get your uninitialized drive working again:
- Check the physical connections – Disconnect the data and power cables from both the drive and computer, inspect for any damage, blow out any dust, reseat the connections firmly.
- Try a different USB port or cable if using an external drive. Ports can fail and cables can become loose or damaged over time.
- If this is a new drive, make sure you have removed any protective packaging and have initialized/formatted it so your system recognizes it.
- Restart your computer and try accessing the drive again after rebooting.
- Update your disk drivers from the manufacturer’s website if available.
- Try connecting the drive to a different computer to rule out issues with your system.
Causes of Drive Not Initializing
If you have tried the quick fixes above and the drive still is not initializing, here are some common causes to investigate:
- Loose connections – If cables are loose or partially unplugged, the drive may not be getting consistent power or communication between it and the computer.
- Outdated disk drivers – Check for driver updates from the manufacturer and install them if available. Old, corrupt, or missing drivers can prevent proper communication.
- Drive not recognized in BIOS – Boot into BIOS settings and check if the drive is showing up there. If not, it is a connection or hardware issue.
- Damaged data or power cables – Inspect cables for bent pins, frayed wires, cuts, burns etc. Any cable damage can interfere with proper connection.
- Failed or damaged port – Try different ports if possible. USB ports can fail mechanically or electronically.
- Initializing a new drive – Brand new drives need to be initialized and formatted before being recognized by your system.
- Insufficient power supply – Some external drives require more power than provided through USB. Use a Y-cable or attach an external power supply.
- Outdated USB controller – On older systems, USB 2.0 ports may not provide sufficient power for some external drives. Try USB 3.0 ports if available.
- Drive not spinning up – Listen closely to the drive. If you don’t hear any activity, the issue could be with the drive motor, controller board, or power supply.
- Corrupted master boot record (MBR) – The MBR contains drive partition information. Corruption can cause the drive not to initialize.
How to Initialize a Drive in Windows
If you have a new drive that needs to be initialized before use, follow these steps:
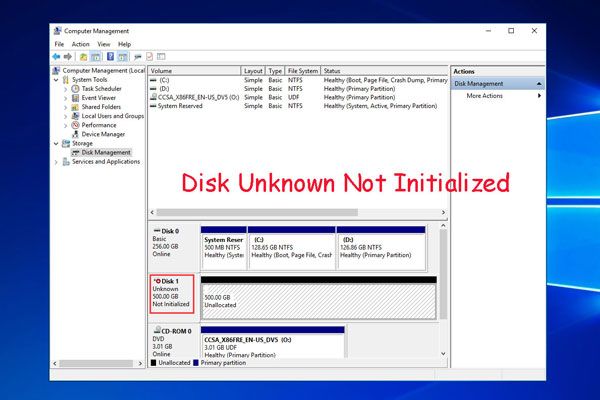
- Open the Disk Management utility. Right click the Start button and select “Disk Management”.
- The new drive should appear as an “Unknown” and “Not Initialized” disk. Right click it and select “Initialize Disk”.
- Select either MBR or GPT partitioning. MBR is compatible with older systems. GPT supports larger partitions.
- Right click the volume space and select “New Simple Volume” to create a formatted partition.
- Follow the prompts to assign a drive letter and format the partition.
- The disk should now show up as initialized and allocated with your chosen drive letter.
Fixing an Uninitialized Drive by Rebuilding MBR
If you receive errors about an uninitialized drive and the drive already contains important data, rebuilding the MBR may fix the issue without data loss. Follow these steps:
- Open an elevated Command Prompt by right clicking and selecting “Run as Administrator”.
- Type “diskpart” and press Enter to open the DISKPART utility.
- Type “list disk” to show all connected disks and identify the problematic disk #.
- Select this disk by typing “select disk X” where X is the disk number.
- Type “clean” to wipe the existing damaged MBR.
- Type “create partition primary” to recreate the MBR.
- Type “active” to mark the partition as active.
- Type “format quick fs=fat32” to create a basic quick format on the disk.
- Type “assign” to give the disk a new drive letter.
- Type “exit” to finish.
This process will rebuild the MBR without erasing existing data. However, it is still wise to backup important data first.
Using DiskPart to Clean and Reinitialize the Disk
Using the DiskPart utility, you can also completely reinitialize a drive if rebuilding the MBR does not work or you wish to reformat the disk. This will erase all data:
- Open an elevated Command Prompt and start DiskPart.
- List disks and identify the problematic disk number.
- Select the target disk with “select disk X”.
- Clean the disk to wipe all partitions and volumes: “clean”
- Create new primary partition: “create partition primary”
- Select the partition: “select partition 1”
- Format with file system: “format fs=ntfs quick”
- Assign drive letter: “assign”
- Exit DiskPart when finished.
This will completely reinitialize the drive by erasing and recreating the partition table. You will need to reinstall any data afterwards.
Using Disk Management to Reinitialize the Disk
The Windows Disk Management utility provides a GUI for reinitializing disks:
- Right click the Start button and select “Disk Management”.
- Right click the disk labeled “Unknown” and choose “Initialize Disk”.
- Select MBR or GPT and click OK.
- Right click the “Unallocated” space and select “New Simple Volume”.
- Walk through the wizard to assign a drive letter and format.
This achieves the same result as using DiskPart, but with a more user-friendly graphical interface.
Checking Drive Health with Disk Utilities
If a disk is failing and corrupting its MBR or partition table, this can lead to initialization errors. It is a good idea to check overall drive health using disk utilities:
- CHKDSK – Run “chkdsk X: /f” on the command line to scan for bad sectors and attempt repairs.
- SeaTools – Tools from Seagate to test most hard drives, including SMART status checks.
- Data Lifeguard – Diagnostic tools from Western Digital for their brand hard drives.
- DiskCheckup – General disk diagnostic utility that works with most drives.
If these tools detect drive errors or failures, it may indicate the disk hardware itself is damaged or malfunctioning.
Low-Level Formatting as a Last Resort
If the disk continues to have initialization errors after trying the above troubleshooting, a full low-level format may be necessary as a last resort:
- Backup data from the drive if possible.
- Use manufacturer tools like SeaTools or Data Lifeguard for your specific disk.
- Choose “Write Zeros” or equivalent full overwrite option.
- This erases all data but remaps bad sectors.
- Can take several hours to complete.
Low-level formatting realigns the physical disk structures and may fix issues not resolved by simpler quick formats.
Recovering Data from the Disk
If you need to recover data from the uninitialized drive, do not initialize or format the disk yet. Follow these steps:
- Stop using the affected disk immediately to prevent overwriting data.
- Try data recovery software like Recuva, EaseUS Data Recovery, R-Studio to scan the disk and extract files.
- Attach the disk to another system as an external drive for recovery.
- For mechanical failures, seek professional data recovery service for best results.
- After recovering data, you can safely initialize or format the disk.
When to Seek Professional Help
If you have exhausted the above troubleshooting steps and the disk still fails to initialize, it likely indicates a hardware problem that requires professional repair. Seek help from a data recovery specialist if:
- Low-level formatting did not resolve the issue.
- You hear unusual clicking, grinding, buzzing sounds from the disk indicating mechanical failure.
- CHKDSK finds unrecoverable bad sectors.
- Drive health tests indicate hardware malfunction.
- Connection issues are ruled out but disk still not recognized by computer.
Damaged internal components like the read/write heads, motor, or firmware often require dismantling the drive in a professional data recovery cleanroom to attempt repairs. This gives you the best chance of salvaging data.
Preventing Uninitialized Drive Errors
You can help avoid initialization problems using these proactive disk maintenance tips:
- Keep your system, disk drivers, and firmware updated.
- Use a surge protector to avoid electrical damage.
- Handle drives gently and avoid shock/impacts.
- Detach external drives safely using the “Eject” function.
- Regularly scan disks for errors using CHKDSK, DiskCheckup etc.
- Make sure external power cables are firmly connected.
- Always safely eject and disconnect external drives before transporting them.
- Maintain a good backup strategy so lost data can be restored.
Sample Scenarios
Here are some examples of common uninitialized disk scenarios and how to fix them:
New Internal Hard Drive Not Initializing
- Open Disk Management and initialize disk.
- Create new volume and format.
- Assign drive letter.
Second Hard Drive Not Detected
- Check SATA cable connections.
- Update motherboard disk drivers.
- Try different SATA port on motherboard.
- Reboot and enter BIOS to see if HDD detected.
External USB Drive Not Showing Up
- Try different USB cables and ports.
- Test drive on other computers.
- Try external power supply if available.
- Open Disk Management to troubleshoot.
RAW Drive Errors During Initialization
- Backup data and low level format drive.
- Clean and create new partition in DiskPart.
- Scan drive for bad sectors with CHKDSK.
- Consider replacing failing drive.
These examples cover just some of the common situations where drives may fail to initialize properly. The key is to isolate if it is a connection issue versus a problem with the drive hardware itself. Trying the troubleshooting steps on different systems can help determine the cause.
Conclusion
Drives failing to initialize is a common error that can result from connection problems, configuration issues, or failing hardware. Working through connectivity and software troubleshooting before determining hardware failure can resolve many cases. Rebuilding the MBR, reformatting, or low-level formatting allows fixing software-related initialization errors without expensive data recovery. Seeking professional help is recommended if drive problems persist after exhausting DIY troubleshooting. With the right steps, an uninitialized drive can often be restored to normal functioning.