Quick Overview
There are a few common reasons why your external hard drive may not be detected in Windows 7 and several steps you can take to try and resolve the issue:
- Check your USB cable – Try a different USB port and cable to make sure they are not faulty.
- Update drivers – Update USB and motherboard drivers in Device Manager.
- Change drive letter – Use Disk Management to assign your drive a letter if it doesn’t have one.
- Initialize the disk – Using Disk Management, you may need to initialize the disk.
- Enable in BIOS – Check that your BIOS settings allow for external drives.
- Test on another computer – Try connecting the drive to another computer to see if it is detected.
- Format the drive – Use Disk Management to format the external drive.
- Clean connection – Carefully disconnect, inspect and reconnect all connectors to clean them.
- chkdsk scan – Run chkdsk to scan for and repair any errors.
If none of those steps resolve the issue, the drive itself may be damaged and need to be replaced.
Check Cable and USB Port
One of the first and most common solutions to try is to use a different USB cable and port with your drive. Cables can become loose or damaged over time, and some USB ports may not be functioning properly.
Follow these steps:
- Disconnect your external hard drive from its current USB port.
- Try connecting the hard drive to another USB port on your computer.
- If you have another USB cable available, try replacing the cable and connect it to the original USB port.
- You can also test the drive on another computer to see if it is detected there.
If the drive is still not detected on any USB port or computer you connect it to, the issue likely lies with either the drive itself, drivers, or another issue on your computer rather than just the cable or port.
Update Drivers in Device Manager
Outdated, corrupted or missing drivers can prevent your external hard drive from being properly detected. Updating drivers may resolve the issue.
Follow these steps to update drivers:
- Open Device Manager in Windows 7: Go to Start > Control Panel > System and Security > System > Device Manager.
- Expand the Disk drives and Universal Serial Bus controllers sections.
- Right-click on any items that have a yellow exclamation point and select “Update Driver Software…”
- Select “Search automatically for updated driver software” and follow any prompts to update the drivers.
- You can also visit your motherboard or external hard drive manufacturer’s website to download the latest USB and chipset drivers.
- Restart your computer after updating drivers.
Updating the drivers will often resolve external hard drive detection issues, but if not, move on to further troubleshooting steps.
Change or Assign Drive Letter
If your external drive shows up in Disk Management but not File Explorer, it may be because it doesn’t have a drive letter assigned to it. Assigning a letter will make the disk accessible in Windows.
Here’s how to change or assign drive letter:
- Open Disk Management – Right-click the Start button and choose Disk Management.
- Locate the external hard drive which should have a black bar on top.
- Right-click on the rectangular bar and choose Change Drive Letter and Paths…
- Click Add and assign a letter from the alphabetical list that isn’t in use.
- Click OK and the drive should now display with a letter assigned.
This will allow Windows and programs to access the external drive and its files.
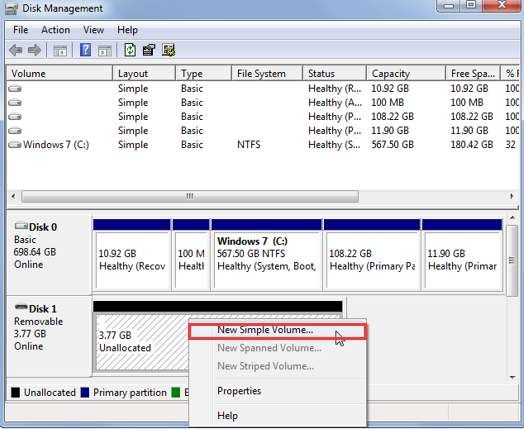
Initialize the Disk in Disk Management
If your external hard drive shows up as Unknown or Not Initialized in Disk Management, you may need to initialize it before use.
- Open Disk Management and locate the disk that says Unknown or Not Initialized.
- Right-click it and choose Initialize Disk.
- Select a partition style – MBR or GPT – and click OK.
- The disk should now display as a Basic Disk and have Unallocated space.
- Right-click the Unallocated space and create a New Simple Volume.
- Follow the prompts to initialize the volume with a file system, assign a drive letter, and format it.
After initializing the disk it should be detected and accessible in Windows Explorer for use as external storage.
Enable External Drives in BIOS
If your computer’s BIOS has USB or external hard drive settings, make sure they are enabled. Computers may have options to enable legacy USB support or explicitly enable certain ports for external hard drives.
Follow these BIOS access steps:
- Restart your computer and press the BIOS key during startup. Common BIOS keys are F2, F10, DEL, ESC.
- Navigate to where USB or external drive configurations are listed.
- Make sure external hard drives are enabled as a boot device and USB ports are enabled.
- Save changes and exit BIOS to restart back into Windows.
Enabling external drives in BIOS will ensure Windows can detect and communicate properly with external storage devices connected to the USB ports.
Test Drive on Another Computer
If you’ve tried the above troubleshooting steps on your computer and the drive still isn’t detected, test connecting the external hard drive on a friend’s working computer.
Use the same USB cable and connect to one of the working computer’s USB ports if possible. If the drive is detected on another computer, the issue lies with your own PC’s configuration or drivers.
However, if the external drive fails to be detected on multiple computers, the drive itself is likely faulty and should be replaced. Most external hard drives come with 1 to 3 year warranties, so contact the manufacturer for a potential replacement if your drive is within warranty.
Format the External Drive
As a last resort before replacing the drive, you can attempt to format the external hard drive to see if that resolves any software or filesystem errors that may be preventing detection.
Warning: Formatting will erase all data on the external drive, so copy any important files off of it first if possible.
- Open Disk Management and see if your drive shows up but has errors or shows up as Unknown.
- Right-click on the disk entry and choose Format…
- Set the file system to NTFS, check Quick Format, and start the format.
This should fully format the drive and hopefully resolve any underlying file system or partition issues causing the external hard drive not to be detected.
Physically Clean the Hard Drive Connections
If no software fixes resolve your external hard drive detection issues, physically inspecting and cleaning connections can help.
Follow these physical cleaning steps:
- Carefully disconnect all cables from the external drive.
- Use compressed air to blow any dust out of the USB port and cable connectors.
- Visually inspect the USB cable and port for any damage, bent pins, or obstructions.
- Use a dry cotton swab to gently clean the USB port on the drive and computer.
- Reconnect the cable and see if the drive is detected after cleaning.
Carefully cleaning contacts in the USB port and cable can fix connection issues that prevent the external drive from being properly detected.
Run chkdsk to Check for Errors
Using the chkdsk command can scan your drive and repair certain file system errors that may be causing detection issues.
Follow these steps to run chkdsk:
- Open an elevated Command Prompt window in Windows 7.
- Type “chkdsk X: /f” where X is the drive letter of your external hard drive.
- Allow chkdsk to fully run and repair any found errors on the disk.
- After completion, reboot your PC and see if the drive is detected.
Running chkdsk often resolves file system issues like corruption, bad sectors, and directory errors that can prevent drive detection.
Conclusion
Checking cables, updating drivers, assigning drive letters, initializing disks, cleaning connections, and running error scans are the most common solutions to get an external hard drive detected in Windows 7. If after trying all of those steps the drive still fails to show up or has hardware issues, physical damage is likely the culprit and the external hard drive will need to be replaced. Backing up important data off the drive beforehand can prevent permanent data loss.
| Troubleshooting Step | Details |
|---|---|
| Check/replace USB cable | Use a known good cable, test different ports |
| Update motherboard drivers | Get latest USB, chipset drivers from manufacturer |
| Assign drive letter | Drive must have letter to show in Windows |
| Initialize disk | Needed for OS to access brand new drives |
| Enable in BIOS | Make sure USB/external support is on |
| Test on second PC | Confirms issue is with original PC |
| Format disk | Repairs file system errors |
| Clean connections | Fixes corrosion, dust, damage issues |
| chkdsk scan | Scans drive and repairs errors |
An external hard drive not detected in Windows 7 can lead to data loss and confusion. Following the step-by-step troubleshooting guide above can resolve most detection issues and get your external hard drive working again, or confirm if replacement is necessary.