A buzzing or rattling laptop fan can be annoying for users. Thankfully, there are several troubleshooting steps you can try to quiet a noisy laptop fan and resolve the issue.
What causes laptop fan buzzing or rattling?
There are a few common culprits behind laptop fan noises:
- Dust buildup
- Fan position
- Worn out fan bearings
- Obstructions or collisions with internal components
- Fan not secured properly
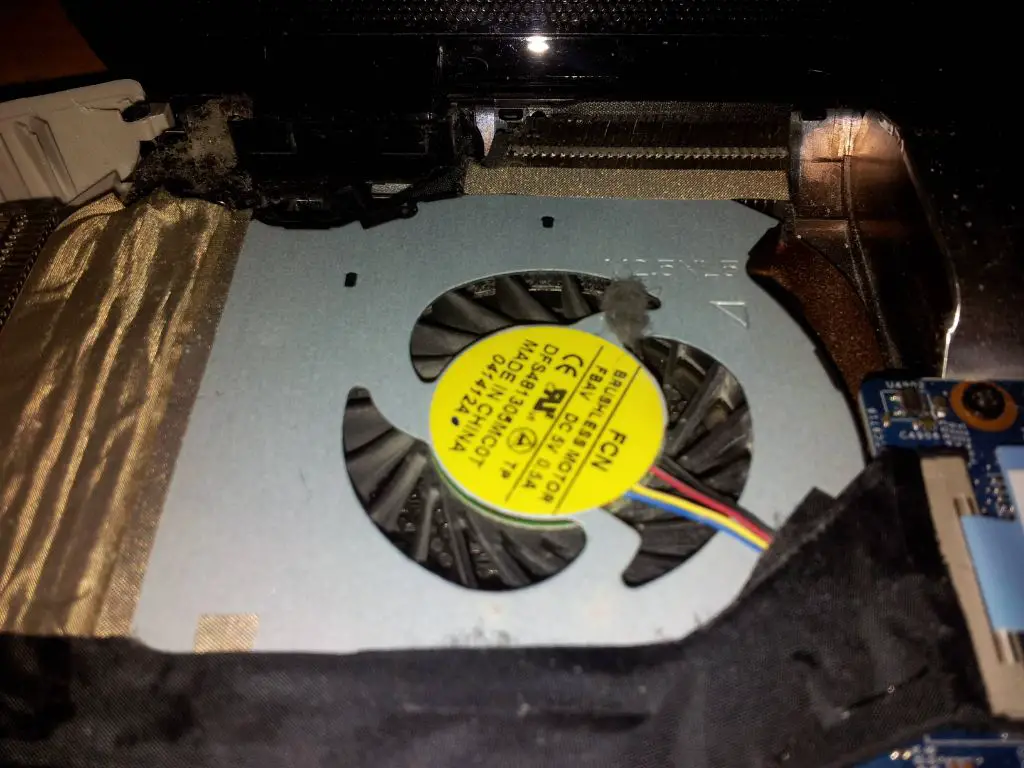
Dust buildup is one of the most common reasons for increased laptop fan noise. As dust accumulates on the fan blades, heat sink fins, and other internal components it can disrupt normal airflow. This forces the laptop to ramp up fan speeds to maintain adequate cooling, which creates more noticeable noise.
If the fan assembly has come loose or moved out of position, the blades can collide with the heat sink or housing while spinning, creating a buzzing sound. Worn out fan bearings are another source of noise as the fan ages.
Cables, wires, or components rubbing or interfering with fan blades can also generate undesirable noises. And an improperly seated fan that is not fully secured into the mounting screws/brackets may vibrate or rattle while spinning.
How to diagnose the cause of laptop fan buzzing
To troubleshoot a buzzing laptop fan correctly, you’ll need to diagnose the underlying cause. Here are some steps to find the root of the problem:
- Listen closely to the noise. A worn bearing typically makes a high-pitched grinding or squealing noise. Blade collisions cause a rattling or buzzing noise. Try stopping the fan briefly with your finger to isolate the noise.
- Inspect the fan assembly. Look for any wires or components touching the fan housing. Check that the fan is firmly secured.
- Check for dust buildup. Look through the fan grille for any dense clusters of dust.
- Monitor temperatures. Download a system monitoring app to check CPU and GPU temperatures. A hot laptop may indicate insufficient cooling due to dust buildup.
- Consider the laptop’s age and usage. Older laptops tend to accumulate more dust and may need new fan bearings after prolonged use.
Once you’ve identified the probable cause, you can move on to the appropriate solution. For dust accumulation, cleaning is key. For hardware faults like worn bearings, the fan unit will need to be repaired or replaced. And repositioning the fan or clearing obstructions solves issues like blade collisions.
Cleaning the laptop fan and heatsink
If dust buildup appears to be the culprit, a thorough cleaning is the best solution for restoring normal fan function and airflow. Here are the steps for cleaning a laptop fan:
- Gather supplies – You’ll need a can of compressed air, cotton swabs, isopropyl alcohol, small pliers, and screwdrivers.
- Power down and unplug – Always shut down and disconnect the laptop fully before working on internal components.
- Access the fan – Refer to a teardown guide for your specific laptop model to find and remove any covers or screws to reveal the fan. Be extremely careful when opening up laptops.
- Blow out dust – Use short bursts of compressed air to forcefully blow out accumulated dust from the fan, heat sink fins, and other components.
- Clean stubborn debris – For more stubborn debris stuck to parts, use a cotton swab dipped in isopropyl alcohol to scrub and dislodge it.
- Clear all obstructions – Ensure no wires or components are obstructing the fan blades from spinning properly.
- Reassemble laptop – Once fully cleaned out, carefully reassemble the laptop by replacing all screws and covers removed earlier.
After reassembling and starting up the laptop again, check if the fan buzzing sound has reduced or stopped completely. The improved airflow should allow the fan to run much quieter and reduce the need for high speeds.
Replacing a worn out laptop fan
If cleaning does not alleviate the fan noise, the fan bearings may be too worn out. When fan bearings get old, they can start to grind and squeal loudly. Replacing the entire fan unit is the solution in this case.
Follow these steps to replace a worn out laptop fan making noise:
- Purchase replacement fan – Find the correct replacement fan for your specific laptop make and model. OEM fans tend to be higher quality than generic.
- Dismantle laptop – Follow a teardown guide to fully access and remove the noisy fan unit.
- Disconnect fan – Detach the fan power connector and any screws or clips securing the fan to the housing/heatsink.
- Install new fan – Attach the new replacement fan unit following any instructions. Make sure it is firmly secured.
- Reassemble laptop – Put the laptop back together again carefully.
- Verify operation – Power on the laptop and confirm the new fan spins quietly without any buzzing.
Fan replacements require patience and care to avoid damaging delicate laptop components. Consider having a repair shop handle the replacement if you are unsure about safely taking apart your laptop model.
Securing a loose laptop fan causing noise
If the fan buzzing is due to the fan assembly becoming loose and vibrating, it just needs to be repositioned and secured properly again. Follow these tips to tighten a rattling laptop fan:
- Hold the fan lightly in place to stop the rattling while the laptop is turned on, to isolate the issue.
- Power down the laptop fully and access the fan unit.
- Check that any rubber mounting grommets are still in place and secure.
- Reseat the fan assembly into its fitted brackets in the housing.
- Tighten any loose screws securing the fan unit.
- Reattach the fan power connector if it came loose.
- Turn the laptop back on to verify the buzzing sound is gone.
If the fan still rattles after being resecured, the mounting screws or plastic anchors may have become stripped. You may need a fan replacement to properly secure the unit again in this case.
Clearing obstructed laptop fan blades
If a cable or component has come loose internally and is obstructing or colliding with the laptop fan blades, it can create a loud buzzing or rattling sound. Here is how to fix a laptop fan hitting internal wires or parts:
- Open up the laptop carefully following a teardown guide for your model.
- Locate anything touching or obstructing the fan blades from spinning properly.
- Secure the wire or component safely away from the fan blades using wire ties or adhesive tape if necessary.
- Clear away any debris if something has worn and broken apart due to contacting the fan.
- Reassemble the laptop, making sure the fan blades can spin freely.
- Listen as you power on the laptop to confirm the buzzing does not return.
Be very cautious when working around delicate internal laptop components to avoid damaging anything further. Preventing wires or parts from obstructing fan rotation again comes down to careful and proper laptop reassembly.
When to seek professional laptop fan repair
While many laptop fan buzzing issues can be addressed with cleaning and troubleshooting, there are times you may want to consult a professional repair technician:
- You don’t feel comfortable disassembling your particular laptop model safely.
- The specific replacement fan for your laptop is unavailable or expensive.
- There are signs of damage beyond just the noisy fan.
- Fan noise persists after troubleshooting and repairs.
- The laptop is still under warranty.
Many repair shops offer affordable laptop fan replacements and repairs for common models. Technicians have the parts, tools and expertise to accurately diagnose fan issues and fix them properly without risk of damage. For severe fan damage or noises indicating a larger problem, professional repair is recommended.
Tips to prevent laptop fan buzzing
You can help minimize laptop fan noise and extend fan lifespan by following proper usage and maintenance habits:
- Clean regularly – Use compressed air to blow out vents and openings every few months to prevent dust buildup internally.
- Avoid overheating – Prevent system overheating by ensuring plenty of ventilation space underneath and avoiding hot surfaces.
- Check positioning – Don’t allow cables or objects to obstruct laptop vents or fan intakes.
- Upgrade if needed – Consider adding more RAM or switching to an SSD to reduce overall system heat generation.
- Replace old thermal paste – Refreshing dried-out thermal paste between the CPU and heatsink improves heat transfer.
- Update BIOS/drivers – Keep your system BIOS and component drivers updated for optimal performance and fan control.
While fan buzzing cannot always be avoided as laptops age, proper maintenance habits make a big difference. Be especially vigilant about regular dust removal, ventilation space, and component positioning to maintain a quieter laptop fan.
Conclusion
Buzzing or rattling laptop fans can quickly go from a nuisance to a serious headache. Thankfully identifying the root cause and applying the right troubleshooting techniques can usually resolve fan noise issues and restore normal operation.
For mild fan buzzing caused by dust buildup or obstructions, a thorough internal cleaning or realignment is generally effective. Replacing aging fan bearings or worn out units remedies noise from hardware deterioration. And repair technicians can safely handle any complex fan repairs beyond DIY methods.
Catching and addressing laptop fan problems promptly prevents long term overheating damage. With the right corrective actions, users can regain a properly cooled laptop with a quiet, smoothly spinning fan.