Formatting an SSD (solid state drive) is an essential step when setting up a new drive or troubleshooting SSD issues. However, sometimes an SSD may fail to format properly in Windows or Mac. This can lead to frustration and prevent you from fully utilizing the SSD.
There are several potential reasons an SSD may fail to be formatted:
- Corrupted system files preventing access to the SSD
- Problems with SSD firmware or outdated drivers
- Bad sectors or physical damage on the SSD
- Incompatible SSD interface/connections
- Wrong initialization and partition settings
- Write protection enabled on the SSD
In this guide, we will explore these common causes in detail and walk through various solutions to successfully format your unresponsive SSD in Windows or Mac OS.
Check Physical Connections
The first step is to check that the SSD is properly connected via the SATA or M.2 slot on the motherboard. Loose cables or an improperly seated M.2 drive can result in the BIOS not detecting the SSD.
Try reseating the SATA data and power cables or removing and reinserting the M.2 SSD. Make sure the connectors are fully inserted and locked in place. You may need to apply slight pressure to get the M.2 drive properly seated.
If the SSD is connected via SATA, try using a different SATA port on the motherboard. The same goes for using a different SATA cable that you know works properly. There could be an issue with that specific port or cable.
For external SSDs connected via USB, try using a different USB port and cable. A faulty port or cable can prevent proper communication with the SSD.
After reseating connections and trying different ports/cables, reboot and enter the BIOS again to see if the SSD is now detected. Proper physical connections are required for the BIOS to recognize the drive.
Update BIOS
Updating to the latest BIOS version can help resolve SSD compatibility issues, especially for newer M.2 SSDs. Older BIOS versions may not fully support detection and initialization of modern SSDs. Motherboard and laptop manufacturers will often add SSD compatibility in more recent BIOS updates. Before attempting to format an SSD that is not being detected properly, first verify you have the latest BIOS version installed. Instructions for checking your current BIOS version and available updates can typically be found on the manufacturer’s website. Some systems also provide utilities within Windows or the UEFI screen to check for and install BIOS updates. Flashing the BIOS should only be done with care, following all instructions provided. Sources:
How to check if my BIOS is SSD compatible?
Can I update my BIOS with an SSD instead of a USB flash drive?
Disk Management
One easy way to check if your SSD is being detected properly is to open Disk Management in Windows. To do this, press the Windows key and type “diskmgmt.msc” and hit enter. This will launch the Disk Management utility.
In Disk Management, look for your SSD in the list of disks. If it shows up but is listed as an “unallocated” drive, this means it needs to be initialized before Windows can access it.
To initialize the disk, right-click on it in Disk Management and select “Initialize Disk.” Accept the default settings and the disk will switch from unallocated to basic. Now you can format the disk by right-clicking it and choosing “New Simple Volume.” Follow the prompts to format and assign a drive letter.
According to TechNewsToday, this initialize-format process should allow Windows to recognize the SSD properly and let you start storing data on it.
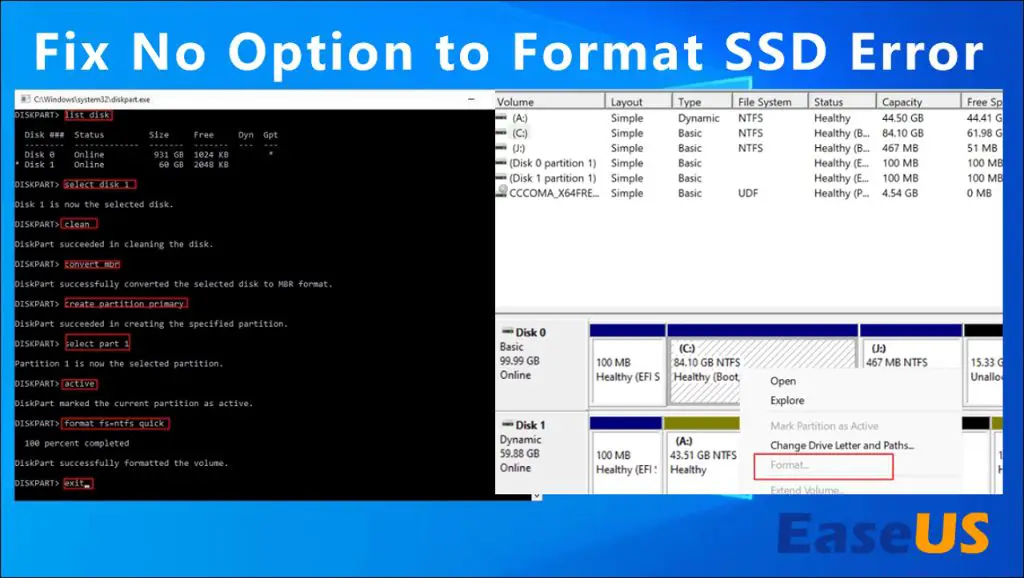
Use Diskpart in Command Prompt
Diskpart is a command-line utility built into Windows that allows you to completely wipe and reformat a drive. To use it to fix your unformattable SSD:
1. Open Command Prompt as Administrator.
2. Type “diskpart” and press Enter to launch the Diskpart utility.
3. Type “list disk” to display all connected disks and identify your SSD.
4. Select your SSD by typing “select disk X” where X is the disk number.
5. Type “clean” and press Enter to completely wipe and erase all partitions and data on the SSD.[1]
6. Create a new primary partition by typing “create partition primary”.
7. Select the partition you just created and format it:
type “select partition 1”, then “format fs=ntfs quick”.
This will completely wipe the SSD and create a blank NTFS partition ready for use. Be sure to select the correct disk, as Diskpart will erase whatever drive is selected without warning.
Secure Erase the SSD
One method to fix the formatting issue is to securely erase the SSD using the manufacturer’s secure erase tool or a tool like hdparm. This will wipe the drive and reset it to factory condition, erasing all existing data and partitions. According to an article by Crucial, “To permanently erase the data on the SSD so that it is unrecoverable, go to the manufacturer’s website to download software.”
For example, Samsung provides a free SSD utility called Magician that can securely erase Samsung SSDs (Samsung, 2023). WD and SanDisk offer the SSD Dashboard tool to securely erase their SSDs (WD, 2023). For other SSD brands, hdparm can be used – this article outlines the steps to securely erase an SSD with hdparm (OnLogic, 2023).
After the secure erase, the SSD should be reset to a factory-like blank state, which should allow Windows to format and partition it properly. Just be aware that secure erase will completely wipe the SSD, so be sure to backup any needed data first.
Reset SATA Mode in BIOS
One potential solution is to reset the SATA mode in the BIOS from AHCI to IDE or vice versa. The SATA mode controls how the SATA controller interfaces with storage devices like hard drives and SSDs.
To change the SATA mode in BIOS:
- Restart your computer and press the key to enter BIOS, usually Delete or F2.
- Navigate to the “Advanced” tab and look for SATA or Onboard Devices options.
- Find the option for SATA mode and switch it from AHCI to IDE or IDE to AHCI.
- Save changes and exit BIOS.
Changing the SATA mode can allow Windows to detect the SSD and may resolve formatting issues. However, switching from AHCI to IDE risks performance decreases. It’s best to leave AHCI enabled if possible for SSDs. See this guide for more details on changing SATA mode without reinstalling Windows.
FirmwareUpdate
Updating the SSD firmware using the manufacturer’s tool is one recommended way to try fixing formatting issues or compatibility problems (source). Most SSD manufacturers like Samsung, Crucial, WD etc. provide firmware update utilities that can be downloaded from their official websites. These tools allow you to easily update to the latest firmware version.
Updating to a newer firmware can potentially resolve bugs or compatibility problems that may be preventing the SSD from being formatted properly. Newer firmware versions contain stability fixes, performance enhancements and improved compatibility with different platforms like Windows 11. Before updating, be sure to backup any important data on the SSD.
The firmware update process itself is quite straightforward in most manufacturer tools. Simply download and install the utility, select your SSD drive, and let the firmware update complete. A reboot may be required after the update finishes. Checking for a firmware update and installing one if available is generally a worthwhile troubleshooting step when dealing with SSD formatting or compatibility issues (source).
Replace Cables
If you have tried everything else, the issue may be caused by faulty SATA cables connecting your SSD to the motherboard. SATA cables can degrade over time and develop faults that prevent proper communication between the drive and the rest of the system.
Try replacing the SATA data and power cables with brand new ones. Use cables that are recommended by your SSD or motherboard manufacturer. Low-quality generic cables can sometimes introduce issues.
Ensure both ends of each cable are securely connected. Faulty cables, loose connections, or bent pins in the SATA ports can interrupt the connection between the SSD and the motherboard, preventing the drive from being detected properly.
After replacing the cables, reboot your PC and check if your SSD is now detected in the BIOS and can be formatted properly. High-quality SATA cables designed for data transfers can help resolve detection and communication issues.
Contact SSD Manufacturer Support
If you have tried all the troubleshooting steps listed above and your SSD still cannot be formatted, contacting the SSD manufacturer’s customer support is the next step.
When you contact them, be prepared to provide the model name and number of your SSD along with a detailed description of the symptoms you are experiencing and the troubleshooting steps you have already attempted. The more information you can provide upfront, the better equipped they will be to help resolve the issue.
Some things to have ready to share:
- SSD model name and number
- Computer make and model
- OS version
- Exact wording of any error messages
- Screenshots of error messages if possible
- Steps attempted so far like updating BIOS, using Diskpart, Secure Erase, etc.
With this information, the SSD manufacturer’s tech support team will review your case and work to determine why the SSD cannot be formatted. They may have you run diagnostic tools, update firmware, or suggest replacement if a hardware fault is suspected. As the drive manufacturer, they have specialized knowledge to tap into when troubleshooting SSD formatting issues.
Getting assistance directly from the source can help resolve even difficult formatting problems. With their help, you will hopefully be able to get your SSD up and running once again.
