Xbox hard drive failure is a common issue that can prevent you from playing games, saving progress, and storing downloaded content on your console. The most common causes of Xbox hard drive failures are mechanical breakdowns, logical/software corruption, overheating, and physical damage from drops or shocks.
Mechanical failures occur when the physical components of the hard drive wear out over time. The moving parts like the platter, actuator arm, and spindle motor have a finite lifetime. Logical failures happen when the hard drive’s file system or other software data gets corrupted. This can occur due to bugs, viruses, or improper shutdowns. Overheating can also damage the drive components and electronics. Lastly, physical damage from drops, shakes, or other impacts can render the drive inoperable.
Determine if the Hard Drive is Failing
There are several common symptoms that indicate an Xbox One hard drive may be failing:
- Slow loading times – Games and apps take much longer than usual to start up or load new levels or content.
- Frequent freezing or crashing – The console suddenly freezes or crashes frequently, especially during gameplay or when using demanding apps.
- Difficulty installing games – New games fail to download or install correctly.
- Frequent error messages – Errors like “The hard drive is corrupted” or “Hard drive not found” appear regularly.
Specific error codes to watch out for include E101, E102, E105, E106, E200, E208, and E302 which all indicate issues with the hard drive. The console may also display a message asking you to “Reset this Xbox” which points to corruption.
If you are experiencing any of these symptoms, it likely means the hard drive is failing and will need to be replaced. Checking the Xbox Status page and running diagnostics can help confirm the drive is the issue before replacing it.
Back Up Important Data
Before replacing your Xbox hard drive, it’s crucial to back up any game saves, profiles, and downloaded content you want to keep. Here are the steps to back up your Xbox data:
Connect an external USB storage device like a hard drive or flash drive to your Xbox. The drive needs to have at least 256GB of storage. Go to Settings > System > Storage and select the drive.
To back up your game saves, go to Settings > System > Storage. Select the external drive, then ‘Transfer.’ Choose the game saves you want to transfer over. According to Microsoft, you can also use the ‘Manage All’ option on each game to copy or move saves.
For profiles, go to Settings > General > Personalization and select ‘Transfer profile.’ Move your profile to the external drive.
Finally, to transfer downloaded content like games and apps, go to My Games & Apps. Press the Menu button on each item and choose ‘Move.’ Select the external drive as the destination.
Once everything is backed up, you’re ready to replace the hard drive safely without losing your data.
Open the Xbox Case
Opening the Xbox case is an important step to access the hard drive. Here are step-by-step instructions with images on how to safely open your Xbox case:
-
Place your Xbox on a flat, stable surface. Make sure the console is turned off and unplugged.
-
Locate the seam along the backside of the console. Insert a small flathead screwdriver into the seam and gently pry open the backside cover. There are clips that need to be released for the cover to come off.

-
Once unclipped, lift off the backside cover. Set it aside in a safe place.

-
Locate and remove the eight retaining T-10 Torx screws securing the metal RF shielding plate to the motherboard. Lift off the RF shielding plate once the screws are removed.

-
Your Xbox interior components like the hard drive are now accessible with the case open.
Be very careful when handling internal components to avoid damage. Refer to the Xbox service manual for more detailed steps on proper disassembly. Now you can move forward with locating and removing the hard drive.
Remove the Old Hard Drive
Once you have the Xbox case open, you need to remove the old, failing hard drive. Here are the steps:
Locate the hard drive bay. It will likely have a hard drive already installed. The bay is often located on the left side towards the front of the console.
Remove any plastic brackets or screws securing the hard drive in place. You may need a Phillips screwdriver for this step. Be sure to keep track of any small screws you remove.
Gently pull the hard drive upwards to unseat it from the SATA connector. Some force may be required if it is stuck in place.
Detach the hard drive’s power and data cables from the back of the drive. The cables may use a connector latch or require gently wiggling to detach.
Make note of how the drive and cables were oriented so you can replicate it later. Completely remove the hard drive from the console.
Inspect the SATA connector on the Xbox motherboard and clear any obstructions or dust buildup. You want a clean connection for the new drive.
Set the old hard drive aside. You may be able to recover data from it later by connecting it to a computer externally.
Install a New Hard Drive
When installing a new hard drive in your Xbox, you first need to decide between a solid state drive (SSD) or a traditional hard disk drive (HDD). SSDs are faster, lighter, and more reliable than HDDs, but HDDs offer more storage capacity for the price. According to Windows Central, the best options for Xbox Series X/S are:
- SSD – WD_Black SN850 or Samsung 980 Pro
- HDD – Seagate FireCuda 530
Be sure to choose a drive that is compatible with your Xbox model and has enough capacity for your needs. The drive should connect via USB 3.0 or USB-C if external, or use the proprietary connector if installing internally.
Once you have the new drive, follow these steps to install it:
- Turn off the Xbox and disconnect all cables.
- Open the Xbox case. This requires removing 5-6 screws on the back/sides.
- Locate the hard drive bay and remove the cover if installing an internal drive.
- Slide out the old drive from the connector and carefully remove it from the Xbox.
- Line up the connector on the new drive and gently insert it into place.
- Replace the hard drive bay cover if applicable.
- Close up the Xbox case and replace all screws.
Take care when handling the hard drive and connections. With the new drive installed, you can proceed to formatting it and transferring data.
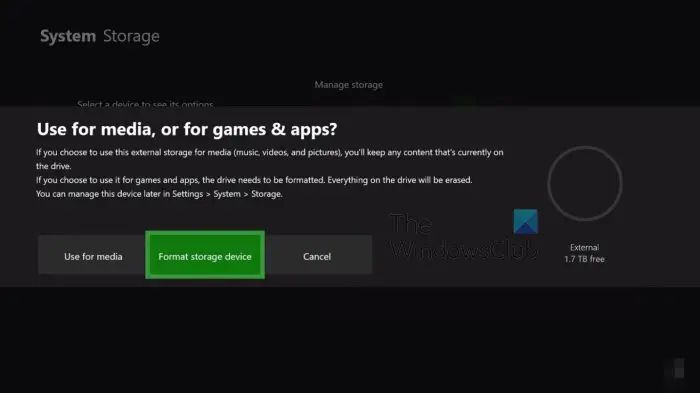
Format the New Hard Drive
Once the new hard drive is installed in your Xbox, you’ll need to format it properly for the console to recognize it. The easiest way is to use the Xbox’s built-in formatting tool.
Go to Settings > System > Storage devices on your Xbox dashboard. Select the new hard drive, then choose Format for games & apps. This will erase any existing data on the drive and optimize it for storing games, saved data, screenshots, etc.
The formatting process only takes a few minutes. Once it’s done, the Xbox will recognize the new hard drive and you can begin installing games, apps, and other content.
Formatting through the Xbox settings is the preferred method, as it configures the drive to work seamlessly with your console. No extra software or complex steps are required. As long as you initialize and format the drive properly within your Xbox settings, it will function just like the original hard drive.
Transfer Data to the New Drive
Once the new hard drive is installed and formatted, you will need to transfer your data from the old drive to the new one. This includes profiles, games, save files, and any other data you want to keep.
To transfer profiles, open the Xbox Guide by pressing the Xbox button, then go to System > Settings > Account > Transfer profile. Select the profile you want to move and choose Transfer. The profile will copy over to the new drive.
For saved games and other data, connect the old hard drive to your Xbox using a SATA to USB adapter cable. Go to My games & apps > Games and you will see a list of games on both drives. Select a game on the old drive and choose Move or Copy to transfer it over to the new drive.
You can also use the Xbox Accessories app on Windows 10 to move content between drives. Connect both drives to your PC, launch the app, select Manage > Transfer content, and choose what to move. This allows bulk transfers between drives.[1]
Keep transferring data until everything you want to keep has been moved to the new hard drive. Then you can reformat the old drive if you want to reuse it for something else.
With your games, profiles, and saves now on the new drive, you can reassemble your Xbox and start gaming again!
[1] https://recoverit.wondershare.com/harddrive-recovery/recover-data-from-xbox-one-hard-drive.html
Reassemble the Xbox
After installing the new hard drive, it’s time to reassemble the Xbox. This is the reverse process of taking it apart.
- Place the top case back onto the bottom case, making sure all the ports, buttons, and vents line up properly.
- Replace all the screws that were removed earlier. It’s important to screw them back in tightly to ensure the case stays securely closed.
- Carefully flip the Xbox back over so it’s right-side up.
- Reconnect any cables that were unplugged before disassembly, such as the power cord, HDMI cable, and any other accessories.
- Slide the fan assembly back into place above the hard drive bay. Push it in until the tabs click.
- Replace the top case screws using a Phillips screwdriver. Insert and tighten the screws snugly.
- Attach the vented top case cover. Align the pegs with the screw holes and push down gently until it clicks into place.
- Turn on your Xbox and make sure it powers on correctly. If the green Xbox logo appears, the reassembly was successful.
- Once at the home screen, run a game or app to verify everything is functioning properly before putting the console back into use.
With the case reassembled and all components firmly in place, the Xbox is ready for action again. Take care not to overtighten screws or force pieces together too aggressively during reassembly, as this could cause damage.
Troubleshooting
Even after replacing the hard drive, you may encounter issues getting the Xbox to recognize and properly function with the new hard drive. Here are some common troubleshooting solutions:
If the Xbox does not detect the new hard drive:
- Make sure the SATA and power cables are firmly connected to the hard drive and motherboard. Reseat the connections.
- Try a different SATA cable in case the one being used is damaged.
- Press and hold the Xbox power button for 10 seconds to reset the console.
- Go to Settings > System > Storage and see if the new drive is listed. If not, the console still does not detect it.
If the new hard drive is detected but cannot be formatted:
- The drive may need to be initialized first. Go to Settings > System > Manage Storage to initialize the drive.
- If initialization fails, the drive itself may be damaged and need replacing.
If games and apps are freezing or crashing after the replacement:
- The new hard drive may be faulty. Try installing a different drive.
- The drive may not be formatted properly. Redo the format process.
- Game files may have become corrupted. Delete and reinstall affected games.
If errors persist, contact Xbox Support for further troubleshooting assistance.
