Getting water or liquid under the screen of a MacBook Air is a common issue that can cause screen damage. Water can seep under the screen through openings around the edges or get trapped under the screen if the laptop gets wet. Some of the most common causes of water under the MacBook screen include spilling liquid directly onto the keyboard, putting the laptop in a wet bag, exposing it to rain, and using it in humid environments where condensation builds up.
Water under the screen is problematic because it can damage the sensitive electronics powering the LCD display. It can cause corrosion, short circuits, and lead to dead pixels or lines on the screen. The longer the water sits there, the more damage it can cause. That’s why it’s critical to address water under the MacBook screen right away before permanent damage occurs.
Assess the Damage
The first step is to thoroughly inspect your MacBook for any signs of water damage. Carefully look over the entire device and pay attention to the keyboard, trackpad, ports, and ventilation areas which are most susceptible to water exposure. According to How To Tell If MacBook Has Water Damage, some telltale signs of water damage include:
- Corrosion or sticky residue on the keyboard and trackpad
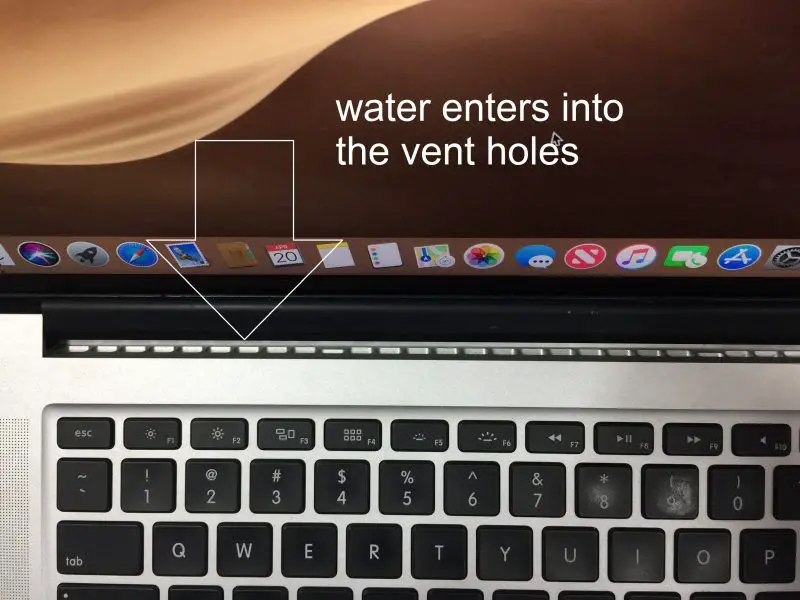
- Liquid stains around ports, vents or other openings
- Unresponsive or sticking keys
- Trackpad not clicking or responding to taps
Press down on every key and make sure each one inputs properly without sticking. Test the trackpad by moving the cursor around and clicking. If any keys or the trackpad are unresponsive, it likely indicates water exposure. Thoroughly inspect the MacBook from all angles in good lighting to check for any visible moisture or stains.
Power Down Immediately
It is crucial that you power down the MacBook as soon as possible after the spill. According to The Admin Zone, “you don’t want to give it any chance to short out and cause further damage” (https://www.theadminzone.com/threads/water-laptop.14942/). Keeping it on while wet risks short circuiting and permanent damage to components.
You’ll also want to drain out any remaining liquid right away. Tilt the MacBook to allow the liquid to flow out of openings and ports. Gently shake out excess water, but avoid getting rough. Use a soft cloth to dab up any standing liquid on the surface or keyboard. With the power off, there is no risk of short circuiting from doing this.
Disassemble the MacBook
To access the internal components, you’ll need to fully disassemble the MacBook Air. Refer to iFixit’s teardown guide[1] for step-by-step instructions and photos of the disassembly process.
Start by removing the bottom case, which is held in place by pentalobe screws. You’ll need a P5 pentalobe screwdriver[1] to remove them. Carefully pry up the bottom case once the screws are removed.
Next, you’ll need to detach any display cables and remove the battery. The display cables are secured with screws and clips. Be very gentle when handling the cables to avoid any tears or damage. Remove the screws securing the battery and then gently pry it out of place[1].
With the bottom case, display cables, and battery removed, you’ll have access to the internal components, including the logic board where water damage likely occurred.
[1] https://www.ifixit.com/Teardown/MacBook+Air+13-Inch+Early+2015+Teardown/38266
Dry Out Components
After disassembling the MacBook, the next step is to thoroughly dry out all of the internal components. It’s important to remove any remaining moisture, as it can lead to corrosion, shorts, and permanent damage if left untreated.
Use canned air to blow out any droplets of water lingering inside the MacBook. Canned air can be purchased at electronics stores and is highly effective for drying. Spray it into all the crevices and ports, holding the can upright to avoid any liquid being sprayed out. Make sure to dry the underside of the keyboard, trackpad, logic board, and other components.
According to experts, it is recommended to let the MacBook sit for 1-2 days after drying with canned air to allow any residual moisture to evaporate completely [1]. Though moisture may seem gone after air drying, trapped droplets could remain internally. Letting it sit 72 hours is ideal for thoroughly drying all parts inside and out [2].
Be patient during the drying period to avoid potential water damage issues down the road. Rushing to reassemble or turn on the MacBook too soon can cause major problems. Taking the time to fully dry it out will help ensure its proper functioning after water exposure.
Inspect for Damage
Once the MacBook Air has had time to thoroughly dry out, the next step is to inspect the components for any damage from the water spill. Pay particular attention to the logic board, as this contains many of the laptop’s most important electrical components.
Check the logic board carefully for any signs of corrosion. Corrosion can occur when minerals in the water interact with the metal traces and components on the logic board. Look for discolored or damaged traces, as well as any components that appear corroded or have a buildup of mineral deposits on them. If corrosion is present, the logic board may need to be replaced.
Also inspect components like the keyboard, trackpad, speakers, ports, and fans. Test them to make sure they are still fully functional. Water can short out circuits and cause components to fail. If any component seems damaged or no longer works properly, it will likely need to be replaced.
Refer to the iFixit MacBook Air teardown guide for help identifying parts and properly disassembling the laptop for inspection.
Replace Damaged Parts
If after drying out the MacBook, certain components still seem damaged or unresponsive, you’ll need to replace them. The keyboard, trackpad, and logic board are the most common parts that need replacing after water damage.
You can purchase genuine Apple replacement parts on sites like iFixit. iFixit has detailed repair guides for each MacBook model, so you can identify exactly which parts need replacing. They also sell kits with all the necessary tools and components.
Replacing the keyboard or trackpad is a fairly involved process that requires completely disassembling the MacBook in order to access them and disconnect the cables/screws. So make sure you feel comfortable taking your MacBook apart before attempting this. The iFixit keyboard and trackpad guides have step-by-step instructions.
For advanced damage, the logic board may also need replacing. This is a complicated repair best left to a professional, unless you have extensive electronics experience.
Reassemble MacBook
After all internal components have dried sufficiently and any damaged parts have been replaced, it’s time to reassemble the MacBook. Follow the take-apart guide from earlier in reverse order to put the laptop back together correctly.
Carefully reconnect the display cable and lower display back into place, ensuring the clips fully latch. Reseat the battery, taking care to align the connectors properly. Attach the bottom case starting with the rubber strips around the edges, then insert and tighten all screws methodically.
As a final step, press down firmly along all edges of the bottom case to ensure it is properly seated and sealed again. Visually inspect the ports and vents to make sure no obstructions or gaps are present.
Reassembling the MacBook correctly is crucial to restoring proper functionality and water resistance. Take it slow and double check each step to avoid rework down the line. With some patience, you can get your laptop back in working order after water damage.
Turn On and Test
After reassembling your MacBook, it’s time to turn it on and test that everything is working properly after the water damage. This is an important final step before you can start using your MacBook again.
First, power up your MacBook as normal by pressing the power button. Allow it to boot up completely. The boot up process may take a little longer than usual as the MacBook recovers from the water exposure.
Once booted up, thoroughly test the keyboard and trackpad. Try every key and make sure each one inputs properly without sticking. Move your finger over the entire trackpad surface to verify it tracks your finger movement accurately.
Finally, inspect the display. Make sure the screen lights up and shows a picture. Verify all areas of the screen work by displaying a white image and checking for any dead pixels or artifacts. Connect an external monitor if you want to diagnosis the internal screen further.
If everything powers on and functions correctly, then your MacBook water damage repair was successful. You can start using it again once you’ve confirmed no lingering issues. But if problems still persist, you may need to re-open it and check for any parts that need replacement or further drying.
Prevent Future Damage
While fixing water damage on a MacBook Air can be done, it’s always better to try to prevent the damage in the first place. Here are some tips to help prevent water and liquid damage to your MacBook Air:
Use laptop skins or cases – Get a waterproof skin or case for your MacBook Air that will protect it from accidental spills or splashes. Waterproof skins can be adhered directly to the laptop and come in styles with keyboard covers as well. Waterproof cases are shells that your MacBook fits into. Both options create a barrier that blocks water and moisture.
Avoid liquids near laptop – Be very careful when carrying open containers of liquid like glasses of water, coffee cups or juice near your laptop. Don’t place drinks right next to your MacBook Air. Spills can happen easily, so keep some distance between your electronics and liquids.
