A locked file on a Mac is one that has been marked as read-only, preventing it from being modified or deleted. Locked files are denoted by a little lock icon next to the file name. There are a few reasons why a file may be locked on a Mac:
- The file permissions are set to read-only
- The file is in use or open by another application
- The file is associated with installed software or the operating system
While locked files protect against accidental changes, sometimes you may need to delete a locked file that is causing problems, obsolete, or taking up space. This guide will cover several methods to force delete locked files on a Mac.
Check File Permissions
The first step to force deleting a locked file on Mac is to check the file’s permissions. Permissions determine who can access, modify or delete a file. When permissions are restrictive, it can cause the file to appear locked.
To check permissions on a locked file:
- Right click on the file in Finder and select Get Info.
- In the Get Info window, go to the Sharing & Permissions section.
- Here you can see the read & write permissions for the Owner, Group, and Everyone.
- If the file is locked, the permissions may be restricted to Read only or No Access for your user account.
- Identifying restrictive permissions can help explain why you are unable to delete the file.
Checking file permissions is an important first step in troubleshooting and fixing locked files on a Mac. Restrictive permissions are often the reason a file appears locked in Finder. Understanding the permission settings will guide the next steps needed to unlock the file for deletion.
Source: https://iboysoft.com/howto/change-permissions-mac.html
Unlock the File
If you need to delete a locked file on your Mac, the first step is to unlock it. There are a couple ways to do this:
You can temporarily disable System Integrity Protection to unlock files. System Integrity Protection prevents even administrators from modifying protected system files and folders, which can lead to files becoming locked. To disable it, restart your Mac and hold down Command + R to boot into Recovery Mode. Open the Terminal app and type “csrutil disable” then restart your Mac. You can now unlock and delete locked files. Remember to re-enable System Integrity Protection when you are done by booting into Recovery Mode again and typing “csrutil enable”.
You can also unlock files in Terminal using the “chflags” command. Open the Terminal app and type “sudo chflags -R nouchg /path/to/locked/file” (replacing the path with your file’s location). This will recursively remove the locked status on the file and allow you to delete it.
Additionally, you can unlock files in Finder by Control + clicking on them, selecting Get Info, and unchecking the Locked checkbox. This unlocks the file without having to use Terminal.
See this guide for more details on how to unlock files on a Mac: https://www.wikihow.com/Delete-Locked-Files-on-a-Mac
Force Delete with Terminal
You can use the Terminal app and the ‘rm’ command to force delete locked files on your Mac. Here are the steps:
- Open the Terminal app (located in /Applications/Utilities/).
- Type ‘sudo rm -rf’ and a space, but do not press Enter yet.
- In Finder, locate the file or folder you want to delete. Drag the file/folder and drop it into the Terminal window after the ‘rm -rf’ command.
- Press Enter to execute the command and force delete the file or folder [1].
The ‘sudo’ gives you temporary admin rights to delete system files. The ‘rm -rf’ will delete the target file or folder recursively and forcefully. This Terminal method allows you to bypass the usual file permissions to force delete locked files.
Be very careful when using ‘sudo rm -rf’ as you can accidentally delete critical system files. Make sure you properly target only the file or folder you intend to delete.
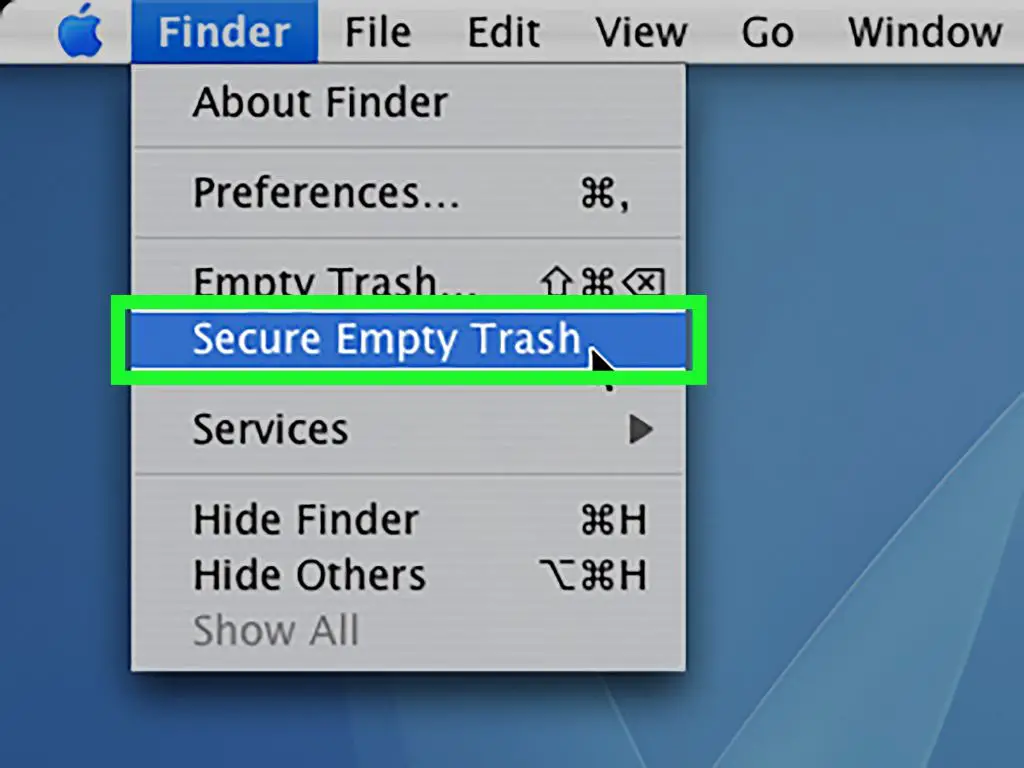
Delete via Trash
One way to delete a locked file on a Mac is by moving it to the Trash and then emptying the Trash. This can be done using the Terminal app.
To move a locked file to the Trash with Terminal, first open the Terminal app on your Mac. Then type the following command and hit enter (replace “filename” with the actual name of the locked file):
mv filename ~/.Trash
This will move the locked file to your Trash without needing to unlock it first. Then to fully delete the locked file, simply empty the Trash by right-clicking on the Trash icon and selecting Empty Trash.
The advantage of using the Terminal to move locked files to the Trash is it avoids the need to unlock the file first before deleting. Just be sure to empty the Trash after moving the locked file to fully remove it from your system.[1]
Use a Third Party App
One of the easiest ways to force delete locked files on a Mac is by using a third party app that’s designed for this purpose. Apps like CleanMyMac X include special tools to safely delete stubborn locked files and folders.
CleanMyMac’s Smart Scan feature can detect junk files that may be locked on your system. You can then review these files and delete them with one click. The app bypasses Apple’s System Integrity Protection to force delete locked files, without needing to disable SIP or use terminal commands.
Other handy utilities in CleanMyMac X include uninstalling stubborn apps, erasing large hidden files, freeing up storage space, and optimizing performance. So it provides an all-in-one way to clean up locked files as part of a complete Mac optimization.
The benefit of using a dedicated app like this is that it provides an intuitive graphical interface to handle locked files, instead of needing terminal expertise. And the smart scanning locates locked files automatically, saving you time hunting them down.
Reset File Permissions
After deleting a locked file, it’s a good idea to reset the permissions on that file or folder to avoid potential issues in the future. Here are the steps for resetting permissions on Mac:
1. In Finder, right-click on the file or folder and select “Get Info.”
2. In the Info window, click the arrow next to “Sharing & Permissions” to expand that section.
3. Click the lock icon in the bottom right corner to unlock it.
4. At the bottom of the Sharing & Permissions section, click the “Reset” button to reset permissions to their default settings.
You may need to enter your admin user name and password. Resetting permissions will remove any custom permission settings that were previously set.
According to Apple’s support documentation, resetting permissions can often resolve issues with being unable to delete locked files (1).
Avoid Locked Files
There are several ways you can proactively avoid running into locked files on your Mac in the future:
Set appropriate file permissions – Make sure you are not setting restrictive permissions on files that could lead to them becoming locked. Use the Get Info window to set open permissions where possible.
Perform regular system maintenance – Do occasional checks for files that may have incorrect permissions set and reset them if needed. Also run maintenance routines like permissions repairs and clearing caches.
Install software and OS updates promptly – Keeping your system up-to-date will ensure you have the latest security fixes and optimizations to avoid potential issues that could lead to locked files.
Use anti-malware software – Malware infections can sometimes cause system changes that result in locked files. Using anti-malware protection can prevent this.
Avoid force-quitting apps – Forcibly quitting apps can cause locked files in some cases. Try to properly save/close files before quitting an app.
Back up regularly – Having backups ensures you have copies of your files should they become locked. You can then restore from a backup rather than trying to unlock the original.
Understanding permissions and setting them appropriately, keeping your system maintained, and having proper security measures in place will help you avoid the headache of locked files in the future.
Recover Deleted Files
If you ended up deleting the locked file and need to recover it, there are a few options:
Use Time Machine to restore the deleted file. Time Machine automatically backs up your Mac and saves previous versions of files. You can restore deleted files by navigating to the Time Machine interface and finding the file in a previous backup [1].
Try file recovery software like Data Rescue or Disk Drill. These apps can scan your hard drive and recover deleted files even if you emptied the Trash [2]. Some file recovery software offers a free trial so you can see if the deleted file can be recovered before purchasing.
If you don’t have a backup or recovery software, you may be able to recover the deleted file using the terminal. Run commands like grep -a -B100 -F "search phrase" /dev/diskX to scan the hard drive for traces of the deleted file contents that may still exist. This method requires some technical skill.
As a last resort, you can take the Mac to a data recovery service but this can be expensive and not guaranteed to recover the deleted file.
To avoid needing file recovery in the future, be sure to regularly back up your Mac using Time Machine or another backup service.
Summary
In summary, there are various options for force deleting locked files on Mac:
– The simplest option is to check and reset file permissions using Get Info or the chmod command. Unlocking the file allows normal deletion.
– For advanced users, the sudo rm command in Terminal can force delete any file. However it’s risky with no recycle bin recovery.
– You can try deleting locked files via the Trash as an alternative to Terminal. Just be aware that some files may still require chmod or unlocking first.
– Third party apps like OmniDiskSweeper or AppCleaner include force delete functions as well, providing a GUI for convenience.
Overall the most effective options are to unlock the file first before deletion, or use Terminal for force deletes. Just remember to be cautious to avoid accidentally deleting important files.
