Trying to delete files from a write-protected USB drive can be frustrating. The write-protection prevents files from being modified, which includes deleting files. However, there are a few methods you can use to force delete files from a write-protected USB drive.
What Does Write-Protected Mean?
A USB drive that is write-protected cannot be written to. This means new files cannot be saved to the drive and existing files cannot be deleted or modified. There is usually a physical switch on the USB drive that toggles write-protection on and off.
Write-protection is useful for keeping the data on a USB drive from being accidentally changed or deleted. It essentially makes the drive read-only. But sometimes you may need to delete files from a write-protected drive when you no longer need the data.
Why Can’t I Delete Files Normally?
When you try to delete a file from a write-protected USB drive, you’ll get an error saying something like “Access denied” or “Cannot delete file.” This is because the write-protection prevents any changes to the drive.
The write-protection locks the drive into read-only mode, so the normal delete operations do not work. The drive will simply refuse commands to delete, modify, or overwrite files.
Method 1: Disable Write Protection
The most straightforward way to delete files from a write-protected drive is to simply disable write protection. This unlocks the drive and allows you to delete files normally.
To disable write protection:
- Locate the physical write-protect switch on the USB drive. This is typically on the side of the drive.
- Slide the switch so it is in the opposite position. This usually means sliding it forwards or upwards.
- The drive is now writeable. Try deleting files again and it should now work.
Once you’ve deleted the files, you can re-enable write protection by sliding the switch back to the original locked position if desired.
Method 2: Format the USB Drive
Formatting the USB drive will also delete all files and remove write protection. Formatting resets the drive to a clean, writable state.
To format the drive on Windows:
- Open File Explorer and right-click on the USB drive.
- Click “Format…”
- Choose FAT32 or exFAT as the file system.
- Check the “Quick Format” box.
- Click “Start” to begin formatting.
On Mac:
- Open Disk Utility.
- Select the USB drive.
- Click “Erase” at the top.
- Choose “MS-DOS (FAT)” as format.
- Click “Erase” to format the drive.
This will completely wipe the drive and remove all files and write protection.
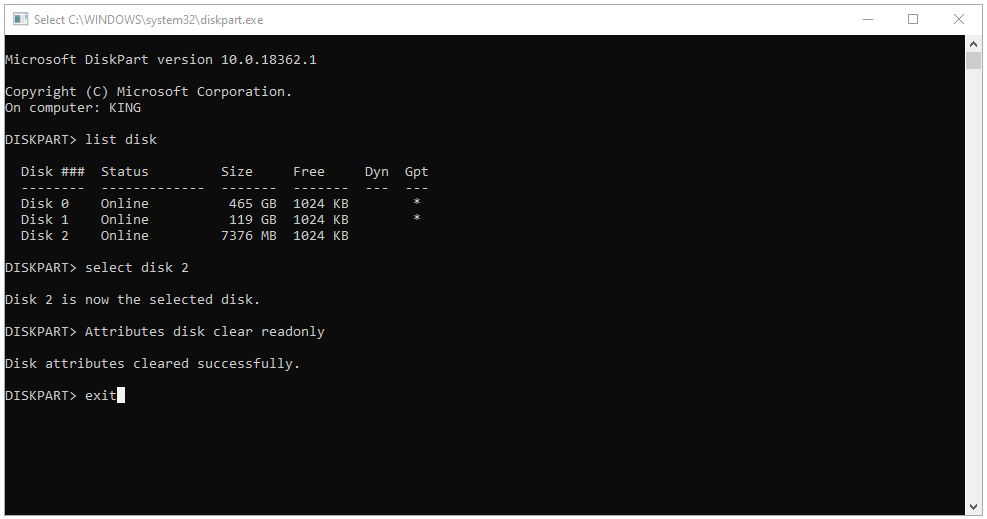
Method 3: Use Diskpart to Clean and Removable BitLocker
Diskpart is a command line tool built into Windows that can be used to clean and reformat a drive. This forces the drive into a writable state.
To use Diskpart:
- Type “diskpart” in the Windows search box and open it.
- Type “list disk” to show disks. Identify the disk number of the USB drive.
- Type “select disk X” where X is the disk number.
- Type “clean” to remove all files and formatting.
- Type “create partition primary” to reformat the disk.
- Type “format quick fs=fat32” to quick format it as FAT32.
- Type “exit” when done.
This will force delete all files by cleaning the disk. Be very careful to choose the correct disk, as this will erase anything on that disk.
Method 4: Use the Diskpart ‘removable’ Command
Diskpart also has a special “removable” command that can force a drive to be writable.
To use it:
- Open Diskpart.
- Type “list disk” and identify the USB drive.
- Type “select disk X” where X is the drive number.
- Type “removable on” to unlock the drive.
- Type “clean” to wipe files.
- Type “create partition primary” to reformat.
- Type “format quick fs=fat32” to quick format FAT32.
- Type “removable off” to re-enable write protection.
- Type “exit” to close Diskpart.
This forces the drive into a writable state so files can be deleted. It then re-enables write protection when done.
Method 5: Use SD Card Formatting Software
There are third party programs designed for formatting removable media like USB drives and SD cards. Many of these tools can remove write protection.
SD Card Formatter is a free utility that works well for this on Windows and Mac:
- Download and install SD Card Formatter.
- Insert the write-protected USB drive.
- Open SD Card Formatter.
- Select the USB drive.
- Click “Option” and check “Quick Format”.
- Click “Format” to erase and reformat the drive.
This overrides the write protection and deletes everything. Other tools like HP USB Disk Formatter or Ridgecrop Consultants USB Formatter work similarly.
Method 6: Initialize the Disk in Disk Management
Initializing a disk in Windows Disk Management will also get around write protection.
To do this on Windows:
- Go to Control Panel > Administrative Tools > Computer Management.
- Select Disk Management on the left pane.
- Right-click the USB drive and choose “Initialize Disk.”
- In the popup, check “Quick Format” and OK to initialize.
This will delete all data and reformat the disk, ignoring the write protection.
Method 7: Use Diskpart to Clean All Partitions
If initializing the disk in Disk Management doesn’t work, Diskpart has an option to clean all partitions that should force the drive to become writable.
To do this:
- Open Diskpart.
- Type “list disk” and identify the USB drive.
- Type “select disk X” (where X is the drive number).
- Type “clean all”. This will erase all volumes and partitions.
- Type “create partition primary” to create a new volume.
- Type “format quick fs=fat32” to quick format FAT32.
- Type “exit” when done.
Using “clean all” instead of just “clean” forces the removal of all partitions, ensuring the disk is writable again.
Method 8: Remove BitLocker Encryption
If the USB drive has BitLocker encryption enabled, this can sometimes trigger write protection. Removing BitLocker allows the drive to be deleted and formatted normally.
To disable BitLocker:
- Go to Control Panel > BitLocker Drive Encryption.
- Click “Turn off BitLocker” for the USB drive.
- Enter the encryption password if prompted.
BitLocker will then decrypt the drive and disable write protection.
Method 9: Use Third Party Encryption Tools
Some USB drives use third party encryption tools like EncryptStick, SafeStick, or FlashSecurity to enforce write protection. You may need to temporarily decrypt the drive before you can format it.
If you don’t know the password, these tools may have a “force reset” option that can disable encryption without it. This disables write protection so the drive can be erased.
Check the documentation for the specific encryption software used on the drive for more details on resetting it.
Method 10: Cover the Write Protect Notch
Some USB drives achieve write protection through a small notch in the corner of the metal casing. Covering this notch tricks the drive into enabling writes.
To do this:
- Locate the small notch on outer metal casing of the USB drive.
- Use a piece of tape, paper, or anything that can block the notch completely.
- With the notch covered, the drive should now be writable and can be formatted.
- Remove the cover to re-enable write protection once done.
This method won’t work on all drives, but works as a simple trick for some models.
Conclusion
Write-protected USB drives prevent file deletion normally, but there are still ways to force delete files. The easiest options are to disable the physical write protection switch, format the drive, or initialize the disk. Tools like Diskpart and SD Card Formatter can override write protection. For encrypted drives, decrypting or resetting first may be necessary.
With the right tools, any write-protected drive can be reset to a normal writable state. Just be careful when initializing disks, as this will permanently erase all data. Back up anything important before attempting to format a protected drive.