Restoring your iPhone using iTunes can be necessary if you need to rollback your device to a previous state, experience software issues, or prepare it for resale. Forcing a restore initiates a complete wipe and reinstallation of iOS, erasing all settings, content, and apps in the process.
There are a few main reasons you may need to force your iPhone to restore on iTunes:
- You’re having major software issues or crashes that a normal reset does not fix.
- You want to unlink the iPhone from an Apple ID before selling it or giving it away.
- You forgot your passcode and need to reset the device.
This guide will walk through the full process to force an iPhone restore using iTunes on a computer. We’ll cover the steps to back up your data, put the iPhone into recovery mode, connect to iTunes, initiate the restore, and then recover your content.
Back Up Your Data
Before restoring your iPhone, it’s crucial to back up your data first. This ensures none of your photos, messages, settings and other important information is lost in the restore process. You have two options for backing up – using iCloud or iTunes.
iCloud automatically backs up your iPhone each day when it’s charging, connected to WiFi, and the screen is locked. To check that iCloud backup is enabled, go to Settings > Your Name > iCloud > iCloud Backup. Make sure this is toggled on. You can also initiate a manual iCloud backup by going to Settings > Your Name > iCloud > iCloud Backup > Back Up Now.
Alternatively, you can back up your iPhone using iTunes on your computer. Connect your iPhone to your computer using the USB cable and open iTunes. Under Backups, select “This Computer” and then click Back Up Now. The backup will save to your computer.
For a full system restore recommended in this guide, an iTunes backup is preferable over iCloud. iTunes backs up absolutely everything on your iPhone, whereas iCloud does not include all data.
Once you’ve verified your iPhone is backed up either to iCloud or iTunes, you’re ready to proceed with restoring your iPhone.
Download Latest iTunes
Before attempting to force restore your iPhone, it’s important to make sure you have the latest version of iTunes installed. iTunes has been updated many times over the years to add new features and improve compatibility with iOS devices like the iPhone [1]. Having an outdated version of iTunes could lead to problems force restoring your iPhone.
You can download the latest version of iTunes for free from Apple’s website. Go to www.apple.com/itunes/ and click the “Download” button. This will download the iTunes installer for either Windows or Mac. Run the installer and follow the on-screen prompts to update iTunes on your computer [2].
Before force restoring, check iTunes > About iTunes to confirm you’re running the most current release. Keeping iTunes up-to-date ensures the best chance of successfully force restoring your iPhone.
Put Your iPhone Into Recovery Mode
To force your iPhone to restore in iTunes, you first need to put it into recovery mode. Recovery mode is a special state your iPhone can enter that allows you to restore it through iTunes.
Entering recovery mode is easy. The steps depend on your iPhone model:
- On an iPhone 8 or later model, press and quickly release the Volume Up button. Then press and quickly release the Volume Down button. Finally, press and hold the Side button until you see the recovery mode screen.
- On an iPhone 7 or iPhone 7 Plus, press and hold the Side and Volume Down buttons at the same time. Keep holding them until you see the recovery mode screen.
- On an iPhone 6s or earlier, press and hold the Lock button and Home button at the same time until the recovery mode screen appears. The Lock button is on the top or right side of your iPhone.
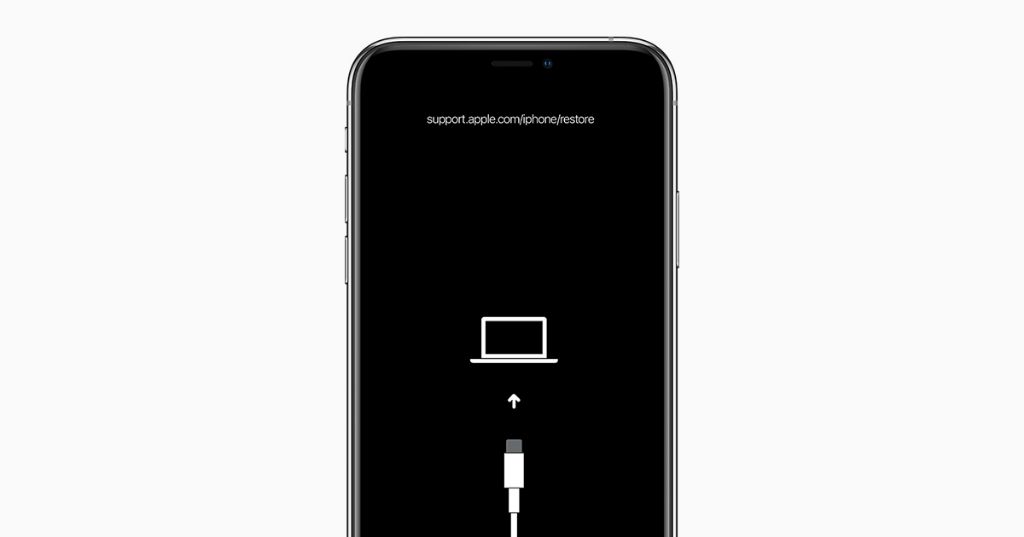
You’ll know your iPhone is in recovery mode when you see the Connect to iTunes screen. This shows an iPhone icon with a cable pointing to a computer.
As this guide mentions, recovery mode is an important troubleshooting step to take if your iPhone is having major issues updating or restoring. Using the hardware buttons to trigger it gets your iPhone into the necessary state before restoring through iTunes.
Connect iPhone to Computer
To connect your iPhone to your computer, you will need a Lightning to USB cable. Apple’s official Lightning to USB Cable is recommended, but high-quality third party cables like those from Paracable will also work.
Use the Lightning end of the cable to plug into the Lightning port on the bottom of the iPhone. Use the USB end of the cable to plug into an open USB port on your computer. For best results, plug directly into a USB port on the computer rather than into a hub or splitter.
Once connected, your iPhone should show up in iTunes if you have that open, or it will be accessible from the Finder on a Mac or File Explorer on a Windows PC.
Force Restore in iTunes
Once your iPhone is in recovery mode and connected to your computer, you can force a restore in iTunes. This will erase all data and settings and restore your iPhone to factory default settings.
In iTunes, you will see a recovery mode alert stating that your iPhone is in recovery mode and needs to be updated or restored. Click “Restore” to proceed.
iTunes will warn you that restoring will erase all data and settings from your iPhone and install the latest software. Click “Restore” again to confirm.
iTunes will now download the latest iOS software file and restore it to your iPhone. This process can take some time depending on your internet connection speed.
Make sure your iPhone stays connected and do not disconnect it until the restore is fully complete. Once finished, iTunes will take your iPhone out of recovery mode and you can set it up like new.
Wait for Restore to Finish
The time it takes for your iPhone to fully restore can vary depending on the size of your backup, the specific iPhone model, and the speed of your computer and internet connection. Generally, an iPhone restore from an iTunes or iCloud backup takes between 15 minutes to 4 hours [1].
You will see a progress bar in iTunes indicating the status of the restore process. The progress bar may start and stop periodically as different components are restored. Some common progress bar messages you may see include “Preparing iPhone for restore”, “Restoring iPhone”, “Verifying restore with Apple”, and “Finishing restore process”. Just let the process complete, even if it seems stuck for a while.
As a benchmark, restoring a 256GB iPhone from an iCloud backup can take around 2-3 hours. Smaller 16GB models may only take 30 minutes. If your progress bar gets stuck for several hours with no change, you may need to force restart your iPhone and try again [2].
Restore from Backup
After the restore process finishes, you’ll be asked to set up your iPhone. At this point, you can choose to restore from a backup. You have two options for backups to restore from: iCloud backup or a backup saved on your computer through iTunes.
If you backup to iCloud, you’ll see a list of all available iCloud backups associated with your Apple ID. Simply select the desired backup from the list and your iPhone data and settings will be restored from that point. iCloud backups are unencrypted by default, but you can choose to encrypt your iCloud backups for added security.
For backups stored locally through iTunes, you’ll need to select the device backup you wish to restore from. Keep in mind iTunes backups can be encrypted or unencrypted. Encrypted backups protect your data and are password protected. Unencrypted backups are accessible to anyone with access to the backup files.
Once you’ve selected the desired backup, the restore process will begin and your iPhone will be returned to the state saved in that backup.
Sync iPhone with iTunes
Once the restore process is complete, you can sync your iPhone with iTunes to transfer your media, apps, and settings back onto your device. Connect your iPhone to your computer using the USB cable and open iTunes. In iTunes, click on your iPhone icon. This will show the sync options for your device.
You can choose which media and apps to sync from your iTunes library to your iPhone. For example, under the Music section, check the boxes for the playlists and albums you want to transfer. Do the same for Movies, TV Shows, Podcasts, Books, and Apps. iTunes will copy the selected content back onto your iPhone during the next sync.
Under the Summary tab, you can also choose to encrypt your iPhone backups for increased security. Encrypted backups are password protected. You can also toggle on automatic syncing if you want your iPhone to sync each time you connect it.
Once you have configured your sync settings, click Apply in the bottom right corner to start the sync process. Let iTunes transfer your selected content back onto your iPhone. Syncing helps restore your apps, settings, and media while keeping your iPhone up to date with your iTunes library content.
Conclusion
In summary, forcing an iPhone restore in iTunes involves backing up your data, downloading the latest version of iTunes, putting your iPhone into recovery mode, connecting it to your computer, and selecting the Restore option in iTunes. It’s important to wait for the restore process to fully complete before unplugging your device.
To avoid issues with restoring, make sure you regularly back up your iPhone and keep iTunes up-to-date. Avoid interrupting the restore process in any way. If you encounter errors or problems restoring your device, you can try restarting both the iPhone and computer, using a different USB cable, updating to the newest iOS version, or contacting Apple support.
Restoring your iPhone through iTunes can fix many system issues and refresh the device. Just remember to back up first so you don’t lose data. With some patience, the restore process should successfully reset your iPhone to factory settings.
