With the rise in popularity of both Mac and Windows computers, the ability to share files and data seamlessly between the two operating systems has become increasingly important. Cross-platform compatibility allows users to access and modify files regardless of which OS they are currently using. Formatting an external drive to work with both Mac and Windows gives you a portable storage solution and flexibility when transferring and sharing files between computers.
There are a couple different formatting options to make an external drive readable and writable on both Mac and PC. The two main file system formats that provide this cross-platform functionality are FAT32 and exFAT. FAT32 is compatible with all versions of Windows and Mac, but has some limitations like a 4GB file size limit. exFAT is a newer file system without some of the restrictions of FAT32, but requires newer OS versions on both Mac and Windows to work. In this article, we’ll take a closer look at both formatting options and walk through the steps to format a drive on either OS.
Filesystem Differences
One of the biggest considerations when formatting a drive for cross-platform compatibility is the filesystem. Mac OS uses HFS+ as its native filesystem, whereas Windows uses NTFS. There are some key differences between these filesystems that impact cross-platform usage.
HFS+ (also known as Mac OS Extended) is optimized for macOS. It allows features like resource forks and file-level permissions. However, HFS+ lacks some features like file compression and file-level encryption that are built into NTFS. HFS+ also does not officially support writing from Windows without additional drivers, although reading HFS+ drives works fine.1
In contrast, NTFS is optimized for Windows. It supports advanced features like file compression, encryption, and permissions. The downside is that macOS can only read NTFS drives by default – writing requires installing additional software. NTFS is also less efficient than HFS+ at handling many small files. 2
In summary, HFS+ and NTFS have limitations for cross-platform usage. HFS+ does not allow writing from Windows, while NTFS is read-only on macOS by default. To make a drive seamlessly accessible on both platforms, a different filesystem is required.
FAT32 Format
FAT32 is a file system format developed by Microsoft in the mid-1990s for use with Windows 95 OSR2. It supersedes the older FAT16 format and is designed to support larger partition sizes. Some key characteristics of FAT32 include:
Overview:
- Maximum partition size of 2 TB
- Maximum file size of 4GB
- Uses 32-bit disk addressing for improved efficiency
- Compatible with Windows 95 OSR2 and later Windows versions
- Also compatible with macOS and other operating systems
Advantages:
- Wide compatibility – supported by all major operating systems (https://www.profolus.com/topics/fat32-advantages-and-disadvantages/)
- Good for small removable media like USB flash drives
- Simpler disk structure compared to NTFS
Disadvantages:
- 4GB maximum file size limit (https://superops.com/ntfs-vs-fat32)
- No built-in file compression like NTFS
- Lack of security features like encryption and permissions
- Not ideal for modern high capacity hard drives
exFAT Format
exFAT is a file system format created by Microsoft in 2006. It was designed to be utilized on flash drives and SD cards as an alternative to FAT32, with support for much larger file and partition sizes.
exFAT offers several advantages over the older FAT32 file system when used on flash drives and other external storage devices (exFAT):
- Supports individual files up to 16 exbibytes in size, compared to FAT32’s limit of 4 gigabytes per file.
- No realistic limit on volume size, unlike FAT32’s 8 terabyte limit.
- Faster file saves and deletions due to its optimization for flash memory.
- Lower memory and CPU usage compared to NTFS.
In terms of cross-platform compatibility, exFAT is supported natively in macOS 10.6.5 and higher and Windows XP and higher. This makes exFAT a good choice for external drives that will be transferred between Mac and Windows computers frequently (exFAT for cross-platform).
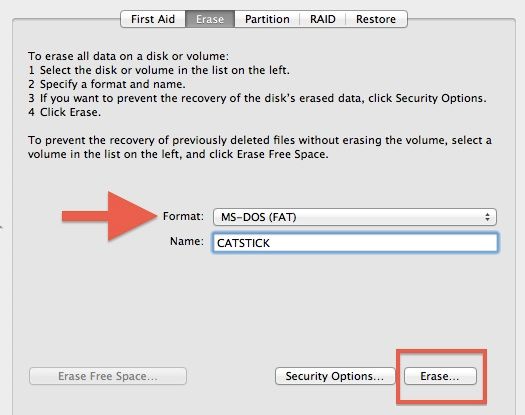
Formatting in macOS
Here is a step-by-step guide to formatting a drive as FAT32 or exFAT on Mac:
-
Connect the external drive to your Mac.
-
Open Disk Utility (located in Applications > Utilities).
-
Select the external drive from the left side panel.
-
Click Erase at the top.
-
Choose a name for the drive, select FAT32 or exFAT as the format, and click Erase.
-
Wait for the formatting process to complete. The drive will now be formatted for use on both Mac and Windows.
It’s important to back up any data on the drive first, as formatting will erase all existing data. FAT32 has a 4GB individual file size limit, while exFAT does not. So if you need to store files over 4GB, choose exFAT. Otherwise FAT32 is compatible with more devices.
Some helpful tips when formatting on Mac:
-
Make sure to eject the drive before disconnecting it after formatting.
-
If you accidentally format the wrong drive, stop the process immediately and use data recovery software to attempt restoring the data.
-
reformatting an existing drive will erase all data, so always backup first.
Sources:
https://www.reddit.com/r/Serato/comments/15mqrmh/macbook_external_drive_formatpartition/
https://tr-ex.me/translation/english-korean/external+drive
Formatting in Windows
Here is a step-by-step guide to formatting a drive as FAT32 or exFAT on Windows:
-
Open File Explorer and right-click on the drive you want to format.
-
Select “Format” from the menu.
-
Under “File system” select “FAT32” or “exFAT”.
-
You can also change the volume label if desired.
-
Check the “Quick Format” box.
-
Click “Start” to begin formatting.
-
A window will pop up to confirm formatting – click “OK”.
-
The formatting process will now run. This can take a few minutes depending on drive size.
-
When done, the drive will be formatted as FAT32 or exFAT as specified.
The drive is now formatted and ready for cross-platform use between Windows and Mac.
File Transfer
When transferring files between Mac and PC, the best practice is to use a file transfer protocol or service that maintains compatibility. Here are some top options:
Cloud storage services like Dropbox, Google Drive, or Box make it easy to access the same files from both Mac and PC. You can simply save files to the cloud folder on one computer and access them seamlessly on the other. Cloud services maintain compatibility for most file types.
Using an external hard drive or flash drive formatted to a cross-platform file system like FAT32 or exFAT allows you to directly transfer files by plugging into either Mac or PC. This provides a quick way to manually move files back and forth.
File sharing over a local network is another option for Mac to PC file transfers. You can enable file sharing on both computers and transfer files between them as needed. This requires both devices be on the same network but doesn’t require any external devices or services.
Tools like Apple’s Boot Camp allow you to install Windows directly on a Mac. This provides full file system compatibility in one device. Virtualization tools like Parallels or VMWare Fusion also allow you to run Windows on Mac, enabling seamless file transfers between the virtual OS and native macOS.
No matter which method you choose, the key for smooth file transfers is using a file system or service that retains cross-platform compatibility. FAT32, exFAT, cloud services, and virtualization tools are good options to ensure your files transfer easily between Mac and PC.
Optimization
There are a few tips for optimizing your external drive’s performance when sharing between Mac and PC:
On Windows, defragmenting and optimizing your drive can help improve performance. According to Seagate, formatting your external drive to NTFS can optimize it for use with Windows.
However, defragmentation is not necessary for Macs. As noted on the MacRumors forums, macOS automatically manages optimization in the background.
You can also partition your external drive into separate sections for Mac and PC, which helps organize your data more efficiently, according to Digital Trends.
Overall, formatting to NTFS on Windows and allowing macOS to handle optimization automatically can help maximize performance.
Troubleshooting
Here are some common problems and solutions when formatting a drive for Mac and PC compatibility:
External hard drive not mounting on Mac: This is a common issue and can occur if the drive was formatted incorrectly or uses an incompatible file system. Try reformatting the drive with exFAT or FAT32 which are compatible on both Mac and PC. You can use Disk Utility on Mac to reformat the drive. [1]
External hard drive not showing full capacity: Sometimes when formatting a drive, it may show less capacity than advertised. This is usually because the drive used some space for formatting overhead. You can fix this by reformatting the drive, making sure to do a full format to reclaim all the space. [2]
Errors transferring files between Mac and PC: If you run into errors moving files between Mac and PC, it’s likely due to incompatible file types. Mac uses HFS+ while Windows uses NTFS, so those formats may cause transfer issues. Stick to exFAT or FAT32 for smooth cross-platform file transfers.
Slow transfer speeds: This can occur if the drive is connected via USB 2.0 instead of USB 3.0, or if the drive is formatted with FAT32 which has a 4GB size limit per file. Use USB 3.0 ports and exFAT format instead.
Summary
Formatting a drive for compatibility between Mac and PC requires careful consideration of the filesystem options available. The key steps are:
– Determine your use case and storage needs to pick the right filesystem – FAT32 for smaller drives, exFAT for larger drives.
– Back up any data on the drive before reformatting.
– On macOS, use Disk Utility to format the drive with your chosen filesystem.
– On Windows, use the Disk Management utility to reformat the drive.
– After formatting, optimize the drive by checking for errors and partitioning if needed.
– Transfer files between Mac and PC to test compatibility.
– Troubleshoot any issues by reformatting or trying a different filesystem if needed.
With the proper filesystem choice and formatting steps, you can create an external drive that seamlessly works across both Windows and macOS.