Formatting a drive in Disk Utility on a Mac is a straightforward process that can be completed in just a few steps. Properly formatting a drive erases all data and prepares it for use with a Mac. There are a few key things to know before formatting a disk using Disk Utility on a Mac.
When to Format a Disk
There are several instances when you may need to format a drive on your Mac:
- When you purchase a new external hard drive or SSD
- To erase all data before selling or giving away a disk
- To resolve disk errors or instability
- To change the format of a drive, like from Windows (NTFS) to Mac (APFS)
New disks will be unformatted out of the box and will need to be formatted for use with your Mac. Formatting completely erases all content on the drive, so make sure to backup your data beforehand.
How to Format a Drive on Mac
Here is the step-by-step process to format an external or internal disk using Disk Utility on Mac:
- Connect the drive you want to format to your Mac if it is an external drive. Make sure any data you want to keep on the drive is backed up.
- Open Disk Utility, which is located in your Mac’s Applications > Utilities folder.
- In the sidebar, select the disk you want to format. Make sure you select the disk, not a container on the disk.
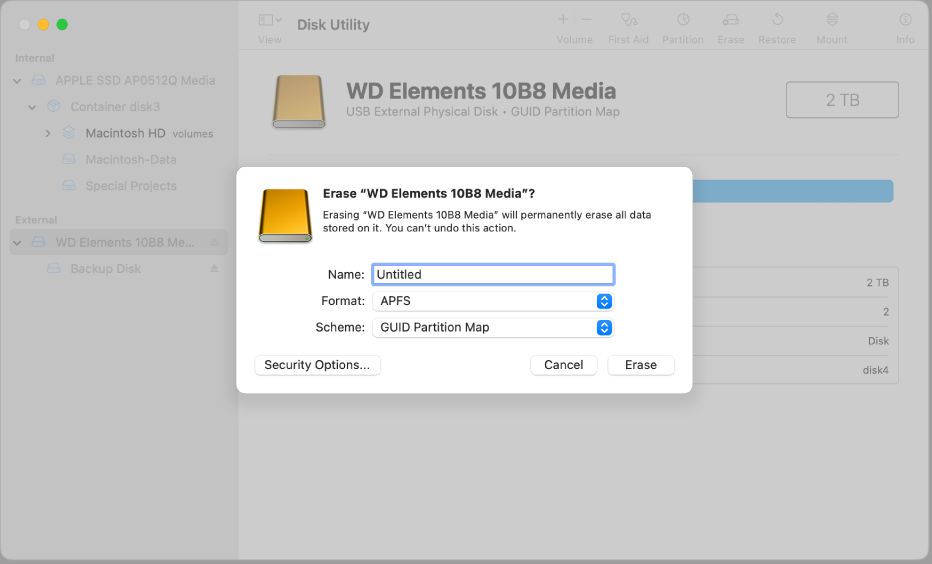
- Click Erase along the top toolbar.
- In the pop-up window, enter a name for the disk.
- Choose a format for the drive. For general Mac use, APFS is recommended.
- Click Erase to start the formatting process.
That’s all there is to it! Disk Utility will quickly format the drive and prepare it for use. The formatted drive will now show up ready to use in Finder when connected to your Mac.
Choosing a Format Type
When formatting a drive in Disk Utility, you have several format options to choose from. The most common types include:
- APFS (Apple File System): The modern format used for flash drives and SSDs. Optimized for solid state drives.
- Mac OS Extended (Journaled): The older Mac format to support HDDs. Less relevant with modern SSDs.
- exFAT: A compatible format between Mac and Windows. Useful for external drives to transfer files.
- FAT32: An older Windows format. Only supports smaller drives.
For general day-to-day use on a Mac, APFS is typically recommended as it is optimized for modern drives. exFAT is useful for external disks that you want to transfer between Mac and Windows. Mac OS Extended (Journaled) is best for older mechanical hard drives.
Additional Formatting Options
Disk Utility offers a few additional formatting choices:
- Name: The name for the formatted drive. Can be customized to your liking.
- Scheme: Either GUID Partition Map or Master Boot Record. GUID is newer and works with all Macs.
- Encryption: Optionally encrypt the disk with a password for added security.
The most important setting is the format type (APFS, Mac OS Extended, etc). The name can be customized so the drive is easily identifiable. The encryption option is useful if you want to protect sensitive data on the disk.
Time to Format a Drive
Formatting a drive only takes a few moments, but completely erases all data on the disk. So make sure you have backups of anything important before formatting. When Disk Utility finishes, the drive will be blank and ready to use.
Some key things to keep in mind when formatting a disk include:
- Back up your data first
- Select the full disk, not a container
- Choose your desired format (usually APFS or exFAT)
- Enter a name for the disk
- Click Erase to start formatting
Now you have the steps to follow when you need to format a fresh drive or erase all data off a disk. Formatting using Disk Utility is fast, easy, and prepares the drive for use on your Mac.
Frequently Asked Questions
Why is my drive read-only in Disk Utility?
If your drive shows up as read-only in Disk Utility, it means you are only able to view the contents and not able to make changes to the disk. Some common reasons include:
- The drive is formatted as NTFS for Windows. Remounting the disk may fix it.
- The drive is encrypted with FileVault or a third-party tool.
- You don’t have administrator privileges for the disk.
- There are disk errors making the drive unwritable.
Try remounting the NTFS disk. For encrypted drives, make sure you have unlocked the disk. If you get permission errors, add your user as an administrator in System Preferences > Users & Groups. Disk errors may require repairing the disk first.
How can I repair disk errors in Disk Utility?
If your disk is acting abnormal or showing errors, Disk Utility can be used to verify and repair common disk problems. Here are the steps:
- Open Disk Utility and select the problematic disk.
- Click First Aid in the top toolbar.
- Run Verify Disk to scan for and detect errors.
- If errors are found, click Repair Disk to fix the issues.
- Repeat Verify Disk to ensure the errors are now fixed.
The First Aid feature in Disk Utility is great for troubleshooting basic disk problems before you reformat. Make sure you run Verify Disk first to scan for errors before attempting Repair Disk.
Can I stop formatting a disk mid-process?
It is not recommended to stop formatting a disk mid-process. Once the formatting starts, it is best to let it fully complete. Interrupting the process can lead to errors or data corruption.
However, if you absolutely must stop formatting a drive urgently, you can force quit the Disk Utility app. Just launch Activity Monitor and find the Disk Utility process. Select it and click the “X” stop button to force it to quit. Again, only do this in an emergency.
In most cases, just be patient and wait for the formatting to finish. Rushing or interrupting the process risks botching the format and leaving your disk unusable.
How can I recover data after formatting a disk?
If you accidentally formatted a disk that had important data on it, recovery may be possible using data recovery software. Some options include:
- Data Rescue – Specialized Mac data recovery software.
- Stellar Data Recovery – Multi-platform data recovery with deep scanning.
- Disk Drill – Free data recovery app with premium upgrade.
- Photorec – Open source data recovery tool.
The quicker you act after a reformat, the better chance of recovery. Avoid writing new data to the drive. Data recovery costs vary but can retrieve gigabytes of lost data in many cases.
Conclusion
Formatting a disk using Disk Utility on Mac is a quick and simple process. By following the step-by-step guide, you can easily erase, repartition, and reformat any internal or external drive on your Mac. Just remember to backup your data beforehand.
Choosing the optimal format type for your needs and properly selecting the target disk avoids common issues. Additional options like encryption provide added flexibility. With just a few clicks your disk will be erased and ready to use.
Now you have the knowledge to confidently format disks using Disk Utility on your Mac. So upgrade to a new drive or repurpose an old one by reformatting it to keep your data organized and your Mac running smoothly.