Formatting a new hard drive is an essential step before you can use it to store files, whether you are using Windows or Mac. The formatting process prepares the hard drive by creating a file system on the disk so your operating system can read and write data. This article provides step-by-step instructions on how to properly format a new hard drive for use with Windows and Mac.
What is Disk Formatting?
Disk formatting, also known as initializing or partitioning a disk, is the process of preparing a new, blank hard drive for use. When you format a disk, the following things happen:
- A file system is created on the hard drive.
- The hard drive is divided into segments called partitions (for example, a C drive and D drive).
- Boot sectors and boot records are created on the hard drive.
- The hard drive is checked for errors or bad sectors.
The file system coordinates how data is stored, retrieved and updated on the hard drive. Without a file system, the operating system would not be able to make sense of the data on the disk.
The most common file systems used today are:
- NTFS (NT File System) for Windows
- HFS+ (Hierarchical File System) for Mac
- exFAT (Extended File Allocation Table) for external storage devices to be shared between Windows and Mac
When you format a new hard drive, you can choose which file system to use based on whether you will be using the drive for Windows, Mac, or both operating systems.
When to Format a New Hard Drive
Here are some common situations when you may need to format a brand new hard drive:
- You have purchased a new internal or external hard drive that you plan to use for additional storage space.
- You are installing a larger new hard drive as your primary system drive on your computer.
- You want to change the file system on an existing drive to make it compatible with your operating system.
- You need to erase all data on a used hard drive before using it for a new purpose.
- You suspect there are errors on your current hard drive and want to do a low-level format.
New hard drives will not show up or be accessible in Windows or Mac until they are initialized and formatted. Trying to use an unformatted hard drive will result in errors like “Disk not initialized” or “Unitialized” in Windows, or the drive not appearing at all in Disk Utility on a Mac.
How to Format a Hard Drive in Windows
Here are the steps to format a new hard drive in Windows 10 or 11:
- Open the Disk Management utility. You can access this by right-clicking the Windows Start menu and choosing “Disk Management”.
- The new hard drive should appear in the list of disks in the lower panel, but it will be labeled as an “Unknown” and “Not Initialized” disk. Right-click on the disk entry and choose “Initialize Disk”.
- In the next window, select either “MBR” or “GPT” partition style. MBR is compatible with older versions of Windows, while GPT works better for newer 64-bit Windows installations.
- Right-click on the “Unallocated” space on the drive and select “New Simple Volume”. Go through the wizard to create a new partition.
- Specify the partition size. The default maximum size is recommended for regular hard drive formatting. Click “Next”.
- Assign a drive letter such as “F:” for the partition. Click “Next”.
- Select “Format this volume with the following settings” and choose NTFS file system. Give the drive a descriptive label if desired. Click “Next”.
- Click “Finish” to begin the formatting process. This may take several minutes depending on the drive size.
Once done, the new hard drive will show up in Windows File Explorer ready to use. The disk preparation is now complete and you can start saving files to the newly formatted drive.
How to Format a Hard Drive on Mac
Here is how to format a new hard drive on a Mac running macOS:
- Connect the new hard drive to your Mac and power it on if it is an external drive. Internal hard drives should automatically be detected.
- Open Disk Utility on your Mac. You can find this via Spotlight or by going to Applications > Utilities > Disk Utility.
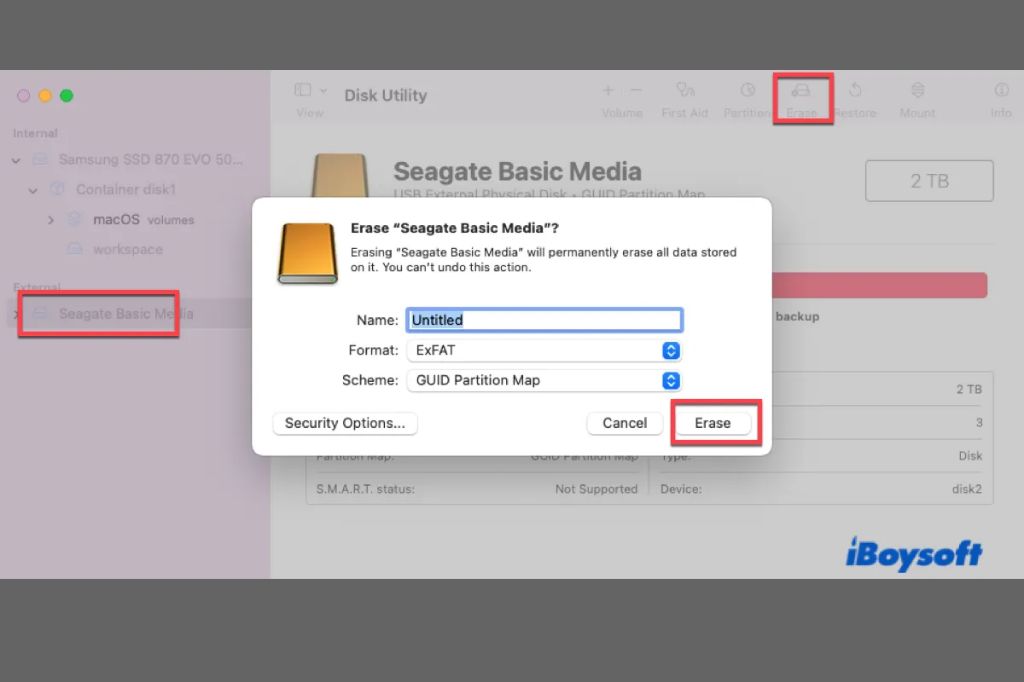
- Select the new hard drive on the left pane in Disk Utility. Make sure you choose the correct disk – double check the hard drive name and size.
- Click the “Erase” button across the top menu bar. Give the drive a name, format it as “Mac OS Extended (Journaled)” and click Erase.
- Once formatting is complete, you can close Disk Utility. The new hard drive should now be available to select as a location to save files in the Finder and other apps.
That’s all there is to it! After following these steps, macOS will be able to read and write data to the newly formatted hard drive.
Choosing a File System
When initializing a disk, you will need to choose between MBR, GPT, exFAT, NTFS, HFS+, APFS, etc. What does this mean and which file system is right for your needs?
MBR vs GPT
MBR and GPT are two partition table styles that affect how the partitions on your hard drive are defined and accessed by the OS. MBR (Master Boot Record) is the older legacy option compatible with BIOS systems. GPT (GUID Partition Table) is newer and designed for modern UEFI firmware. Here’s a comparison:
| MBR | GPT |
| – Compatible with BIOS and older operating systems | – For newer UEFI systems and 64-bit Windows |
| – Limited to 4 primary partitions | – No limit on number of partitions |
| – 32-bit LBA, supports up to 2TB per partition | – 64-bit LBA, supports massive drives up to 9.4 ZB |
| – Prone to partition loss from mistakes | – More robust against human error |
For most home users today, GPT is the best choice because it supports large high-capacity hard drives on modern systems. MBR remains an option if you dual boot with older OS versions or BIOS computers.
exFAT vs NTFS vs HFS+
When it comes to choosing a file system for your data partitions, you have several options:
| exFAT | NTFS | HFS+ |
| – Cross-platform file system | – Default modern Windows file system | – Default macOS file system |
| – No built-in permissions or encryption | – Advanced security features | – Journaling improves data integrity |
| – No file size limit | – Large 16TB+ file size limit | – Unlimited file sizes |
| – Fast performance | – Higher CPU overhead | – Slower compared to APFS |
As a general guideline:
- Use NTFS for internal hard drives formatted exclusively for Windows.
- Use HFS+ for internal hard drives formatted exclusively for Mac.
- Use exFAT for external portable drives to transfer files between Windows and Mac.
APFS vs Mac OS Extended
On Macs, you’ll see two options for formatting your startup drive in Disk Utility – APFS and Mac OS Extended (also known as HFS+). What’s the difference?
| APFS | Mac OS Extended |
| – Newer file system introduced in 2017 | – Legacy HFS+ format used for older macOS |
| – Supports solid state drives | – Optimized for hard disk drives |
| – Fast performance with native encryption | – Slower compared to APFS |
| – Used for SSD system drives | – Recommended for HDD data drives |
For most Mac users today, you should format your startup drive or system SSD as APFS. However, you may still use Mac OS Extended for additional external or internal hard disk drives used for extra file storage rather than running your OS.
Tips for Hard Drive Formatting
Follow these tips when initializing a new hard drive:
- Back up existing data first before formatting! Formatting erases all data on a drive.
- Choose GPT partition style for new large-capacity drives on modern PCs.
- Make sure to select the right disk to avoid accidentally erasing the wrong drive.
- Use exFAT if you will share the drive between Windows and Mac.
- Allow plenty of time to complete the format on large high-capacity hard drives.
- After formatting, check Disk Management (Windows) or Disk Utility (Mac) to verify the drive is recognized properly before saving data.
Reasons to Format a Hard Drive
Some common reasons why you may need to format a hard drive include:
- To prepare a new blank hard drive for initial use
- To change the file system to make it compatible with your OS
- To permanently delete all data on a used hard drive
- To resolve file system errors, bad sectors, or corruption issues
- To improve performance that has degraded over time
- To divide a single large drive into multiple partitions
Formatting resets the hard drive back to factory settings, erasing all your data in the process. So you should always back up important files first before formatting a used hard drive.
When Not to Format a Hard Drive
Here are some cases when you should NOT format a hard drive:
- If you need to recover lost files or data on the drive.
- If you want to remove a virus but preserve your data.
- If the drive contains your only backup of important files.
- If you are selling or giving away the hard drive with data intact.
Formatting is not necessary if you just want to securely delete certain files or folders without wiping the entire hard drive. You also don’t need to format a drive if it is already working properly with your OS.
How to Low-Level Format a Hard Drive
Low-level formatting completely erases, remaps, and tests every sector on a hard disk. It is an advanced maintenance process rarely needed for modern hard drives. Here are the steps to low-level format a drive:
- Backup anything important on the hard drive first.
- Boot into BIOS setup and find the low-level format utility, under advanced options.
- Select the drive to format and start the low-level format.
- This may take 4+ hours to complete depending on drive size.
- After it finishes, exit BIOS and boot back into Windows to partition and format the drive as usual before using it.
Low-level formatting is mainly used to fully reset and test worn or failing hard disk drives. But it is a time-consuming, destructive process. Most users will never need to do it unless advised by technical support.
Alternatives to Low-Level Formatting
For most purposes, regular formatting through your operating system is sufficient and much quicker. Other alternatives to low-level formatting when you want to sanitize or diagnose a hard drive include:
- Quick format – Only deletes file tables, not all data. Fast with no testing.
- Full format – Overwrites entire drive space before reallocating. Takes more time.
- Secure erase – Uses drive firmware commands to reset all data.
- Disk wipe utilities – Repeatedly overwrite all sectors until drive is cleared.
Low-level formatting is unnecessary for typical hard drive initialization. Using the regular high-level formatting built into your OS or a disk wipe utility is usually sufficient and much less disruptive.
Can You Recover Data After Formatting a Hard Drive?
When you format a hard drive, the file structure is recreated and previous file data is marked for overwrite. However, until those disk areas are rewritten, the original data may still exist intact but will be inaccessible through normal access methods.
It is possible to recover data after accidentally formatting a drive using file recovery software. But this relies on the files not yet being overwritten by new data saved onto the drive after formatting.
File recovery success depends on:
- How much new data has been written after formatting
- The recovery software’s capabilities to access raw disk areas
- The original file system format – unformatted drives have no file structure
For the best chance of getting data back after formatting, you must avoid writing new data to the drive and use file recovery software as soon as possible.
Steps to Recover Files After Formatting
Here are the general steps to recover files from a formatted hard drive:
- Stop using the formatted drive immediately.
- Install and scan the drive with data recovery software.
- Preview found files that are intact before recovery.
- Select the files to recover and save them to another drive.
- Analyze the health of the formatted drive before reusing.
Professional recovery software like Disk Drill has the best chance of retrieving lost data after a format. But there is no guarantee – overwriting data makes it unrecoverable.
Can You Cancel Hard Drive Formatting?
Once begun, it is not possible to stop or cancel a hard drive format process. The initialization and setup of the file system involves rewriting information across the entire disk, so it is not reversible.
However, it is usually safe to force power off the computer during formatting. The operation will be interrupted, leaving the drive in an unfinished state but without harming data. Then restart and reformat again fully before using the drive.
Turning off the computer mid-format should only be done as a last resort. It is better to wait patiently until formatting completes normally before using the drive. Rerunning the format ensures file system structures are set up properly.
Conclusion
Preparing a new hard drive for use requires initializing and formatting it correctly for your operating system. This process writes a file system structure to organize the storage space and prepare it for reading and writing data.
On Windows, use Disk Management to initialize with GPT partition style, then format partitions with NTFS. On Mac, use Disk Utility to format the drive as APFS or Mac OS Extended. For external drives, use exFAT for cross-platform compatibility.
Choose the right file system for your OS and intended drive usage. Completing the formatting process is essential to be able to fully utilize and access the full capacity on modern internal and external hard drives.