Formatting a SanDisk flash drive to be compatible with Windows is a straightforward process that can be done in just a few steps. Properly formatting the drive erases all data, allowing you to start with a clean slate. Read on for step-by-step instructions on formatting a SanDisk flash drive for Windows using the built-in Disk Management utility.
What You’ll Need
- SanDisk USB flash drive
- Windows PC
Step 1: Insert the SanDisk Flash Drive into Your Computer
First, insert your SanDisk flash drive into an available USB port on your Windows PC. You may see an AutoPlay window pop up, but you can close it or ignore it for now. The flash drive should appear as a removable disk under This PC or My Computer (depending on your version of Windows).
Step 2: Open Disk Management
The next step is to open the Disk Management utility built into Windows. This allows you to manage storage devices connected to your computer. To open Disk Management:
- Open the Start menu and search for “disk management.” Select the Create and format hard disk partitions result.
- Right-click the Start button and choose Disk Management.
- Press Windows Key + X on your keyboard and select Disk Management.
This will open the Disk Management window where you can view all disk drives connected to your PC.
Step 3: Locate Your SanDisk Drive
In Disk Management, locate your SanDisk flash drive in the list. It will likely show up as an unknown device, display the drive capacity, and be marked as Removable. You may see other storage drives listed here as well, like your main hard drive partitions.
Be very careful not to format the wrong drive!
If you’re unsure which one is your flash drive, you can try unplugging and reconnecting it to identify the correct device in Disk Management based on the change.
Step 4: Right-click the Drive and Select Format
Once you’ve identified the correct SanDisk flash drive in Disk Management, right-click on it and select Format from the menu.
Important
This will erase all data currently on the drive. Be sure you have backups before proceeding!
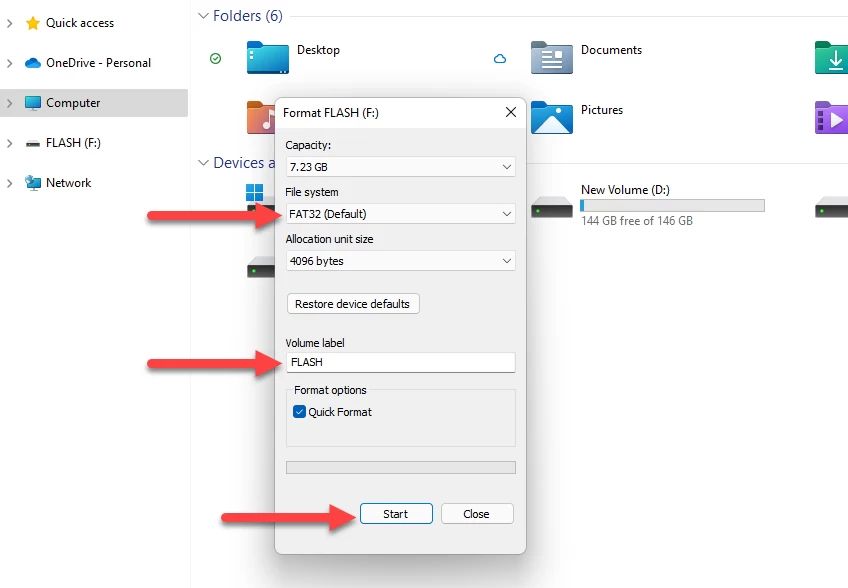
Step 5: Choose FAT32 File System
In the Format window that appears, you can configure some options for formatting the flash drive.
For the File System, choose FAT32. This is the ideal file system for USB flash drives to make them fully compatible with Windows computers.
You can give the drive a Volume Label like “USB Drive” to easily identify it later.
The Allocation unit size can be left at Default.
Make sure Quick Format is checked to format the drive more rapidly.
When ready, click Start to begin the formatting process.
Step 6: Confirm the Format
A warning message will appear to confirm you want to format the drive. Formatting will erase all current data, so be sure you have backups.
If you’re ready, click OK to confirm.
Step 7: Wait for Formatting to Finish
The format will now run. This may take a minute or two depending on the size and speed of your flash drive. The white progress bar will let you know the status.
Do not remove the flash drive during this process or the format could become corrupted.
Step 8: Close Disk Management
Once done, the flash drive will show the new FAT32 file system and designated drive letter. You can now close the Disk Management utility.
Your SanDisk USB flash drive is now formatted and ready to use on Windows PCs!
Tips for Using Your Newly Formatted Flash Drive
Here are some helpful tips for using your flash drive that’s now formatted for Windows:
- You can now use File Explorer to drag and drop files/folders to transfer data.
- For quick removal, use the Safely Remove Hardware icon in the system tray.
- For optimal performance, reformat again every 6-12 months.
- FAT32 limits file sizes to 4GB, so it won’t work for larger files.
- You can reformat again later if needed back to FAT32.
Troubleshooting Problems with a SanDisk Flash Drive
If you experience issues while using your newly formatted SanDisk flash drive, here are some troubleshooting steps:
Drive Not Detected by Windows
- Try reconnecting the drive to a different USB port.
- Check for dirt/debris in the USB connector.
- Make sure drivers are up to date.
- Try on a different computer if available.
Unable to Format
- Close other applications or restart computer.
- Use Command Prompt to format if Disk Management fails.
- Scan for viruses or malware that may block formatting.
- Drive may be damaged and unusable – contact SanDisk.
Errors Transferring Files
- Make sure files are not currently in use or open.
- File size may exceed FAT32 limit of 4GB per file.
- Drive may have physical damage causing transfer issues.
- Try reformatting again or test on a different PC.
USB Port Not Recognizing Drive
- Inspect USB port for damage, debris, bent pins.
- Try different USB ports, cables, and computers.
- Update USB drivers from device manufacturer website.
- USB port may need replacement if issue persists.
For any persistent problems, reach out to SanDisk customer support for further troubleshooting help.
Formatting a SanDisk Flash Drive on Mac
If you want to format a SanDisk flash drive for use with Macs rather than Windows PCs, the process is very similar:
- Insert the drive into your Mac.
- Open Disk Utility (located in Applications > Utilities).
- Select the SanDisk drive in the sidebar.
- Click Erase at the top.
- Choose Mac OS Extended format.
- Name the drive if desired.
- Click Erase to format.
This will format the drive in the HFS+ format that works best with Mac OS. The drive will now be compatible with Time Machine for backups.
Conclusion
Formatting a SanDisk flash drive to work optimally with Windows is straightforward using the built-in Disk Management utility. Simply locate the correct drive, right-click, choose Format, pick FAT32 as the file system, and click start. In a matter of minutes, your drive will be erased and ready to use.
Remember to be extremely careful not to format any other drive accidentally. And always backup your data beforehand. Following these simple steps though, you can have a freshly formatted SanDisk flash drive ready for file transfers, backups, and more.