What is an External SSD?
An external SSD is a solid-state drive that connects to a computer externally, typically using a USB or Thunderbolt cable (Source). Like an internal SSD, it uses flash memory instead of a spinning hard disk for storage. This makes external SSDs much faster, more reliable, and more portable than external hard disk drives (HDDs).
The main benefits of an external SSD over an HDD include:
- Faster file transfer speeds, with read/write speeds up to 10x faster than HDDs
- More durable and resistant to shocks due to no moving parts
- Smaller and lighter for easy portability
- Silent operation and runs cooler
External SSDs connect via USB 3.2 or USB-C for data transfer speeds up to 10Gbps. Newer Thunderbolt 3 connections offer speeds up to 40Gbps. This makes them ideal for tasks like transferring large files, running applications, editing media files, gaming, and as boot drives (Source).
Choosing an External SSD for Mac
When selecting an external SSD for a Mac, some key factors to consider are:
- Storage Capacity – Determine how much storage space you need. External SSDs come in a range of capacities from 500GB to 4TB or more. Consider your current and future storage needs.
- Read/Write Speeds – Faster SSDs with higher read/write speeds will improve transfer times. Look for SSDs with speeds of at least 500MB/s for optimal performance.
- Connectivity – Most external SSDs connect via USB-C or Thunderbolt 3 which offer fast transfer speeds. Ensure compatibility with your Mac ports.
- Build Quality – External SSDs come in rugged, durable designs to protect from drops and impacts during travel.
- Security Features – Some SSDs offer password protection and hardware encryption to keep data secure.
- Warranty – A longer warranty provides more coverage in case of defects. 3-5 years is common for quality SSDs.
Leading options like the Samsung T7 (Source), Sandisk Extreme, and WD My Passport SSD are optimized for use with Macs and deliver fast performance when connected via Thunderbolt 3 or USB 3.2 Gen 2 ports. Always check for compatibility with your specific Mac model before purchasing.
Formatting the Drive for Mac
When formatting an external SSD for use with Mac, you have three main file system options: APFS (Apple File System), exFAT (Extended File Allocation Table), and HFS+ (Hierarchical File System). Choosing the right format depends on your specific needs and situation.
APFS is optimized for flash/SSD storage and is the default file system for SSDs formatted on modern versions of macOS. It supports strong encryption and faster performance compared to HFS+. The downside is APFS drives can only be read by Macs running High Sierra or later. (Source)
exFAT is compatible with both Mac and Windows. It works well with large file sizes over 4GB and doesn’t have the file size limitations of FAT32. However, exFAT lacks the extra features of APFS and HFS+ like encryption, journaling, and Time Machine support. (Source)
HFS+ is the predecessor to APFS and is compatible with older versions of macOS. It supports key features like journaling, encryption, permissions, and Time Machine backups. But HFS+ performance lags behind APFS, especially on flash storage like SSDs. (Source)
In general, APFS is best for SSDs that will be mainly used with Macs, while exFAT is ideal for cross-platform SSDs. HFS+ is a good option for older Macs. The choice depends on your specific needs and setup.
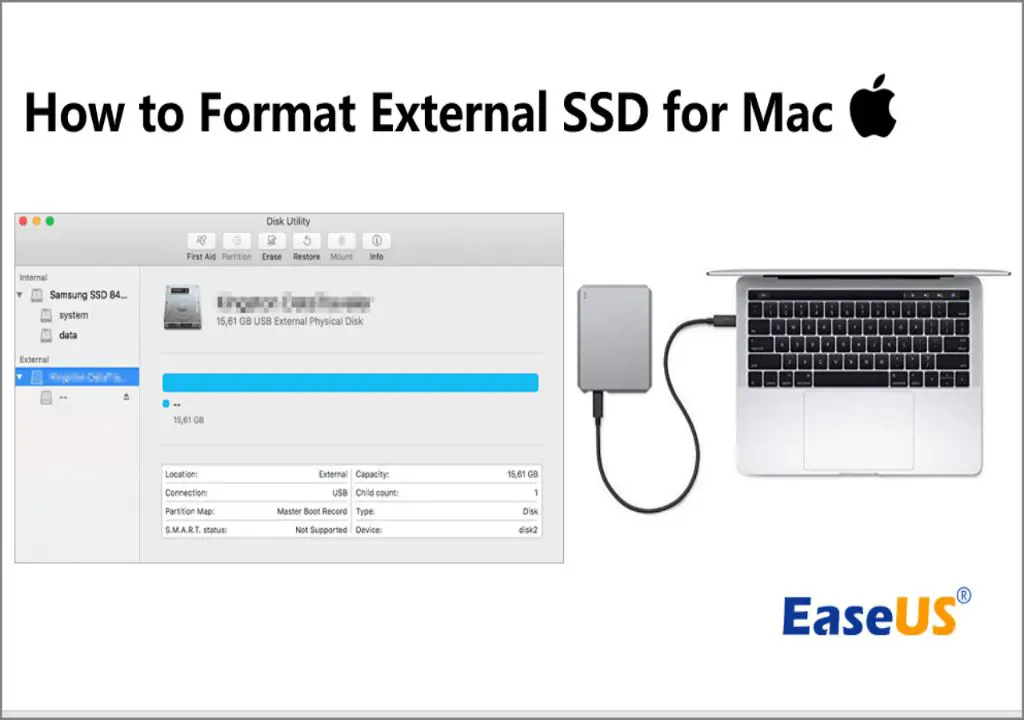
Using Disk Utility to Format
Disk Utility is the built-in disk management application on Macs. Here is a step-by-step guide to using it to format an external SSD for Mac:
- Connect the external SSD to your Mac via the USB port.
- Open Disk Utility (located in Applications > Utilities).
- In the sidebar, click on the external SSD device.
- Click the Erase button at the top.
- Give the drive a name and select MAC OS Extended (Journaled) as the format.
- Click Erase to confirm and format the external SSD.
This will completely erase all data on the external SSD and reformat it to the Apple file system. Once formatted, the external drive will be compatible with Time Machine and bootable for Macs (Apple Support).
If you want to use the drive for both Mac and Windows computers, choose ExFAT instead of MAC OS Extended during formatting.
Using Terminal to Format
You can also use the Terminal app to format your external SSD drive. Here are the step-by-step commands:
- Open the Terminal app on your Mac. You can find it in the Utilities folder or use Spotlight Search.
- Type
diskutil listand press enter. This will show all the drives connected to your Mac. - Identify the disk name for your external SSD drive. It will likely start with /dev/disk and end with the drive’s capacity.
- Type
diskutil unmountDisk /dev/diskXreplacing X with your disk name. Press enter. - Type
sudo newfs_msdos -F 32 /dev/diskXto format FAT32 orsudo newfs_hfs -J /dev/diskXto format Mac OS Extended (HFS+). Press enter and type your admin password when prompted.
This will fully format the external SSD into the specified format. Be very careful to choose the correct disk name in the commands, as selecting the wrong one could erase your internal drive. Refer to this guide for more details on using Terminal for formatting.
Choosing a Volume Format
The two main file system formats to choose from for an external SSD on Mac are APFS (Apple File System) and Mac OS Extended (HFS+). APFS is newer and has some advantages, while Mac OS Extended has wider compatibility with older Macs.
APFS is optimized for solid state drives like flash storage and SD cards. It offers faster performance, especially for large files, and more reliable storage. APFS also has more robust metadata and snapshots for easy backups. However, APFS is only fully compatible with Macs running High Sierra or later.
Mac OS Extended is an older file system that works with Macs running Snow Leopard or later. It is necessary for Fusion Drives and older HFS-dependent apps. Mac OS Extended may be preferable if you need wider backwards compatibility with Time Machine or older Macs. But it is slower than APFS and does not have the same robust integrity checks.1
In general, APFS is recommended for newer Macs running High Sierra or later. Mac OS Extended offers better legacy support. You can also choose between encrypted and non-encrypted options for added security.
Encrypting the External SSD
Encrypting your external SSD is highly recommended to protect sensitive files from unauthorized access. Here are some key benefits of encrypting your drive:
- Prevents others from accessing your data if the drive is lost or stolen
- Adds an extra layer of security beyond requiring a password to access your Mac
- Encryption protects data even if the drive is removed from your Mac
To encrypt your external SSD on Mac:
- Connect the external SSD to your Mac.
- Open Disk Utility (located in Applications > Utilities).
- Select the external drive in the sidebar.
- Click “Erase” at the top.
- Choose “APFS” as the format.
- Check the box for “Encrypt backup disk.”
- Enter a password to encrypt the drive.
- Click “Erase” to begin encrypting the drive.
The encryption process can take some time depending on the drive size. Once completed, you’ll need to enter the password each time you connect the external SSD to access the data.
For advanced users, encryption can also be enabled via the command line using Terminal.
Troubleshooting Tips
If you run into issues formatting your external SSD for Mac, here are some troubleshooting tips:
If Disk Utility won’t format the drive, make sure your Mac is updated and running the latest version of macOS. There is a known bug in Monterey that prevents external SSDs from formatting properly (see https://forums.macrumors.com/threads/disk-utility-wont-format-external-ssd.2322179/). Try formatting the drive on a Mac running Big Sur or earlier.
If the drive won’t format and gets stuck, it could be a compatibility issue with that specific drive model. Try connecting a different external SSD and see if the formatting completes (see https://discussions.apple.com/thread/253410439). Not all drives work flawlessly with Mac.
If you get a “write protected” error, make sure the lock switch on the SSD enclosure is not in the lock position. Slide the switch to unlock and then try formatting again.
For older SSDs, updating to the latest firmware can help resolve formatting issues. Check the manufacturer’s website for firmware updates.
As a last resort, you can try formatting the external SSD from Terminal using the diskutil command. This bypasses Disk Utility entirely.
If none of those tips help get the external SSD formatted for Mac, it’s likely a hardware compatibility issue with that specific drive model.
Using the External SSD
Once you have formatted and set up your external SSD for Mac, accessing and managing data on the drive is straightforward. Here are some tips for getting the most out of your external SSD:
The external SSD will show up as an icon on your desktop and in the Finder sidebar under Devices. You can access, copy, move and manage files and folders on it just like you would with an internal drive.
For the fastest transfer speeds, connect your SSD to your Mac using the provided USB-C cable into a Thunderbolt 3 port if available. The Thunderbolt interface provides lightning fast data transfer.
To safely eject the external SSD, click the eject icon next to it in the Finder sidebar or drag it to the Trash in the Dock. Disconnecting without ejecting first could lead to data loss or corruption.
Consider enabling encryption on your external SSD if you store sensitive files. In Disk Utility, you can select the drive and click “Enable Encryption” to add a layer of security.
Back up important files from your external SSD to another drive or cloud storage. External SSDs are still mechanical drives susceptible to failure or damage. Having a backup ensures you won’t lose data.
When traveling with your SSD, make sure to use a protective case. Drops or impacts can damage the drive. Also avoid exposing it to extreme heat or cold which can affect performance.
Periodically use Disk Utility’s First Aid tool to verify and repair disk errors. This can help resolve minor corruption issues and keep your external SSD healthy.
Maintaining and Backing Up Data
It is crucial to regularly maintain and back up the data on your external SSD to avoid data loss. Here are some best practices:
Use Time Machine to back up your external SSD – Time Machine is the built-in backup utility in macOS that can automatically back up your drive hourly. Simply connect your drive and select it as a backup disk in Time Machine preferences (See Apple Support).
Back up important files manually – In addition to Time Machine, you should manually copy important files from your external SSD to another location periodically. This provides an extra layer of protection against data loss. You can use the Finder to drag and drop files to another drive or folder.
Use backup software like Carbon Copy Cloner – Apps like Carbon Copy Cloner (See Bombich Software) can make bootable clones of your drive for easy restore. This helps if your drive fails or needs to be reformatted.
Store backups offline – Keep at least one backup physically disconnected from your computer for protection against malware or ransomware. External hard drives stored safely off-site provide defense against these threats.
Check backup integrity – Occasionally verify your backups completed properly and files can be restored. Corrupted backups are useless, so regularly checking integrity avoids nasty surprises.
Encrypt sensitive data – Use FileVault or a utility like Boxcryptor to encrypt sensitive files on your external SSD before backing them up. This provides an additional layer of security for important data.
Eject properly – Always eject your external SSD properly before disconnecting physically. This avoids data loss or filesystem corruption.
