Reformatting and reinstalling your Mac’s operating system is often necessary to restore peak performance and fix any software issues you may be experiencing. This process can seem daunting, but it’s actually quite straightforward if you follow the right steps. Here’s a quick rundown of what’s involved in reformatting and reinstalling macOS:
- Back up your Mac – Make sure your files, photos, etc. are safely backed up before erasing your hard drive.
- Erase/format the startup disk – This removes any files/apps and resets the disk to factory settings.
- Reinstall macOS – Download the latest macOS version from the App Store and install it on the erased disk.
- Migrate your data & settings – Use a backup to transfer your apps, settings, and personal files back to your Mac.
- Update software – Check for any macOS or app updates to finish setting up your Mac.
Doing this entire process can take a few hours, so make sure you set aside enough time. It requires the latest macOS installer (over 5GB) and an external hard drive or Time Machine backup to store your files during the reformatting.
As long as you carefully work through each step, you’ll complete the job without issue. Read on for detailed instructions on how to format and reinstall macOS from start to finish.
Back Up Your Mac Before Reformatting
The first and most important step is to fully back up your Mac before erasing or reformatting it. Formatting will wipe your Mac’s hard drive by deleting all of its files, apps, account settings, and everything else stored on it.
So if you don’t first back up your important data, you could lose personal files, work documents, emails, photos and everything else saved on the computer. Here are the best ways to back up a Mac before formatting:
Use Time Machine to backup to an external hard drive
Time Machine is the built-in backup software designed for macOS. It can backup your entire Mac system to an external hard drive. Here’s how to use it before reformatting:
- Connect an external HDD with at least double the storage capacity of your Mac’s hard drive.
- Open System Preferences > Time Machine and select the external drive as the backup disk.
- Turn Time Machine on and select “Back Up Now” to start the initial backup. Let it run until finished.
- Time Machine will continue making incremental backups leading up to the reformatting.
When you reformat the Mac, you’ll be able to restore your files during setup using the Time Machine backup. Just make sure the external hard drive you backed up to is still connected after you format the Mac.
Manually copy important files to an external drive
If you don’t want to use Time Machine, you can manually copy important files to an external hard drive instead. This isn’t a full system backup, but lets you preserve your key data.
To do this:
- Connect an external hard drive with enough storage space.
- Open the Finder and navigate to your user account folder.
- Manually copy any important documents, photos, videos, music, downloads folder, desktop files, etc. to the external drive.
Double check that your important files have transferred over. Though tedious, manually copying key data gives you a quick way to pull files off your Mac before erasing it.
Use iCloud to store documents and photos
If you use iCloud Photos, make sure your photo library is fully uploaded to iCloud before reformatting your Mac. You can check this in the Photos app.
You can also store any documents in iCloud Drive. Open each document, click File > Move to iCloud Drive, to upload it.
After reinstalling macOS, you can just sign into iCloud again to restore your photos, documents and other iCloud content.
Back up iPhone or iPad to save messages, call history, etc.
Don’t forget to backup your iPhone, iPad or iPod touch so you don’t lose any iOS data. Connect the device to your Mac, then select it in the Finder sidebar. Click File > Back Up to save text messages, call history, settings, etc.
Once you’ve secured important files, photos, settings and other personal data, you’re ready to move on to erasing, reformatting and reinstalling your Mac.
Erase and Format the Startup Drive
With your files backed up, it’s time to reformat your Mac’s drive. This will completely erase the contents of the drive and prep it for a fresh install of macOS.
Here’s how to format/erase your Mac’s startup drive:
- Restart your Mac and hold down Command-R as it boots to enter macOS Recovery mode.
- Select Disk Utility from the options.
- Choose your startup drive (usually named “Macintosh HD”) from the sidebar.
- Click Erase in the toolbar.
- Enter a name for the drive (Macintosh HD is fine).
- Choose APFS as the format.
- Click Erase to reformat the drive – this takes several minutes.
Once done, your Mac’s drive will be blank and prepped for a fresh OS installation. Quit Disk Utility when finished – your Mac will reboot itself.
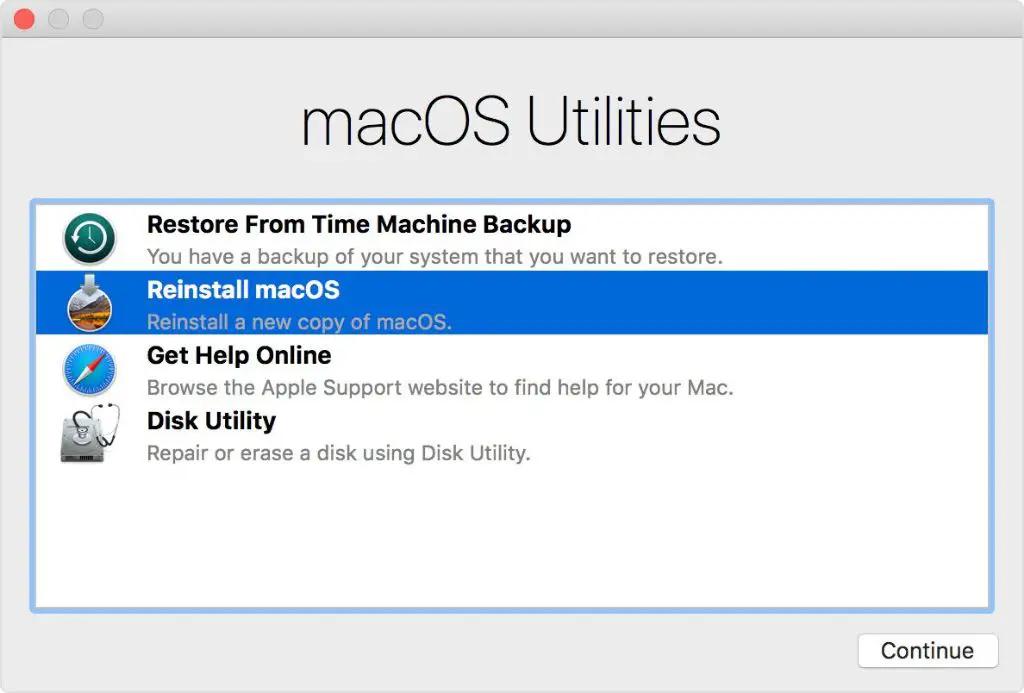
Reinstall the Latest macOS Version
With the startup drive formatted, you can now install a fresh copy of macOS:
- Your Mac should still be in Recovery mode. Click Reinstall macOS from the options.
- Follow the prompts to select your language and other settings.
- Click Continue when asked to install macOS to the startup drive.
- The latest macOS build will download from Apple – this can take a while depending on your Internet speed.
- Once downloaded, the installation process will begin – this also takes 30-45 minutes.
- Your Mac will reboot itself multiple times during installation.
- When finished, macOS Recovery will display setup assistant options.
- Select a country/region then click Continue to proceed to setup your Mac.
The macOS installer will automatically detect and erase your startup drive, so you don’t need to reformat again. Be patient during download/installation, as this process takes roughly an hour.
Transfer Data and Settings Using a Backup
With a fresh copy of macOS set up, you can now transfer your apps, files, settings and other data out of backup storage.
If you backed up your Mac with Time Machine before formatting, here’s how to restore that data:
- During Mac setup, select the option to migrate data from a Time Machine backup.
- Plug in the external hard drive used for your Time Machine backup.
- The Mac setup assistant will scan the drive and give migration options.
- Select the backup you want to migrate data from.
- Check the boxes of all data you wish to transfer, like applications, settings, documents, etc.
- Click Continue to transfer the backup to your Mac – this takes a while.
Migration is complete once your Mac restarts. Sign into iCloud and any other accounts you had set up.
If you manually copied important files instead, just copy them back over from the external drive via the Finder once you’ve finished setting up your Mac.
You can also sign into iCloud to download photos, documents, contacts, calendars and other iCloud data you backed up.
Update Your Apps and macOS
With your files, settings and accounts restored, the last step is to download any macOS updates and update all your reinstalled apps:
- Click the Apple menu and select System Preferences > Software Update. Install any macOS updates that are available.
- Open the App Store app. Click Updates in the toolbar to check for app updates.
- Click Update next to each app to download the latest versions.
- Check the Mac App Store purchases tab to re-download any paid apps you own.
Updating ensures your freshly installed apps and macOS system are running the most recent versions without bugs or security holes.
You can also reinstall third-party apps you use that aren’t found in the App Store.
Conclusion
Reformatting a Mac takes a bit of effort and time commitment, but following these steps will ensure the process goes smoothly:
- Fully back up your Mac’s data using Time Machine, manual file copies, and/or iCloud.
- Erase/format the startup drive in Recovery mode to prep for reinstallation.
- Download the latest macOS and install it onto the formatted drive.
- Transfer apps, files, settings, etc. out of your backups.
- Update all apps and macOS to their latest versions.
With a freshly reformatted drive and clean install of macOS, your Mac should now be running like new again. Just be diligent about properly backing up next time before erasing, and you won’t lose any important data or time getting set back up.