What is Device Manager?
Device Manager is a utility in Windows that allows you to view and manage hardware devices connected to your computer. It provides an overview of installed devices and enables you to check their status, update drivers, troubleshoot issues, and perform other device-related tasks.
Device Manager displays devices organized into a hierarchical tree. At the top level are general categories like Display adapters, Disk drives, and Network adapters. Expanding each category shows the individual devices under it. For example, Disk drives may list your hard drive(s), optical drive(s), and any external drives connected via USB.
Key capabilities offered by Device Manager include:
- Viewing device properties and status
- Updating, rolling back, or uninstalling drivers
- Enabling/disabling devices
- Troubleshooting hardware errors and issues
Device Manager is useful for getting an overview of connected devices, diagnosing problems, and performing maintenance tasks. It’s an essential tool for managing hardware and drivers on a Windows PC.
Why format an external hard drive?
Formatting an external hard drive can provide several benefits. One key benefit is improved performance. According to Are there any performance benefits to fully formatting a hard drive?, a full format cleans the drive and checks for bad sectors, helping optimize performance. Formatting also clears all the data, freeing up space on the drive. What Does Formatting a Hard Drive Do? notes formatting provides more available memory and allows devices to run processes faster with ample storage. Additionally, formatting can resolve data corruption issues caused by improper ejection or other errors. Overall, periodically formatting external drives helps maintain optimal performance and storage capacity.
Accessing Device Manager
The Device Manager allows you to view and control devices connected to your Windows computer. To access the Device Manager on Windows:
On Windows 10 and 11:
- Press the Windows key + X to open the Power User menu and select Device Manager.
- Or type “devmgmt.msc” in the Windows search bar or Run command and press Enter.
On earlier Windows versions like Windows 7:
- Go to Control Panel > System and Security > System and click on Device Manager in the left pane.
- Or click on Start, type “devmgmt.msc” and press Enter.
You can also right-click on Computer or This PC and select Manage, then click on Device Manager in the left pane.
Device Manager opens up a window showing all connected devices to your system like disk drives, audio devices, video cards, etc. This allows you to view device properties, update drivers, disable devices, and perform other maintenance as needed.
Locating the External Hard Drive
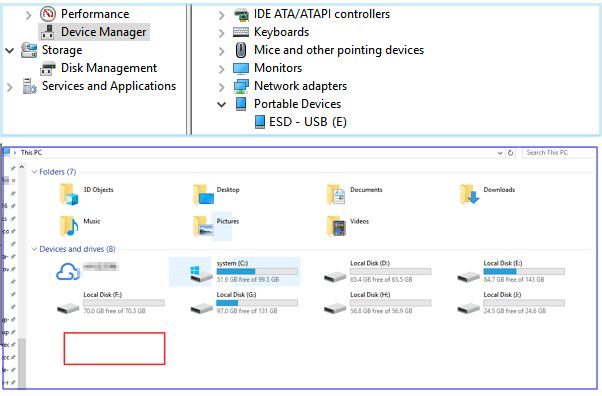
To locate the external hard drive in Windows, you’ll need to access Device Manager. Device Manager provides a list of all the hardware connected to your computer, including disk drives. Here’s how to find your external drive in Device Manager:
1. Open the Start menu and search for “Device Manager”. Open the Desktop app called Device Manager.
2. In Device Manager, click on “Disk drives” to expand the section.
3. Look for the drive labeled with your external hard drive’s name, or look for a disk drive name that doesn’t seem familiar. This should be your external drive.
If you’re still not seeing the external drive show up in Device Manager, try unplugging the drive, plugging it back in, and then refreshing the list in Device Manager. This should make the external drive show up.
You may also see the external drive show up in the “USB Controller” section in Device Manager. Click to expand this section and look for the external drive there.
If the external drive shows up in Device Manager but not This PC/My Computer or File Explorer, you may need to initialize the disk. Initializing will allow Windows and File Explorer to recognize the drive.
Refer to the Microsoft forums and Sweetwater article for more tips on getting Device Manager to recognize external drives.
Formatting the external hard drive
Here are the step-by-step instructions for formatting an external hard drive in Device Manager:
1. Open Device Manager by right-clicking on the Start menu and selecting Device Manager.
2. Expand the Disk drives section.
3. Right-click on the external hard drive you want to format.
4. Click on Format from the menu.
5. Select the file system you want to use. For Windows devices, NTFS is recommended. For Mac devices, exFAT is recommended.
6. Check the Quick Format box if you want a faster format. This won’t fully erase the drive, but works for most uses.
7. Click Start to begin the formatting process.
8. Wait for the format to complete. This may take several minutes depending on the drive size.
9. Once completed, the drive will show as Raw in Device Manager. You can now close Device Manager.
The external hard drive is now formatted and ready to use. Be sure to safely eject it before physically disconnecting it from your computer.
Formatting options
When formatting an external hard drive in Device Manager, you have a few options for the file system to use. The most common options are:
NTFS (NT File System): This is the standard file system for Windows 10, 8, 7 and Vista. NTFS allows for larger partition sizes and file sizes over 4GB. It also provides more security features like permissions and encryption. NTFS is a good general purpose option for external drives used with Windows PCs. (1)
exFAT: This file system is compatible with both Windows and Mac. It supports larger file sizes like NTFS, but doesn’t have the same security features. exFAT is a good option for external drives that will be used across Windows and Mac OS.
FAT32: This older file system has maximum compatibility with devices beyond just Windows and Mac. However, it limits partitions to 32GB and individual files to 4GB. FAT32 can be useful for small external drives that need wide device support. But for larger drives, NTFS or exFAT are better options.
When formatting in Device Manager, you can also choose the allocation unit size which ranges from 512 bytes to 64KB. Larger allocation unit sizes can improve performance for large files but waste space for small files. The default allocation size is 4KB which provides a good balance for general external drive use.
Safely removing the external drive
Before physically unplugging your external hard drive from your computer, it’s important to properly eject the drive to avoid potential data loss or corruption. Here are the steps to safely eject an external drive on Windows 10:
1. Locate the external drive icon in the notification area on the taskbar. Right click on the icon and select ‘Eject’.
2. A prompt will appear notifying you that it is safe to remove the hardware. At this point, you can disconnect the external drive from the computer.
If you disconnect the drive before ejecting it, Windows will display an error that the device was not ejected properly. Forcing removal without ejecting can lead to file system corruption and lost or damaged data [1]. Always be sure to use the Safely Remove Hardware option.
On Mac computers, you can eject an external drive by right-clicking on the drive icon on the desktop and selecting ‘Eject’. Or by dragging the icon from the desktop to the Trash.
Safely ejecting the drive ensures any cached writes are flushed to disk before disconnecting. This prevents files from being corrupted. Get in the habit of properly ejecting drives before removal to keep your data safe.
Potential issues when formatting
Formatting an external hard drive can sometimes lead to issues, especially if not done properly. Here are some potential problems and solutions:
Drive not recognized after formatting
If your external hard drive is not showing up after formatting, try these troubleshooting tips:
- Connect the drive to another USB port on your computer.
- Try a different USB cable – a faulty cable can prevent detection.
- Plug the drive into another computer to see if it is recognized.
- Go to Device Manager and scan for hardware changes.
- Restart your computer and reconnect the external drive.
Slow drive performance
A freshly formatted drive that is slow could point to:
- Fragmented drive – defragment it for improved performance.
- Insufficient USB power – use USB 3.0 port or plug into wall outlet.
- Outdated USB drivers – update drivers in Device Manager.
- External drive errors – run CHKDSK scan and fix detected errors.
Formatting failed or interrupted
If the format did not complete or was interrupted:
- Scan the drive for errors and correct any found.
- Safely disconnect and reconnect the external drive.
- Try formatting again using default settings.
- Attempt format using a different computer if available.
- Contact drive manufacturer support if issue persists.
Carefully following the formatting steps and troubleshooting any issues can help avoid potential problems.
Restoring data after formatting
When formatting a drive, the previous data is not actually erased, but the space is made available to be overwritten with new data. Until that new data is written, the previous files often can be recovered using data recovery software.
There are several options for recovering deleted files after accidentally formatting an external hard drive:
Use recovery software like Disk Drill or EaseUS Data Recovery to scan the drive and restore recoverable files. Many data recovery programs offer a free trial or demo to preview recoverable files.
Try the built-in Windows previous versions tool to restore copies of files from a system restore point or backup.
Send the drive to a data recovery service if the data is critical. Professional services can recover data in some cases where software cannot, but fees typically start around $300.
Recovering data is possible in many cases, but the chances decrease the longer new data overwrites the deleted files. So it’s important to stop using the formatted drive and attempt recovery as soon as possible.
Maintaining your external hard drive
It’s important to practice proper care and maintenance of your external hard drive to keep your data protected. Here are some tips:
- Avoid exposing the drive to extreme temperatures or direct sunlight. Keep it in a cool, dry place. Heat can damage the drive (source: https://www.bobcloud.net/how-to-backup-external-hard-drive-for-free/).
- Be gentle when plugging/unplugging the drive. Don’t yank the USB cable or drop the drive, as this can damage components.
- Make sure the drive has ample ventilation and is not covered. Use the stand provided with the drive.
- Always eject the drive properly before unplugging it. Simply pulling out the cable could corrupt data.
- Keep the drive physically secure when not in use to prevent unauthorized access.
- Avoid exposing the drive to liquids, dust or other contaminants which could get into the housing.
- Periodically scan the drive for errors. This can identify potential problems before data loss occurs.
- Consider using backup software to regularly copy important files from the external drive to a second location.
Following these maintenance tips will help ensure your external hard drive stays in good working condition for many years.
