Back Up Your Files
Backing up your personal files is the most crucial step before reinstalling your operating system. This ensures you have copies of all your important documents, photos, videos, music, and other irreplaceable data in case something goes wrong during the reinstallation process. If you don’t properly back up your files first, you risk permanently losing data.
To manually back up your personal files:
- Attach an external hard drive with enough storage capacity to hold your files. A 1TB or larger drive is recommended if backing up your entire system.
- Create a folder on the external drive such as “Backup”.
- Browse your internal hard drives and folders, then manually copy and paste the files you want to save to the external backup folder.
- Make sure to get files from locations like Desktop, Documents, Pictures, Music, Videos, Downloads folders.
- You may need to show hidden files to access all of your user data. In Windows 10, go to File Explorer > View > Options > Change folder and search options > View tab, then enable “Show hidden files, folders, and drives”.
- Double check the backup folder to confirm your personal files were copied over.
Following these manual steps ensures you have copies of all your important files before reinstalling Windows 10. You can also use the built-in Windows 10 Backup and Restore tools, or third-party backup software for more automated options. But a manual backup should be done first prior to reinstalling Windows just in case.
Create Windows 10 Installation Media
Before reinstalling Windows 10, you will need bootable installation media. This allows you to boot your computer from the USB drive and launch the Windows 10 setup. The installation files need to be on a bootable drive separate from your computer’s main hard drive, since formatting and deleting partitions on the main drive will be required later in the process.
To create a bootable Windows 10 USB drive:
- Go to the Microsoft Media Creation Tool site.
- Run the Media Creation Tool.
- Select “Create installation media for another PC.”
- Choose the language, edition, and architecture (64-bit or 32-bit) of Windows 10 to install.
- Select “USB flash drive” as the destination.
- Plug in a blank USB flash drive with at least 8GB of space.
- Click “Next” and wait for the tool to download Windows 10 and create the bootable media.
Once complete, you will have a bootable USB drive that can be used to install a fresh copy of Windows 10.
Boot From the Installation Media
Once the Windows 10 installation media is created, you need to boot your computer from the USB drive to begin the installation process. This involves changing the boot order in your computer’s BIOS.
Here are the steps to boot from the USB drive:
- Insert the USB drive into your computer.
- Restart your computer. When the manufacturer’s logo appears, press F2, F10, F12, Delete or another function key to enter the BIOS setup utility.
- In the BIOS, go to the boot order settings. This may be under a Boot, Boot Priority or Boot Options menu.
- Move the USB drive to the top of the boot order so it is the first boot device.
- Save the changes and exit the BIOS. The computer will restart and boot from the USB drive.
If the Windows 10 setup screen does not appear, you may need to disable secure boot in the BIOS. The steps to enter the BIOS and change boot order may vary depending on the computer manufacturer (see https://www.lenovo.com/us/en/glossary/boot-from-a-usb-drive/ for examples). Refer to your computer’s documentation if you need assistance.
Delete Existing Partitions
When installing Windows 10, your hard drive is divided into partitions which separate the operating system, programs, and personal files. During a clean install, you’ll want to delete the existing partitions so Windows can create new ones from scratch. This helps avoid corrupted files or registry errors being carried over from your previous installation.
To delete partitions, boot from the Windows 10 installation media and launch the setup wizard. On the installation screen where you select a drive, click on the “Delete” option. This will delete all existing partitions on that drive, leaving you with a blank unallocated space.
Some partitions like the system reserved partition may not delete automatically. To delete all partitions completely, you can use the diskpart command line utility. At the installation screen, press Shift + F10 to open a command prompt. Type diskpart, then list disk, select disk X (where X is your disk number), and clean. This will remove all partitions.
Once all partitions are deleted, you’ll have a blank drive to install Windows 10 freshly. Deleting previous partitions helps prevent issues and ensures a completely clean install.[1]
[1] “How to Perform a Clean Install of Windows 10.” GroovyPost, 30 Aug. 2021, https://www.groovypost.com/howto/clean-install-windows-10/. Accessed 15 Mar. 2023.
Create a New Partition
When reinstalling Windows 10, you will need to delete all existing partitions on the hard drive and create new ones from scratch. The recommended partition structure for Windows 10 64-bit is:
- Recovery partition – 450 MB
- EFI system partition – 100 MB
- Microsoft reserved partition – 128 MB (only for MBR disks)
- Primary C: partition – for installing Windows and programs (the remainder of disk space)
To create these partitions in preparation for a clean Windows 10 install:
- Boot from the Windows 10 installation media.
- On the Install Windows page, click “Drive options (advanced)”.
- Select the disk you want to format and click “Delete”. Delete all existing partitions.
- Click “New” to create a 450 MB recovery partition. Make sure it’s marked “Recovery”.
- Create a 100 MB EFI system partition. Format it FAT32.
- If using MBR, create a 128 MB Microsoft reserved partition.
- Create a primary C: partition using the remaining space. You can leave this one unformatted for now.
- Click “Apply” to save the new partition layout.
With this partition structure in place, you can proceed with installing Windows 10 on the C: drive.
Format the Partition
Formatting a partition erases all data on the partition and prepares it for use with a particular file system. For a Windows 10 installation, you’ll want to format the primary partition using the NTFS file system. Here are the steps to format the primary partition:
- Open Disk Management in Windows. The easiest way is to type “diskmgmt.msc” in the Run dialog (Win + R) and click OK.
- Right-click on the primary partition you want to format and select “Format…”
- In the Format dialog, choose “NTFS” as the file system.
- Check the “Quick Format” box.
- Click “OK” to begin formatting the partition.
The quick format option will erase any existing data on the partition by overwriting the MFT and partition boot sector, allowing you to immediately start using it for your fresh Windows 10 installation.
For more details on formatting partitions, refer to this Microsoft support article: Create and format a hard disk partition.
Install Windows 10
The Windows 10 setup process will guide you through installing the operating system on your newly formatted hard drive partition. Here are the steps to complete the OS installation:
1. Boot from the Windows 10 installation media you created. You’ll be prompted to select your language and other preferences.
2. Accept the Microsoft Software License Terms.
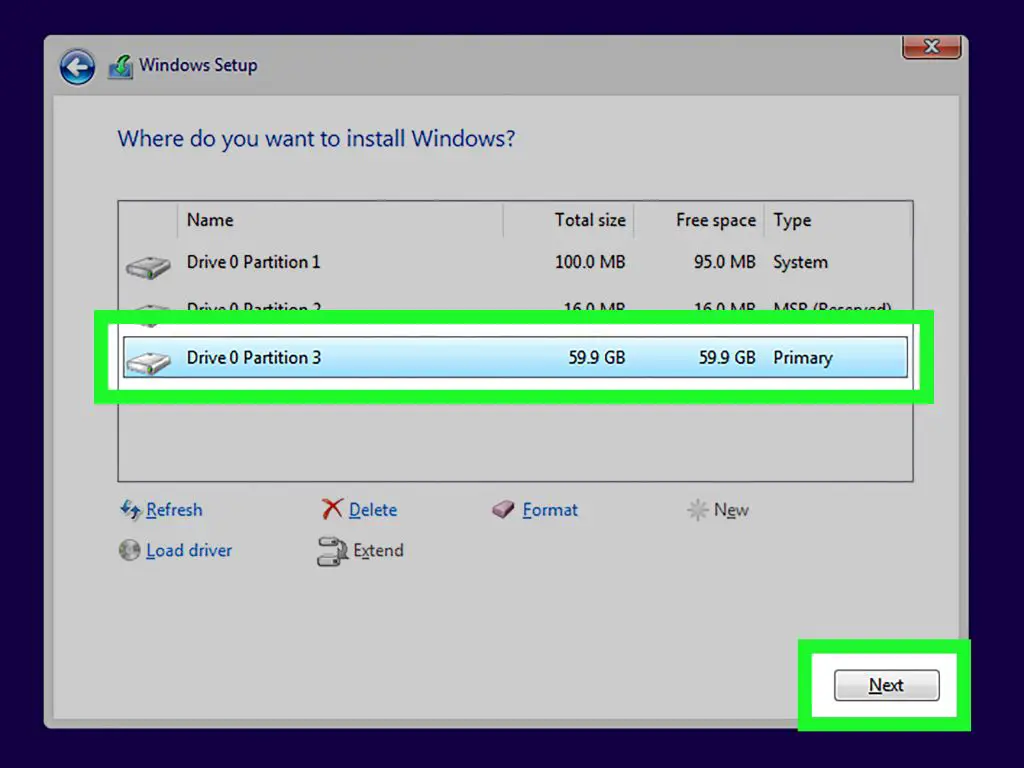
3. Select the partition you formatted earlier when prompted “Where do you want to install Windows?”
4. Windows 10 will begin installing on the selected partition. This may take some time to complete.
5. Once the installation is finished, the system will reboot into Windows 10 for the first time. You’ll be guided through additional setup like connecting to the internet, setting up security questions, and creating a user account.1
After completing the initial Windows 10 setup, the operating system will be installed and ready to use.
Install Drivers
After installing Windows 10, you’ll need to install the necessary hardware drivers. Drivers are software programs that allow Windows to communicate with your hardware devices like graphics cards, printers, touchpads, etc. Without proper drivers installed, your hardware may not function properly or at all.
There are a few ways to install drivers on Windows 10:
Use Windows Update – Windows Update will automatically download and install latest drivers for your hardware. Go to Settings > Update & Security > Windows Update and click Check for updates. Install any available driver updates.
Visit Manufacturers’ Websites – You can visit the manufacturers’ websites for your hardware and download the latest drivers. Make sure to get the drivers specifically for your Windows version and hardware model.
Use Third Party Driver Tools – Apps like IObit Driver Booster can automatically detect your hardware, find matching drivers and install them for you. This is the easiest option but use trustworthy apps only.
The key is to install drivers from the manufacturer, not generic Windows drivers. Device specific drivers are optimized for performance and compatibility. After installing drivers, your hardware like graphics, Wi-Fi, sound etc. will function optimally.
Reinstall Apps
After restoring your personal files, you will likely want to reinstall your apps. Here are some tips for reinstalling your apps in Windows 10:
For apps installed from the Microsoft Store:
- Open the Microsoft Store app and go to the Library section. Here you will find a list of all the apps you’ve previously installed.
- Find the app you want to reinstall and select the Install button. The app will download and install again.
For desktop apps installed traditionally:
- If you have the original installer file (e.g. .exe or .msi file), you can run this to reinstall the app.
- Check the app developer’s website to see if you can download the installer again.
- Use a tool like IObit Uninstaller to get a list of all apps previously installed. You may be able to download installers from here.
For Windows apps that came preinstalled:
- Open Settings > Apps > Apps & features to see a list of installed apps. You may be able to reinstall some from here.
- Use the Windows 10 installation media to repair your installation, which should restore preinstalled apps.
Check the Microsoft forums or contact the app developer if you need help finding a specific app installer.
Restore Personal Files
After reinstalling Windows 10, you will likely want to restore your personal files from your backup. Here are the steps to restore files to your new OS:
First, locate your backup files. Depending on your backup method, this may be an external hard drive, cloud storage, or separate partition where your files were copied. Make sure the backup device is connected to your computer.
Next, open File Explorer and navigate to the location of your backup files. You should see folders containing your Documents, Pictures, Desktop and other personal file folders.
Select the folders you want to restore and copy them back to the original file path location on your newly installed Windows 10 OS. For example, copy your Pictures folder back to C:\Users\YourName\Pictures. Paste the folders which will copy your files back to the proper restored locations.
For more details, see Microsoft’s guide on recovering lost files on Windows 10. Their file recovery tools can help restore deleted files.
With your personal files restored, your Windows 10 reinstallation is now complete. You have a fresh OS with your apps, settings and data back in place.
