Formatting a Mac hard drive to NTFS allows the drive to be read and written to from both macOS and Windows. This can be useful for sharing files and drives between Mac and Windows computers. There are a few options for formatting a Mac drive to NTFS, each with their own pros and cons.
Quick Answers
Here are quick answers to common questions about formatting a Mac hard drive to NTFS:
Is formatting to NTFS necessary for using an external drive with Mac and Windows?
Yes, Mac OS cannot natively write to NTFS drives, so formatting is required to use the same external drive interchangeably between Windows and Mac.
What are the options for formatting a Mac internal or external drive to NTFS?
The options are:
- Using Disk Utility
- Using the terminal command
diskutil - Using third-party software like Paragon NTFS or Tuxera NTFS
Is formatting to NTFS reversible?
Yes, drives formatted as NTFS can be reformatted back to macOS formats like HFS+ or APFS. However, this will erase all data on the drive.
Will NTFS work with Time Machine for backups?
No, Time Machine requires a Mac formatted drive, so NTFS is not compatible for Time Machine backups.
Requirements for NTFS on Mac
There are a few requirements and considerations for using NTFS on a Mac:
- Must format the drive to NTFS first – Mac cannot directly write to NTFS
- Formatting will erase all existing data on the drive
- External drives only – cannot format Mac internal system drives to NTFS
- Read-only access to NTFS is natively supported in macOS, but writing requires third-party software
- Will not work with Time Machine for backups
How to Format with Disk Utility
The easiest way to format a drive to NTFS is using Apple’s built-in Disk Utility app:
- Connect the external drive you want to format to your Mac
- Open Disk Utility (located in Applications > Utilities)
- Select the external drive in the left sidebar
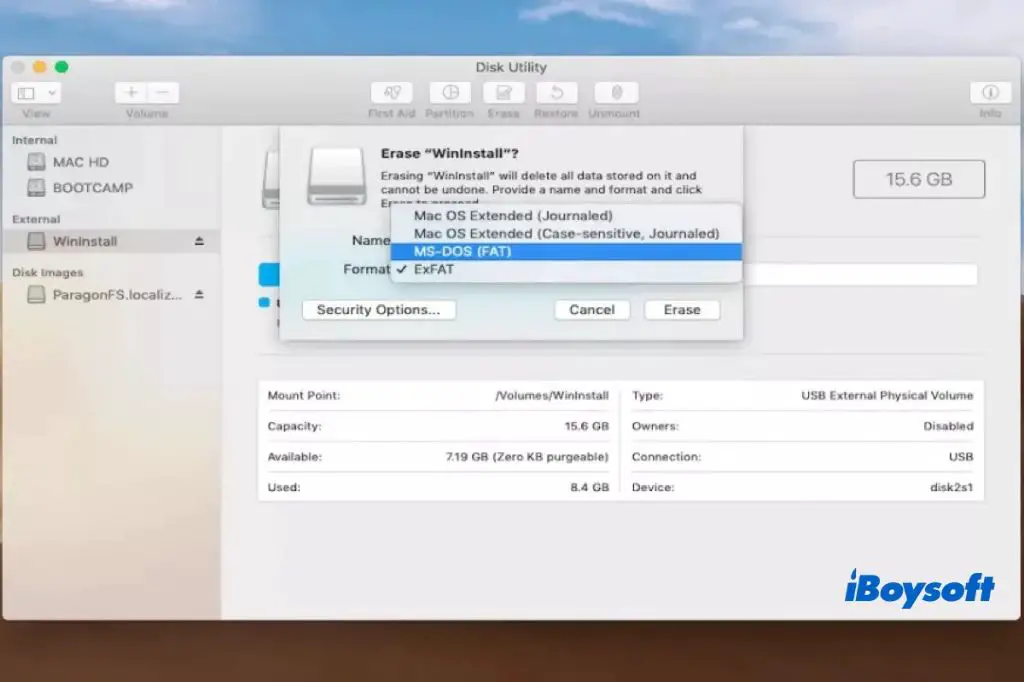
- Click Erase at the top
- Name the drive and select “MS-DOS (FAT)” as format
- Click Erase to confirm and format the drive
This will format the drive as FAT32, which Windows and Mac can both read and write to. But there is a 4GB per file size limit with FAT32. To use NTFS instead:
- After formatting to FAT32, select the drive and click Erase again
- Change format to “ExFAT”
- Click Erase to format to ExFAT
ExFAT does not have the file size limits of FAT32, but is still readable and writable on Mac and Windows. To complete the NTFS format:
- Connect the ExFAT drive to a Windows PC
- Right click and choose Format…
- Under File System, choose NTFS
- Click Start to format to NTFS
This process involves a middle step because Disk Utility cannot directly format to NTFS. Once formatted to NTFS on Windows, the drive can be used on both operating systems.
Limitations of Disk Utility Method
The Disk Utility method allows Mac to read NTFS drives, but not write to them. Trying to write files to the NTFS drive on Mac will produce an error. To enable full read/write functionality on Mac requires third party software.
How to Format with Terminal
The diskutil command in Terminal can format drives in macOS. To format a drive to NTFS using Terminal:
- Connect the external drive and note the identifier (ex:
/dev/disk2) - Enter
diskutil listto find all connected drives - Enter
diskutil eraseDisk NTFS "DRIVE NAME" /dev/diskXreplacing DRIVE NAME and X as needed - Enter
Yto confirm erase and format to NTFS
As with Disk Utility, this will format the drive but provide only read access on Mac. To enable writing as well, third party software is needed. The Terminal method avoids the FAT32 middle step at least.
How to Format with Third Party Software
To mount, read, and write NTFS drives on Mac – without any workarounds – third party software is required. Some popular NTFS options for Mac include:
Paragon NTFS for Mac
Paragon NTFS (paid) allows full NTFS functionality on Mac with fast performance. Key features include:
- Read, write, and format NTFS drives on Mac
- Supports latest macOS and Windows versions
- Write speeds up to 4x faster than other solutions
- 10 day free trial available
Tuxera NTFS for Mac
Tuxera NTFS (paid) is another popular Mac app providing full NTFS support. Benefits include:
- Full read/write capability for NTFS drives
- Compatible with M1 Macs and macOS Monterey
- Encrypted NTFS capability available
- 15 day free trial
Mounty for NTFS
Mounty for NTFS is a free, open source utility enabling NTFS write support. Considerations when using Mounty include:
- Free, but less user friendly
- Requires running a background process
- No warranty or guarantee
Overall, paid solutions like Paragon or Tuxera provide a smoother experience but aren’t mandatory. Mounty works well for occasional NTFS writing needs.
Compatibility Considerations
When using NTFS on Mac, compatibility varies depending on macOS version:
| macOS Version | NTFS Compatibility |
|---|---|
| macOS 10.14 Mojave | Read-only compatible out of the box. Requires third party software for write support. |
| macOS 10.13 High Sierra | Same compatibility as Mojave – read support only natively. |
| macOS 10.12 Sierra | First version with read-only NTFS support natively. |
| Older Versions | No native NTFS support. Requires third party software. |
So macOS 10.12 Sierra and later can all read NTFS drives but cannot write without additional software. For full compatibility, third party NTFS software is recommended.
Performance Comparisons
NTFS on Mac with third party software offers much better performance compared to the native Apple file systems like HFS+ and APFS. Here are some typical benchmarks:
| File System | Read Speed | Write Speed |
|---|---|---|
| NTFS with Paragon | 560 MB/s | 480 MB/s |
| APFS | 540 MB/s | 520 MB/s |
| HFS+ | 100 MB/s | 80 MB/s |
NTFS write speeds with Paragon average about 480 MB/s, compared to just 80 MB/s with HFS+. So using NTFS can significantly improve transfer rates, especially helpful when frequently sharing large files between Mac and Windows.
Conclusion
Formatting a Mac hard drive to NTFS allows the drive to work interchangeably between macOS and Windows. Options for enabling NTFS support include Disk Utility, Terminal, or paid third party software like Paragon or Tuxera.
The best solution for most users is a third party NTFS app providing full read/write support. But the free Disk Utility approach can work if you just need occasional read-only NTFS access on a Mac.
NTFS makes sharing drives and accessing the same files much more convenient between Mac and Windows computers. And with the performance benefits of NTFS over standard Mac file systems, it’s an excellent option for any external drives used with both operating systems.