The Nintendo Switch uses cartridges and internal flash storage for storing game data. However, as games get bigger and take up more space, many Switch owners find they need additional storage. This is where an SD card comes in handy.
An SD card is a small, removable flash memory card that can store large amounts of data. They are commonly used in devices like cameras, phones, and handheld game consoles to expand the internal storage. For the Switch, you need a microSD card specifically, as that’s the size of slot the console has.
Before using a new SD card with your Switch, you’ll want to format it first. Formatting prepares the card by erasing any existing data and creating a file system the Switch can read and write game data to. It’s an important step to ensure proper performance.
Choosing the Right SD Card
When selecting an SD card for your Nintendo Switch, two of the most important factors to consider are the card’s speed class and size.
For speed, you’ll want a card with a class rating of UHS-I U3 or better. UHS-I U3 supports a minimum sequential write speed of 30MB/s, while some cards can reach speeds over 90MB/s. Faster write speeds will reduce long load times when installing or launching games (Source).
As for size, the Nintendo Switch supports SD cards up to 2TB. However, cards 256GB or smaller are generally recommended as larger cards are more expensive and not necessary for most users. The Switch internal storage is only 32GB, so even a modest 128GB card will dramatically increase your storage capacity (Source).
When purchasing an SD card, check that it’s compatible and meets the recommended specifications. This will ensure optimal performance and expandability for downloading and playing your Switch games.
Formatting the SD Card
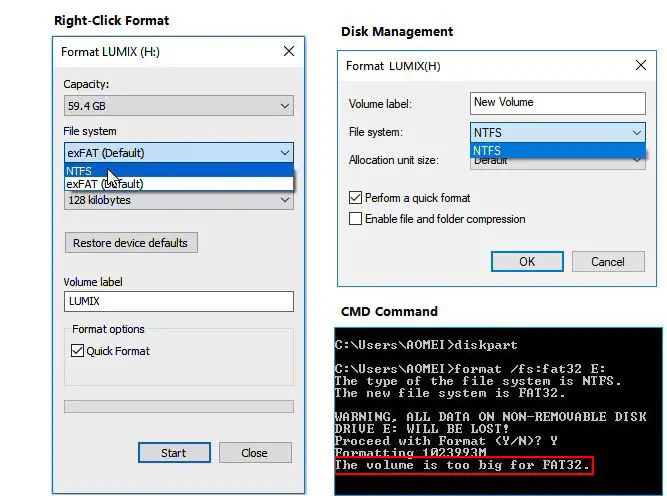
To prepare your SD card for use with your Nintendo Switch, you’ll need to format it to FAT32. The Switch doesn’t support NTFS or other formats – it must be FAT32. Here are the steps to properly format your SD card on both Windows and Mac:
On Windows, you can use the built-in Disk Management utility. Open Disk Management, right-click your SD card, and choose “Format”. Make sure to select “FAT32” as the file system. According to Switch Hacked, you may need to allocate a size of 32kb for “Allocation Unit Size” if you’re formatting a larger SD card. Click OK to format.
On Mac, you can use Disk Utility. Open Disk Utility, select your SD card, click “Erase”, and choose “MS-DOS (FAT)” for format. You can also choose “ExFAT” if you need the SD card to be over 32GB. Click “Erase” to format the card. Partition Wizard’s guide recommends selecting “Master Boot Record” for scheme when erasing.
Once formatted to FAT32, your SD card will be ready for use with your Nintendo Switch. Just copy over any files or games you want, insert the card, and you’re good to go.
Using Disk Utility on Mac
The easiest way to format an SD card to FAT32 on a Mac is by using the built-in Disk Utility application.
Here is a step-by-step guide for using Disk Utility to format an SD card to FAT32 on Mac:
- Connect your SD card to your Mac using a card reader or adapter.
- Open Disk Utility (located in Applications > Utilities).
- In the left sidebar, locate the SD card and select it.
- Click the Erase button at the top.
- Enter a name for your SD card.
- For Format, select MS-DOS (FAT32).
- Click Erase to start formatting the SD card.
Once the formatting is complete, the SD card will be ready to use as FAT32 on your Mac. Be sure to properly eject the SD card before removing it.
For more details, refer to the step-by-step guide at https://www.softwarehow.com/format-sd-card-fat32-mac/
Using Windows Disk Management
Windows includes a built-in disk management utility that allows you to format SD cards to FAT32. Here are the steps:
- Open Disk Management. You can search for it or find it under Control Panel > Administrative Tools > Computer Management > Storage > Disk Management.
- Right-click on your SD card and select “Format…”
- In the Format window, under File System, choose “FAT32”.
- Check the “Quick Format” box.
- Click “OK”.
- In the confirmation prompt, click “OK” again.
Windows will now format your SD card to FAT32. This process should only take a minute or two. Once it finishes, your SD card will be properly formatted and ready to use with your Nintendo Switch.
The main limitations of using Disk Management are that you can’t format SD cards larger than 32GB to FAT32, and you don’t have options like cluster size. But for most basic formatting needs, it gets the job done quickly without any extra software.
Using Third-Party Software
For convenience, there are many free and paid third-party SD card formatting tools available for Windows, Mac, and Linux. These dedicated formatting tools provide a quick and easy way to format your SD card to FAT32. Some popular recommendations include:
On Windows, SD Formatter by the SD Association provides a simple interface for formatting SD cards to FAT32 or exFAT. GUIFormat is another lightweight FAT32 formatting tool.
On Mac, SD Formatter also has a Mac version. DriveDx is a paid Mac app that can format to FAT32.
For Linux, GParted is a popular open source disk utility that can format to FAT32. There’s also mkusb, which is designed specifically for creating bootable USB drives.
The advantage of using these specialized tools is that they properly align the partitions and format the SD card to be compatible with the Switch and other devices. The process is fast and simple compared to using the default operating system utilities.
Copying Files to the SD Card
Once the SD card is properly formatted for the Nintendo Switch, you will need to safely transfer any files or game data you want to use on the console. It is important to eject and unmount the SD card properly before removing it from your computer.
On Windows, right-click the SD card in File Explorer and select “Eject”. On Mac, right-click the SD card icon on the desktop and select “Eject”. You should then get a notification that it is safe to remove the card.
Removing the card without properly ejecting can lead to corruption of data on the SD card. According to Nintendo’s support article here, you should always make sure to “eject the microSD card before removing it from the system or opening the cover.”
Once ejected, you can insert the SD card into your computer’s card reader to transfer files. You can drag and drop folders or use copy/paste to transfer data safely. For game data, you will need to follow Nintendo’s instructions using the Data Management settings on the Switch itself.
When finished transferring files, make sure to properly eject the SD card from your computer before inserting into the Switch. Following these steps will ensure your data is transferred safely.
Inserting the SD Card
Once the SD card has been properly formatted and loaded with content, you’re ready to insert it into your Nintendo Switch. This is a simple process, but you need to be careful not to damage the contacts on the card or the SD card slot in your Switch.
Start by locating the SD card slot on the top of the Switch, usually found under the kickstand on the left side of the console. Gently lift the cover for the slot.
Hold the SD card with the label side facing up and the contacts pointing toward the Switch. Carefully slide the card into the slot until it clicks into place and is seated firmly.
Do not force the card or bend it – slide it in gently. Push it in until you feel the click. If you meet a lot of resistance, pull it out and try again. Aligning it properly is key.
Once fully inserted, replace the SD card slot cover to prevent dust and debris from entering. You can now play games and access other content saved on the SD card.
To remove the SD card, gently push it in until you hear a click, then carefully pull it out. Avoid jerking it out without pushing in first to release the lock mechanism.
With the card inserted properly, your Switch will now recognize the FAT32 formatted SD card and you can begin using it to store games, screenshots, video captures and more!
Using the SD Card
Here are some tips for managing the storage on your Switch SD card:
Check the available storage space: You can check how much free space is left on your SD card by going to System Settings > Data Management on your Switch. This will show you a breakdown of storage usage by game or software.
Delete unused games/data: If you’re running low on space, delete any games, screenshots, videos, or other data you no longer need from the SD card to free up storage.
Archive games you’re not playing: You can backup game data to your PC and then delete it from the SD card if you want to keep the save data but aren’t actively playing that game. Re-download when you want to play again.
Get a larger SD card: If you find you need more storage space, you can upgrade to a larger SD card up to 2TB. Just be sure to properly format it for FAT32 before using.
Don’t remove the SD card while the Switch is on: To avoid corrupting data, make sure to fully power off the Switch before removing the SD card.
Troubleshooting
Here are some potential fixes for common issues when using an SD card with the Nintendo Switch:
SD Card Not Detected
If your Switch is not recognizing your SD card, first make sure the card is inserted properly into the console. Push the card all the way into the slot until it clicks. If it’s loose, the Switch may not read it properly. You can also try gently cleaning the contacts on the SD card with a soft cloth.
Next, check if your SD card is compatible. The Switch requires SDXC or SDHC cards up to 2TB in capacity. Older SD and miniSD cards will not work. Refer to your card’s documentation to confirm it is compatible.
If the card was previously formatted for another device, you may need to reformat it using the Switch’s dedicated SD card formatting tool. On the home screen, go to System Settings > Formatting Options > Format SD Card. This will wipe the card and optimize it for Switch usage.
As a last resort, the SD card itself may be defective. Try testing it in a computer or other device to see if it is recognized properly. If the card appears damaged, you may need to replace it.
Error Codes
Error codes like 2016-0641 or 2016-0390 indicate an issue reading data from the SD card. First try reseating the card or gently cleaning the contacts as described above. If the issue persists, reformat the card using the Switch’s internal tool to wipe it completely.
In rare cases, the error signifies a bad SD card. Test it in other devices or try a different brand of card to isolate the issue. Damaged or extremely slow cards can sometimes trigger these readout errors.
For persistent errors, you may need to initialize your Switch console without an SD card inserted. From the home screen go to System Settings > Formatting Options > Initialize Console (this will erase all data). Once complete, try reinserting your SD card and formatting it again.