Switching your Mac to boot from a solid state drive (SSD) rather than the standard hard disk drive (HDD) can provide a significant speed boost. SSDs are much faster at reading and writing data, which translates to faster boot times and improved general system performance. However, before you can boot your Mac from an SSD, you need to properly configure and format the drive.
Step 1: Install the SSD
The first step is to physically install the SSD in your Mac. The installation process will vary depending on whether you have a desktop or laptop model.
For a desktop Mac like the Mac Mini or iMac, you will need to open up the computer’s case and mount the SSD in an open drive bay using the appropriate cabling. Most SSDs use either the SATA or PCIe interface. Refer to your specific Mac model’s manual for installation instructions.
For MacBooks and MacBook Pros, you can replace the existing hard drive with the SSD by removing the back cover and swapping out the drives. Again, refer to the service manual for your exact model for full disassembly steps. Make sure you have the proper tools on hand, including precision screwdrivers.
If your Mac has space for a second drive, you may be able to add the SSD without removing the existing HDD, allowing you to use both drives together. For example, some iMac models have space for both a SATA drive and PCIe SSD. Do your research to see if dual-drive configuration is an option for improved storage flexibility.
Step 2: Mount the SSD
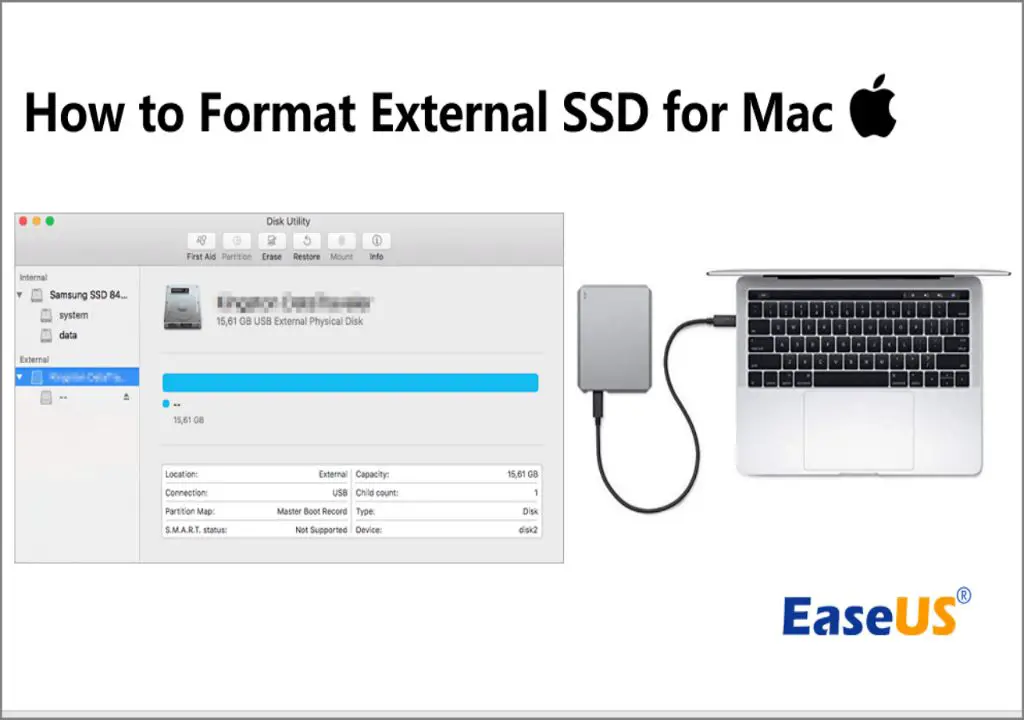
After physically installing the SSD, you will need to mount it in macOS so that it is recognized by the system.
Power on your Mac and launch Disk Utility, located in the Utilities folder in your main Applications folder. In the left sidebar, you should see the SSD listed under Internal or External drives. Click on the SSD volume to select it.
Make sure the new drive is mounted by selecting the “Mount” button at the top of the Disk Utility window. The SSD volume entry should change from grayed-out to black when it is mounted and ready for use.
Step 3: Format the SSD
New drives need to be formatted properly for full Mac compatibility and performance. Follow these steps to format your SSD:
- With the SSD volume selected in Disk Utility, click “Erase” at the top.
- Choose “APFS” as the format.
- Use “GUID Partition Map” for the scheme.
- Name the SSD.
- Click Erase to confirm the reformatting.
APFS is the Apple File System format optimized for SSDs and is required for SSD boot volumes. The GUID partition scheme allows Intel-based Macs to boot from the drive. Reformatting will erase any existing data on the drive, so be sure to backup anything important first.
Step 4: Designate as Boot Disk
With the SSD formatted, you can now designate it as your Mac’s boot disk using Startup Disk preferences:
- Go to System Preferences > Startup Disk.
- A list of available bootable volumes will appear.
- Select the SSD volume.
- Click “Restart” to apply the changes.
Upon reboot, your Mac should now boot up directly from the SSD rather than the old hard drive. You can verify the change by going back into Startup Disk preferences. The SSD should be highlighted in bold as the new startup disk.
Step 5: Migrate Data and Apps
At this point, your Mac will boot from the empty SSD. To complete the upgrade process, you need to migrate your apps, documents, settings, and other important data over to the new drive.
If you are keeping your original hard drive installed as a secondary drive, you can migrate data over gradually by manually copying files from the HDD to SDD. Simply drag and drop files/folders in the Finder to move them.
For more comprehensive migration, you can use Apple’s Migration Assistant, located in /Applications/Utilities. Migration Assistant will copy the contents of your user account, files, and most applications over to the SSD, allowing you to mirror the original drive contents.
To run Migration Assistant:
- Open the Migration Assistant app on both the old hard drive and new SSD (requires OS X 10.5 or later).
- On the SSD, choose “From a Mac, PC, Time Machine backup, or other disk” and select the old hard drive volume.
- Migration Assistant will copy any designated users, applications, files/folders, and settings to the new SSD boot volume.
Be sure to deauthorize any media apps like iTunes and deactivate iMessage before migration. Also disable Find My Mac. For optimal results, make sure both volumes are mounted and accessible.
Step 6: Reenable Startup Items
If there are certain apps or services you had configured to open at login or boot, you will need to reenable these startup items on the new boot SSD:
- Open Users & Groups preferences and select your user account
- Go to the Login Items tab
- Click the + button to add apps or services to automatically open at login
- Log out and back in to apply the changes
Common startup items include VPN clients, antivirus tools, cloud sync apps like Dropbox, and custom user scripts. Make sure to replicate your desired auto-start settings.
Step 7: Enjoy the Speed Boost!
Once migration is complete, you can delete the old system on the HDD if you wish and enjoy the full speed of your new SSD boot drive! Boot times will be significantly faster, and opening and saving documents will be near-instantaneous. Make sure to enable TRIM on third-party SSDs using Trim Enabler to maintain maximum performance. Overall system responsiveness will be dramatically improved across the board.
SSD vs HDD Comparison
It’s important to understand the key differences between a traditional hard disk drive (HDD) and solid state drive (SSD) when it comes to Mac performance:
| Comparison | HDD | SSD |
|---|---|---|
| Storage medium | Magnetic platters | NAND flash memory chips |
| Read/write speed | 80-160 MB/s | 500+ MB/s |
| Random access | Slow | Very fast |
| Makes noise? | Yes, spinning | Completely silent |
| More reliable? | No, disks can crash | Yes, no moving parts |
As you can see, SSDs excel in key areas like speed, responsiveness, noise profile, and reliability. Upgrading to an SSD provides a seamless, silent, and lightning-fast Mac experience!
Choosing the Best SSD for Mac
When shopping for an SSD upgrade, keep the following tips in mind:
- Interface: SATA III for older Macs, PCIe/NVMe for new models.
- Capacity: At least 256GB for boot drive, with 500GB+ recommended.
- Form factor: 2.5-inch for MacBooks, mSATA for MacBook Airs, check iMac/Mac Pro compatibility.
- Brand: Look for trusted names like Samsung, Crucial, Western Digital.
Also make sure to get an appropriate external enclosure if removing the old HDD. USB 3.0 enclosures provide ample speed for most HDD drives. With a quality SSD installed and properly configured as the boot volume, you’ll be enjoying a faster Mac in no time!
Troubleshooting SSD Startup Issues
In some cases, your Mac may fail to recognize or boot from the new SSD correctly. Try the following troubleshooting tips:
- Reset SMC and PRAM by booting into recovery mode and running the commands.
- Update macOS to the latest version to ensure full SSD compatibility.
- Reseat SSD cabling and check for loose connections.
- Disable hibernate mode and safe sleep.
- Try a different SATA/power cable if available.
- Downgrade to older version of macOS if issues appeared after a macOS update.
For advanced troubleshooting, you can boot to single user mode to check the startup disk configuration. Also verify the SSD is being detected properly in Disk Utility when booted from an external drive. Getting your Mac successfully configured and booted from the new SSD will be worth it in the end!
Conclusion
Upgrading a Mac to use an SSD as its boot drive provides one of the biggest performance gains available. The steps include physically installing the SSD, formatting it correctly with APFS, designating it as the startup disk, migrating your data from the old HDD, and reenabling login items. With a properly configured SSD, you’ll enjoy dramatically faster boot times, application launches, and data access. Just be sure to choose the right SSD type and capacity for your specific Mac model. Follow the steps outlined here and you’ll be up and running quickly with an SSD-powered speed demon of a Mac!