Having important files end up in the trash can be incredibly frustrating. Luckily, it is usually possible to recover deleted files on a Mac, as long as you act quickly and don’t overwrite the data. Here are the steps to get all your files back from the trash on a Mac:
Check the Trash Folder
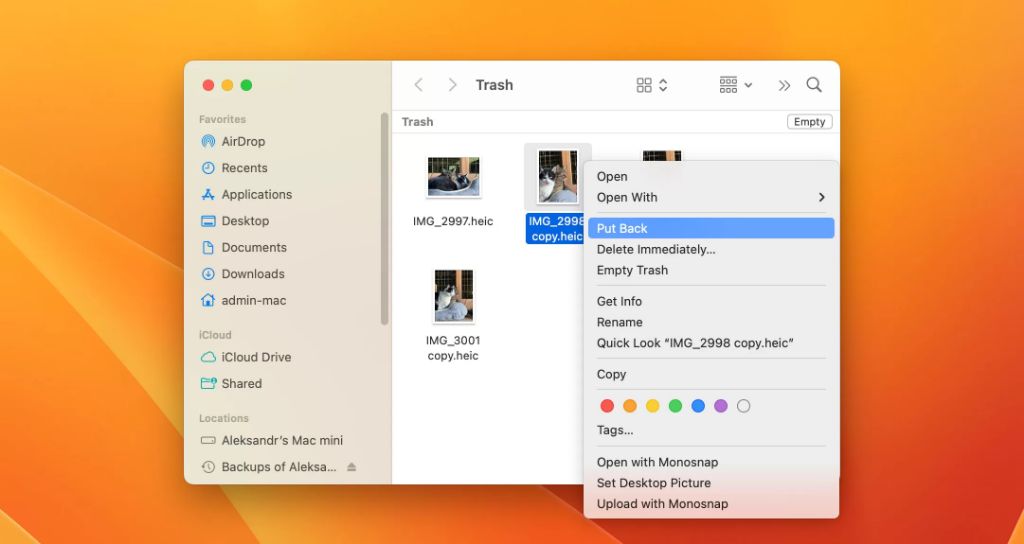
The first place to check when looking for deleted files is in your Trash folder. This is located in the Dock, and holds files before they are permanently deleted. To open the Trash folder:
- Click the Trash icon in the Dock.
- A Finder window will open showing the contents of the Trash folder.
- Browse through the files and folders here to see if what you need is available.
If the file you want to recover is still in the Trash, simply right click on it and select “Put Back” to restore it to its original location. This retrieves the file immediately if the Trash hasn’t been emptied yet.
Restore from Time Machine
If a file is no longer in the Trash, your next option is to restore it from a Time Machine backup. Time Machine continually creates backups of your Mac’s hard drive, allowing you to restore individual files, folders or entire systems from an earlier date. To use Time Machine to recover deleted files:
- Open the Time Machine app from your Applications folder or Dock.
- Click “Enter Time Machine”.
- Navigate back through your Mac’s timeline to find the date before the file was deleted.
- Search for the missing file and restore it to its original or a new location.
This process lets you roll back the state of your system to recover missing data. Time Machine should allow you to salvage files even after they are deleted from the Trash, unless a newer backup overwrote them.
Try File Recovery Software
If the file you need isn’t in the Trash or available from a Time Machine backup, your last resort is file recovery software. These programs scan your drive and attempt to reconstruct deleted files by piecing together leftover data fragments. Some free options to try are:
- Disk Drill – Scans for lost files and reconstructs them using metadata and directory structure.
- PhotoRec – Specifically for photos, audio and video files. Restores files based on file signatures.
- TestDisk – Open source app that locates lost partitions as well as individual files.
Be sure to install the recovery software onto another drive rather than the one you are scanning, to avoid overwriting the deleted data. The process involves:
- Install and open the file recovery app.
- Select the drive to scan for lost files.
- Let the app run – this can take anywhere from several minutes to hours depending on drive size.
- Preview and restore the files the software was able to reconstruct.
Avoid Overwriting the Deleted Data
When trying any method of file recovery, it is absolutely crucial to avoid writing new data to the drive containing the deleted files. Overwriting the data makes it exponentially harder to recover, as fragments needed to reconstruct the files are destroyed.
Until you have fully restored the lost files you need, avoid any activity on that drive that could write data, such as:
- Saving new files
- Installing or updating software
- Downloading and opening large files
- Emptying the Trash again
Also do not attempt to repair or erase the drive, which can make recovery impossible. If possible, take the drive out and connect it externally read-only until recovering the files.
Restore Deleted Files from a Backup
If the files you need cannot be recovered through any of these methods, your final option is to restore them from a backup. This requires having a secondary copy of the files on another drive, system or cloud storage. Ways to restore deleted files from backups include:
- Time Machine – As explained above, you may be able to restore older versions of files using Time Machine backups. Just be sure the backups are intact.
- Cloud storage – If files were synced to iCloud or another cloud service, check there for recoverable versions.
- Mirroring drive – Drives used to mirror folders or systems should have unaltered copies of deleted files.
- External drives – Portable hard drives used for backups may still have the missing data.
If you don’t have another existing copy of the lost files, recovery becomes very difficult or impossible. This is why a solid backup system is so important for protecting against data loss.
How Mac File Deletion Works
To understand why file recovery is possible on Macs, it helps to know how file deletion works under the hood.
When you delete a file on a Mac, either by dragging it to the Trash or using a keyboard shortcut like Command+Delete, the file isn’t immediately destroyed. Instead, the space it occupied is marked as “available” and the file becomes hidden from the operating system.
Until new data overwrites the space, the entire file is still present on the drive and can be undeleted. Even once partly overwritten, fragments of files can often be reconstructed by recovery tools.
When you empty the Trash, the files are not wiped instantly either. Instead, the space is earmarked to be used as needed for new data. This is why it’s critical to recover files from the Trash before it’s emptied.
With SSD drives becoming more common, it’s important to note that TRIM commands can cause more immediate destruction of deleted files. Therefore file recovery from SSDs has lower success rates.
How to Avoid Needing File Recovery
While file recovery tools and techniques exist, it’s always preferable to avoid file loss in the first place. Some tips for keeping your data safe include:
- Use Time Machine backups regularly.
- Utilize cloud syncing services like iCloud.
- Store copies of critical files on external drives.
- Be cautious when emptying the Trash.
- Don’t save over files if data loss is suspected.
Following best practices for backing up your Mac will help ensure that file deletion is an inconvenience and not a catastrophe.
Recovering Lost Files on Other Operating Systems
The file recovery steps outlined here are specifically for macOS. Other operating systems handle deleted files differently. Here is a quick overview of how to recover deleted files on Windows and Linux machines:
Windows
- Check the Recycle Bin for deleted files, similarly to the Mac Trash folder.
- Use System Restore to roll back to an earlier state of the system.
- Utilize backup tools like File History to recover previous versions of files.
- Try file recovery software like Recuva to scan the drive.
Linux
- Check the Trash folder at the root of each partition.
- Scan drives using the debugfs or extundelete utilities.
- Try GUI recovery tools like Foremost to reconstruct files.
- Restore files from /lost+found folder if available.
While the specifics differ, the overall process of checking the Trash, restoring from backup, and using data recovery tools is similar across operating systems.
Conclusion
Losing important files can be a stressful experience. Fortunately, there are almost always options for getting data back after accidental deletion on modern operating systems like macOS. By quickly using the Trash folder, Time Machine, recovery software and other techniques outlined here, you stand an excellent chance of recovering lost files on a Mac.
Make sure to restore deleted files as soon as possible before they are overwritten. Avoid using drives with suspected data loss until absolutely sure the originals are safely recovered. With the right approach, you can rescue your lost files and get your Mac back into working order.