When your computer won’t power on, it can be worrying thinking about all the important files and data trapped inside with no easy way to access them. Photos, documents, music and more could be lost forever if you don’t know how to recover the data from a computer that won’t turn on.
The good news is that even if your computer won’t boot up normally, there are still ways to recover your files and save your data. With some basic steps and the right tools, you can access your hard drive and retrieve your files from a dead PC.
Why Won’t My Computer Turn On?
There are a few common reasons why a computer won’t power on:
- Failed power supply – If the power supply unit inside your PC fails, it won’t be able to provide power to start up the computer.
- Motherboard failure – The motherboard distributes power to all computer components. If it’s damaged or faulty, it can prevent startup.
- CPU failure – Your computer’s processor may have failed and need to be replaced before startup is possible.
- RAM failure – Damaged RAM memory modules can cause startup issues and prevent booting.
- Hard drive failure – A damaged hard drive with your operating system installed may prevent booting up.
If you try turning on your computer and there are absolutely no signs of life – no fans spinning, no lights, no noises – then the issue is likely related to a hardware failure like the power supply, motherboard or CPU. If your computer tries to turn on but can’t boot properly, it’s more likely caused by RAM or hard drive failure.
How to Recover Data from a Computer That Won’t Turn On
If the computer won’t power on at all, you’ll need to remove the hard drive and connect it to another working computer to access the data. Here are the general steps to follow:
- Open up your computer case and locate the hard drive.
- Disconnect the power and data cables from the hard drive.
- Remove the hard drive from the computer.
- Get an external hard drive enclosure or USB adapter cable.
- Connect the hard drive to another computer via the enclosure or cable.
- The external hard drive should appear on the working computer.
- You can now access all files and data from the external hard drive.
- Copy all important files from the hard drive to save them.
Let’s go through these steps in more detail:
1. Open Up the Computer Case
First, you’ll need to open up the case of your computer to locate the hard drive inside. Lay the computer case flat on a table or desk and look for screws on the sides or back panel. Use a Phillips head screwdriver to remove any screws holding the case closed. The side panels should then lift off or slide back to access the internal components.
2. Locate and Disconnect Hard Drive
Once inside, you need to locate the hard drive. This is usually mounted in a drive bay or may be attached with screws somewhere inside the case. It looks like a small metal box or rectangle. There will be two cables connected to it – a wide ribbon-like data cable and a smaller power cable coming from the power supply.
Gently disconnect both the data and power cables from the hard drive. You may need to press clips or lift up tabs to release the connectors. Be careful not to damage the cables or hard drive connections.
3. Remove Hard Drive
Next, remove the hard drive from the computer case. There are usually screws on the side or bottom securing the drive into place. Use your screwdriver to remove the screws and then lift the drive out from the drive bay.
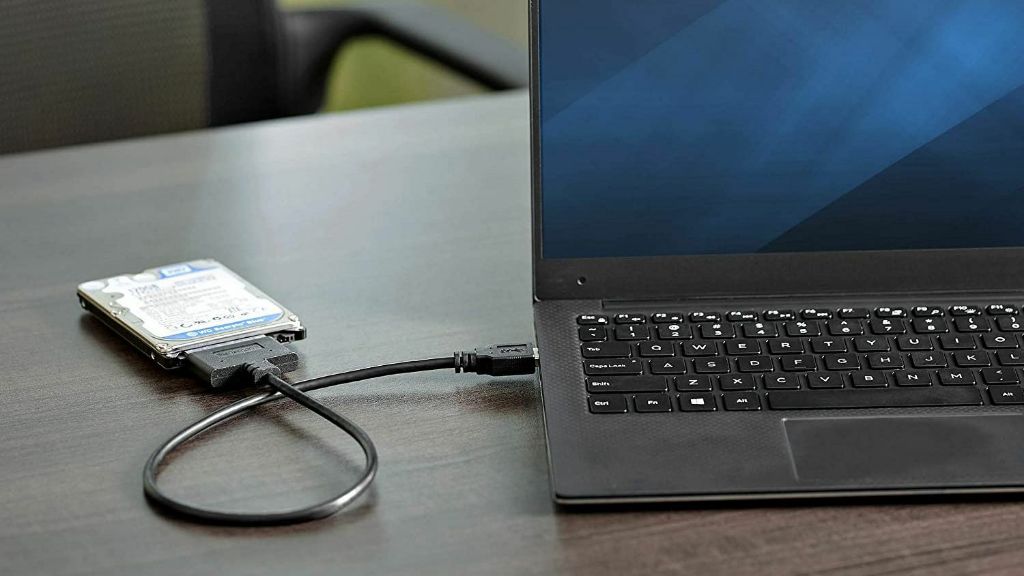
4. Get External Enclosure or Adapter
To connect the hard drive externally to another computer, you need either a hard drive enclosure or USB adapter cable. Enclosures are cases that hold the hard drive and connect it via USB, providing protection and power. USB adapter cables simply convert the hard drive interface into a USB plug, allowing fast connection.
You can purchase enclosures and adapter cables online or from most electronics stores. Make sure to get one compatible with your hard drive type – common interfaces are SATA, IDE or SAS. The enclosure or cable should come with instructions on how to connect the drive.
5. Connect Hard Drive Externally
With the hard drive enclosure or adapter cable, you can now connect the hard drive from the unworkable computer to another working PC. Use the enclosure or cable to plug the hard drive into an open USB port on the working computer.
The computer should automatically detect the connected hard drive, installing any drivers needed. You may need to initialize or format the drive first before it is assigned a drive letter and appears in My Computer / This PC.
6. Access Files and Data
Once connected and recognized, the external hard drive will be accessible in Windows File Explorer or Mac Finder like any other storage drive. You can browse folders and copy files off the drive to save them to the working computer or external backup.
Navigate through the hard drive directories and subfolders to find all your data. You may need to open certain files or programs to check if documents or media are intact and recoverable.
7. Copy Important Files to Safety
With the hard drive attached and files accessible, you can now copy any important data you need to save off the drive. Create folders on the working computer or external storage to organize the files. Move photos, documents, media files and anything else important into these folders.
Copy over your most critical files first before moving on to secondary data to ensure you rescue the essentials. Have enough free space on the computer or external drive to hold all the data you’re migrating over.
With all your key files saved and backed up, you can then reformat or dispose of the old hard drive if it is damaged or faulty.
Tips When Recovering Data from Hard Drive
Keep these tips in mind when salvaging files from a computer that won’t boot:
- Be extremely careful when handling the hard drive. Don’t knock, drop or shake the drive which could further damage components.
- Don’t continue trying to boot the computer if it’s not working. This can further corrupt the hard drive.
- Connect the hard drive externally to a working PC that you have administrator access to.
- Use the computer manufacturer’s enclosure if possible for guaranteed compatibility.
- Initialize or format the hard drive if prompted before trying to access files.
- Copy data over incrementally in batches to ensure successful transfer.
- Prioritize personal files like documents and photos first before programs or operating system files.
Advanced Recovery Methods
For more advanced users, if connecting the hard drive externally doesn’t work, there are some other options to try and recover data.
Remove Hard Drive and Install Internally in Another Computer
Rather than using an external adapter or enclosure, directly install the hard drive internally into another compatible computer’s motherboard. Connect the power and data cables internally to allow the working computer access to the drive.
Use Data Recovery Software
Special data recovery programs can interface with the hard drive to scan and extract files. Software can access data from drives that won’t initialize or have corrupted partitions. Popular recovery programs include Recuva, TestDisk, Disk Drill and EaseUS Data Recovery Wizard.
Repair Corrupted Firmware
If the hard drive has firmware logical corruption, use specialized tools like Boot-Repair-Disk to access and fix the drive firmware and allow data reading.
Send to Professional Data Recovery Service
For catastrophic hardware failure or complex solutions, professional data recovery companies have specialized tools and clean room facilities to recover and repair damaged drives. This can be expensive but may be able to save data when all else fails.
Prevent Data Loss in the Future
Going through data recovery from a dead PC can be a huge hassle. Here are some tips to avoid this situation in the future:
- Perform regular computer backups to external hard drives or the cloud.
- Use a surge protector or UPS battery backup for protection.
- Keep your computer in a cool, ventilated space and free of dust.
- Install computer monitoring software to check on system health.
- Maintain up-to-date backups as computer use changes over time.
- Replace aging computer hardware like the power supply to avoid failures.
- Store important data redundantly in multiple backup locations.
Conclusion
Recovering data from a computer that won’t turn on can be frustrating but is possible with the right tools and techniques. By removing the hard drive and connecting it to another working PC externally or internally, you can access all your files to copy and save key data. Following proper hard drive handling procedures and using data recovery software can help salvage your files when hardware issues prevent normal boot up.
Storing backups routinely and taking steps to safeguard your system can also prevent potential data loss disasters in the future. With the right preparation and methods, you can rescue your files from a dead PC and gain peace of mind knowing your data is safe.