Restoring from an iCloud backup can be a convenient way to get your iPhone or iPad set up quickly after a reset, repair, or when setting up a new device. However, some users find that not all of their photos are restored after the process completes. This can be alarming, since photos are often some of our most cherished digital possessions. Losing old photos of family, friends, vacations, and special events can feel devastating.
Fortunately, there are several ways to try to recover lost or missing photos after an iCloud restore. The photos often still reside in iCloud’s servers or on your original device, even if they did not transfer to your iPhone or iPad. With some effort, you can usually get your pictures back. This guide will walk through the various methods for recovering photos after restoring from iCloud.
How iCloud Backups Work
iCloud backups save a copy of your device’s settings and data to Apple’s servers, allowing you to restore that information in case your device is lost, stolen, or needs to be erased or replaced. However, iCloud backups do not automatically include your full photo library (1).
By default, iCloud backups only save thumbnail versions of your photos. The full-resolution versions of your photos will not be backed up unless you enable a separate iCloud feature called iCloud Photos (2).
With iCloud Photos enabled, your entire photo library including edits and metadata is stored in iCloud. Your photos can then be accessed from any device logged into your iCloud account. So if you rely on iCloud backups for photo recovery, be sure to also enable iCloud Photos.
Sources:
(1) https://support.apple.com/en-us/HT207428
(2) https://discussions.apple.com/thread/253865061
Enabling iCloud Photos
The first step to getting your photos back after restoring from iCloud is ensuring iCloud Photos is enabled across all your devices. iCloud Photos allows you to store your entire photo library in iCloud and access it from any device signed into your Apple ID.
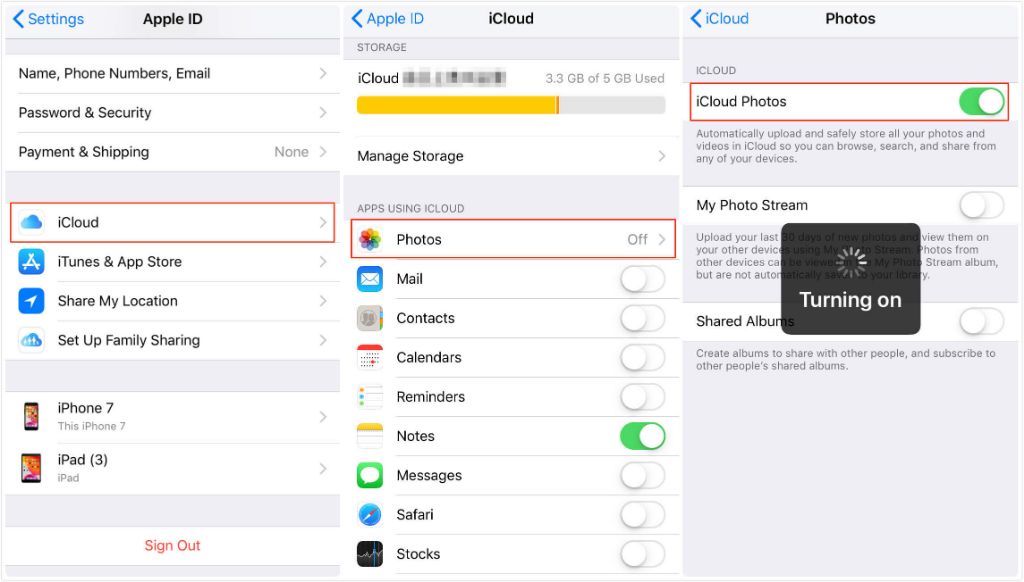
To enable iCloud Photos on an iPhone or iPad:
- Open the Settings app.
- Tap your name at the top of the screen.
- Tap iCloud.
- Tap Photos.
- Toggle on iCloud Photos.
Enabling iCloud Photos will upload your existing photo library to iCloud. This may take some time depending on your library size. This video shows the full process.
On a Mac, open the Photos app, click Photos in the menu bar, select Preferences, go to the iCloud tab, and enable iCloud Photos. This guide covers enabling iCloud Photos on a Mac in detail.
With iCloud Photos enabled, any photos you take on your devices will automatically sync across all devices signed into your Apple ID.
Downloading from iCloud.com
After restoring your device from an iCloud backup, your photos may not be immediately accessible on the device itself. However, you can log in to iCloud.com with your Apple ID to view and download your synced iCloud photo library.
To do this on a computer:
- Go to iCloud.com and sign in using your Apple ID credentials.
- Click on the Photos icon.
- Find the photos you want to download and select them.
- Click the Download button at the bottom.
This will allow you to download the original, full resolution versions of your photos to your computer. You can then transfer them back to your iPhone or iPad using the Photos app or Image Capture utility.
The main benefit of using iCloud.com is that you can access your entire iCloud photo library online, not just what was on your device. So if you forgot to download certain photos before restoring, you can still retrieve them from the cloud this way.
Using Image Capture
One way to access your photos after restoring from iCloud backup is by using the Image Capture app that comes installed on Macs and PCs. To use Image Capture:
- Connect your iPhone, iPad or iPod touch to your computer using the USB cable that came with your device.
- Open the Image Capture app on your Mac or PC. Your iOS device should appear in the sidebar.
- Select the photos you want to transfer from your iOS device to your computer. You can select individual photos or click “Import All” to transfer everything.
- Choose where to save the photos on your computer and click Import or Download.
The Image Capture app lets you easily access your photos stored on an iOS device and save them to your computer. This is helpful if you need to retrieve photos after an iCloud restore. For more details, see Apple’s guide on using Image Capture.
Third-party Apps
There are many third-party apps that can help recover photos from an iCloud backup. One reputable option is iMazing, which allows you to browse and extract photos and videos from iPhone/iPad backups. iMazing gives you access to iCloud backups, even without restoring to a device first.
To use iMazing for photo recovery:
- Download and install iMazing on your computer.
- Connect your iPhone or iPad to your computer.
- In iMazing, select your device and click “Backups”.
- Browse the backup contents and find the photo library.
- Select the photos you wish to recover and click “Export” to save them to your computer.
The great thing about iMazing is that it allows you to extract specific photos from a backup without needing to restore the entire backup. This makes it easy to get back just the photos you want. iMazing can recover photos even from old iCloud backups.
Backing Up Your Photos
One way to ensure you don’t lose your photos when restoring your iPhone from iCloud is to manually back them up yourself. This gives you full control over the process. Here are some strategies for backing up your photos to external drives or computers:
You can connect your iPhone to your computer using the charging cable and use the Image Capture app on Mac or the Photos app on Windows to import photos directly from your iPhone (1). This will allow you to select which photos to import and where to save them.
Another option is to use a third-party app like iMazing to create backups of your photos and save them to external drives or other devices (2). This gives you granular control over which photos are backed up.
You can also use cloud storage services like Google Photos or Dropbox to create additional backups of your photos that are separate from iCloud (3). Just make sure to verify the backups contain all the photos you want to preserve.
The key is to proactively create multiple backups of your important photos so you have copies stored independently from iCloud. This way if you ever need to restore your iPhone, you’ll still have access to your photos.
Sources:
(1) https://www.popsci.com/diy/how-to-transfer-photos-from-iphone-to-computer/
(2) https://www.pcmag.com/how-to/how-to-back-up-and-organize-photos-from-your-iphone-or-ipad
(3) https://support.apple.com/guide/iphone/back-up-iphone-iph3ecf67d29/ios
Avoiding Data Loss
The best way to avoid losing photos is to have multiple backups so you always have copies of your images in different places. Here are some tips to prevent data loss:
- Enable iCloud Photos to keep your photos synced across devices and stored by Apple. You can access your images at iCloud.com.
- Back up your iPhone to your computer using iTunes or the Finder app. This will save a copy of your photos to your computer.
- Use a third-party cloud storage service like Google Photos to back up your images.
- Save copies of your important photos on an external hard drive or USB flash drive.
- Print out physical photos to have hard copies in case of data loss.
Having redundant backups in multiple places ensures that even if you lose your photos in one spot, you’ll still have copies stored elsewhere. It’s smart to utilize both local backups like iTunes and cloud backups like iCloud to protect your data.
When All Else Fails
If you’ve exhausted all other options for recovering your photos from an iCloud backup, there are a couple last resorts you can try:
Contact Apple Support. As the provider of iCloud, Apple may be able to help recover photos from a backup in some cases. You can contact them by phone, online chat, or schedule a Genius Bar appointment for in-person help. They have more capabilities than the average user when it comes to accessing iCloud data.
Use data recovery software. Some advanced third party software like Stellar claims it can recover deleted photos from an iCloud backup without restoring the entire backup. This would allow you to get specific photos without overwriting your device.
Restore from a previous backup. If you have multiple iCloud backups available, you may be able to restore from an older backup that still contained the photos. This should be a last resort though, as you will lose all data created in between the backups.
As a last ditch attempt, you can try fully resetting and restoring your device in case something went wrong with the initial iCloud restore process. Just know this will erase all data currently on your device.
If Apple Support and data recovery attempts are unsuccessful, the photos may be unrecoverable at that point. Always make sure you have a secondary backup of irreplaceable photos for this reason.
Key Takeaways
Recovering photos from an iCloud backup after a restore can be accomplished through several methods, but it’s important to understand how iCloud backups work first. The key steps are enabling iCloud Photos so your camera roll is backed up, then downloading from either iCloud.com or using Apple’s Image Capture app on a paired Mac. Third-party apps may also help retrieve photos not found through official Apple routes.
However, the best way to avoid losing photos during a restore is having solid backup practices in place ahead of time. Regularly backing up your camera roll to iCloud or an external hard drive means you’ll always have access to your photos if anything happens to your device. Avoiding data loss should be the priority.
Following best practices for consistent backups, enabling all iCloud sync settings, and understanding restore procedures are the keys to protecting your irreplaceable photos and memories. With the proper precautions in place, you can safely restore your iPhone knowing your photos are safely stored.