Why You Might Want to Only Import Certain Songs
There are a few reasons why you may want to selectively import songs into iTunes rather than your entire music library:
Save space – Importing your full music library can take up a massive amount of storage space on your computer. By only importing your favorite songs or playlists, you can save gigabytes of space. This is especially useful if you have limited storage on your laptop or device.
Curate your collection – Carefully choosing which songs to import allows you to curate a collection of your favorite music. You may want to import only your most-listened to songs for easy access or import playlists for certain moods and activities.
Avoid unwanted music – Your full library may contain music you no longer listen to or that you added accidentally. Selectively importing prevents filling your iTunes with music you don’t want.
Focus on recent music – If your library contains music from years past you don’t listen to anymore, selecting recent additions to import keeps your iTunes focused on current music.
Locate the Songs You Want to Import
The first step is to locate the specific songs on your computer that you want to import into iTunes. Here are some tips for finding the song files:
Navigate to the folder where your music is stored. This is often in the Music or My Music folder under File Explorer on Windows or Finder on Mac. You can also use the search function in File Explorer or Finder to search for song titles, artists, albums, or file types like MP3.
On Windows 10 and 11, press the Windows key + E to open File Explorer then click on “This PC” in the left sidebar. Use the search bar at the top to search for song names, artists, etc. Source
On a Mac, open Finder and press Command + F to bring up the search bar. Make sure it is set to search the current folder, then enter song titles, artists, or keywords to find music files. Source
You can also use specialized music library software like MediaMonkey to search for specific songs in your music collection. This software indexes your music library making it easy to find songs.
Once you have located the specific songs you want to import, you can select them and prepare to bring them into iTunes.
Select the Songs in Finder/Windows Explorer
To select the specific songs you want to import into iTunes from Finder (Mac) or Windows Explorer (Windows), you’ll need to navigate to the folder where your music files are located. Once in the folder, click on the individual song files to select them one by one. To select multiple consecutive files, click on the first song file, then hold Shift and click on the last file – this will highlight all the songs in between. To select multiple non-consecutive files, click on one song, then hold Command (Mac) or Ctrl (Windows) and click on additional files you want to import.
By clicking, Shift+clicking, and Command/Ctrl+clicking, you can precisely choose the music files you want to bring into iTunes. Avoid dragging to select all the songs in a folder, as this will import everything including songs you may not want.
Open iTunes
The first step is to launch the iTunes application on your computer. iTunes should already be installed if you have an iPhone, iPad, or iPod Touch and sync it to your computer. If you don’t already have iTunes, you can download it for free from the Apple website.
To open iTunes on Windows, go to the Start menu and select iTunes from the list of applications. On a Mac, you can find iTunes in the Applications folder or use Spotlight to search for it. Once you locate the iTunes app, double-click the icon to launch it.
iTunes will open to the library view, which shows your music, movies, TV shows, apps, and other content. Make sure you have the “Music” section selected along the top, as this is where you will import the songs.
Drag Songs into iTunes
Once you have located and selected the songs you want to import in Finder or Windows Explorer, you can easily drag and drop them directly into your iTunes library.
To do this:
- Open iTunes on your computer.
- Arrange the Finder/Explorer and iTunes windows so you can see both.
- Click and drag the selected songs from Finder/Explorer into the iTunes window.
The songs will be imported into your iTunes library. You can drop them directly into the Songs list or into a playlist.
This drag and drop method provides an easy way to get music into iTunes without having to use the import feature.
Alternate Method: Import Button
If you don’t see the Import button at the top right of your iTunes window, you can still easily import songs using the File menu. Just follow these steps:
1. Select the songs you want to import in Finder or Windows Explorer. You can click and drag to select multiple songs.
2. Open iTunes and go to File > Import.
3. A box will pop up allowing you to select files to import. Navigate to where you selected the songs in Step 1 and choose Open.
The songs will begin importing into your iTunes library. Using File > Import is a handy workaround if the main Import button is missing for any reason.
For more troubleshooting tips, see this Apple Discussions thread on the iTunes Import Button Missing.
Check Imported Songs
Once you have imported the selected songs into iTunes, it’s important to confirm they appear properly in your iTunes library. Here are some tips for verifying your imported songs:
Open the iTunes library and navigate to the playlists, artists, or albums where the imported songs should now appear. Scroll through and visually confirm each song is present. Checking the playlists and library views will ensure the metadata and organization came across correctly during the import process.
Do a quick sample playback of a few tracks to confirm the songs play properly in iTunes without any errors or issues. This will help identify any corrupt or improperly imported files.
Check the total number of songs in your library to see if it matches your expectation. For example, if you imported 10 songs, your iTunes library song count should increase by 10.
Use the search field to look up specific song titles and confirm they display the correct results. This is an easy way to verify the imported songs match what you expect.
Double check that any playlists, metadata like artist name or album, or other organizational information came across accurately in the iTunes library. Make any corrections as needed.
Cleaning up any issues with the imported songs now will prevent problems down the line. Taking the time to verify ensures you can then listen, organize, and enjoy your special selection of imported music in iTunes.
Organize Imported Songs
Once you’ve imported the selected songs into iTunes, you’ll want to get them organized so you can easily find and listen to them later. Here are some tips for organizing your imported songs in iTunes:
Add the songs to relevant playlists. iTunes allows you to create customized playlists to organize songs according to genre, mood, activity, or any other system that works for you. Drag and drop your imported songs into one or more existing playlists, or create new playlists specifically for these additions.
Edit the metadata. Make sure song titles, artists, albums, genres, and other metadata are filled out accurately. This helps with searching and sorting your library. Click on a song and edit the info in the metadata fields on the right. For multiple songs, you can select them all then batch edit metadata.
Rate the songs. If you want to mark some songs as favorites, you can give them a 5-star rating. Or use ratings to indicate degrees of liking. This allows you to sort and filter based on ratings.
Add to library. By default, imported songs go into your main Music library. But you can also add them to other preset libraries like Movies or TV Shows, or create new libraries of your own.
Check the file format. Make sure the files are in a format fully supported by iTunes and apple devices, such as AAC or MP3. You may want to convert files if needed.
Back up your library. Once organized as you like, it’s a good idea to back up your iTunes library to an external hard drive so you have a copy. You can find the back up option under File > Library > Back Up to Disk.
Now you can easily find your imported tracks and listen to your personalized collection. And explore more tips for organizing your iTunes music library.
Listen and Enjoy Your Imported Songs
Once you’ve imported the songs you want into your iTunes library, they’ll be ready for playback. You can listen to the imported tracks just like any other song in your iTunes library.
To play an imported song, simply double-click on it in your library or right-click and select Play. The song will start playing immediately. You can also click the Play button in the top left corner of iTunes to play an entire playlist or album containing your imported tracks.
The imported songs will be mixed in with the rest of your iTunes music library. You can sort by Artist, Album, or Song to easily find the tracks you just imported. Make playlists containing your favorite imported songs to listen to again and again.
With the songs safely in your iTunes library, you can listen to them anytime – whether on your computer or on the go by syncing to your iPhone or iPod. Enjoy your imported music!
Other iTunes Tips
In addition to selective importing, iTunes offers many other useful features for managing your music library and settings.
To edit song information like title, artist, album, genre, etc., select a song or multiple songs, right-click and choose “Get Info.” This allows you to fix mislabeled songs or add details.
You can create playlists to organize songs into custom mixes. Click “File” then “New Playlist” to get started. Drag and drop songs into the playlist to add them.
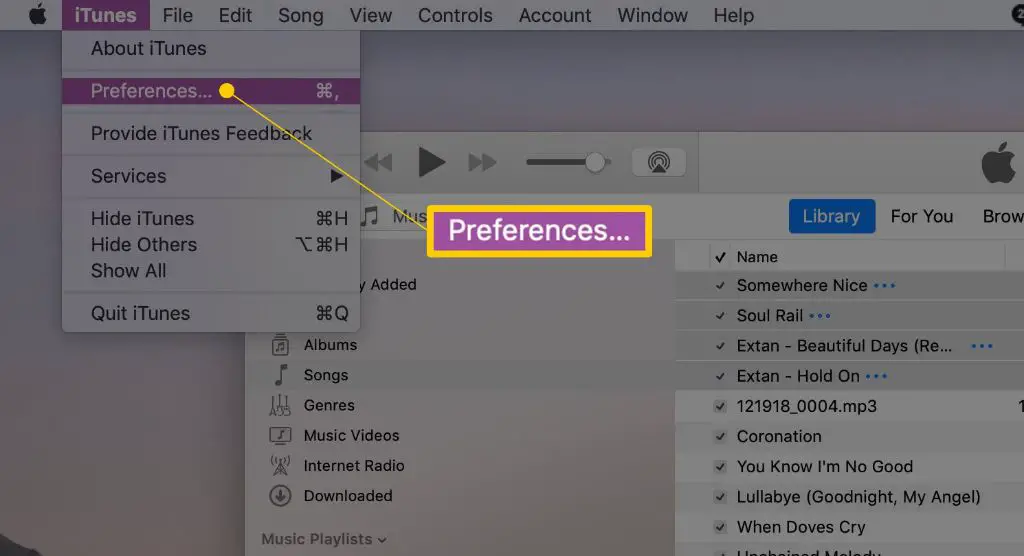
To adjust audio settings like equalizer presets and volume control, go to “Edit” then “Preferences” and click the “Playback” tab. This is where you can enable sound enhancements.
The column browser provides different ways to sort your library. Right-click any column heading to customize the columns shown. Some handy ones are “Play Count” and “Last Played.”
Check for updates under “iTunes” then “Check for Updates” to ensure you have the latest version with newest features. Updates often include improvements to performance and stability.
For help learning more tips and tricks, view tutorials on Advanced iTunes Tips. There are many ways to tailor iTunes to your preferences for managing media.