An external hard drive is a portable storage device that can be attached to a computer using a USB or Thunderbolt cable. External hard drives allow you to expand the storage capacity of your Mac beyond what came with the internal drive.
Before an external hard drive can be used with a Mac, it needs to be initialized, which formats the drive specifically for macOS. Initializing erases all data on the drive and prepares it for use as a backup drive or storage expansion for a Mac.
There are a few reasons you may want to use an external hard drive with your Mac:
- Increase storage for backups, media files, or project archives
- Have a portable drive to take files with you or use with multiple computers
- Add extra storage without opening up your Mac
Overall, external hard drives are a convenient way to add substantial storage and flexibility to your Mac at a relatively low cost. But first, the drive needs to be initialized and formatted properly for macOS.
When To Initialize A New External Hard Drive
Before an external hard drive can be used with a Mac, it needs to be initialized first. This prepares the drive to be readable by macOS and allows you to format it for macOS compatibility. Initialization essentially sets up the structure for macOS to save and read data from the drive.
Most external hard drives formatted for Windows PCs come pre-formatted in NTFS or exFAT. While Macs can read these formats, they are read-only and do not support full compatibility features in macOS. Therefore, a new external drive needs to be reformatted and initialized to work optimally.
There are two main Mac-compatible formats the drive can be initialized as: Mac OS Extended (HFS+) or Apple File System (APFS). HFS+ is compatible with older versions of macOS while APFS is optimal for newer Macs running macOS 10.13 or later. Checking the file system of the external drive first can help determine which format to use.
If the external drive was previously used with a Windows PC, it’s a good idea to back up any needed data first before initializing the drive for a Mac. The initialization process will erase all existing data.
How To Initialize An External Hard Drive on Mac
Initializing an external hard drive on a Mac is done using the Disk Utility application. Here are the steps to initialize an external drive on a Mac:
1. Open Disk Utility. This is located in Applications > Utilities.
2. In the sidebar, select the external drive you want to initialize.
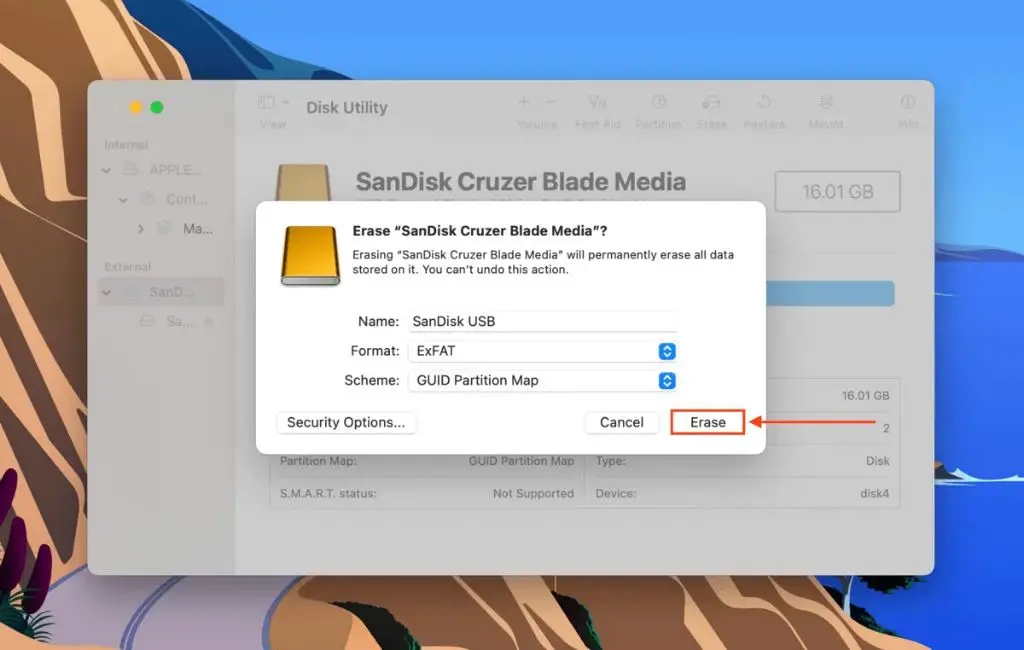
3. Click the “Erase” button at the top of the Disk Utility window.
4. Give the drive a name and select a format. For most uses, APFS is recommended as the format for external drives used with Macs. The default GUID Partition Map scheme is also recommended for most users.[1]
5. Click “Erase” and wait for the process to complete. The drive will now be initialized and ready to use.
That’s all there is to it! Initializing a drive on Mac does not take long and is necessary to prepare an external drive for first use.
Choosing a Format
When initializing an external hard drive on a Mac, you’ll need to choose a format for the drive. The main options are APFS (Apple File System), Mac OS Extended (HFS+), and ExFAT.
APFS is the default format for drives formatted on modern versions of macOS. It is optimized for solid state drives and offers strong encryption and space efficiency. APFS drives can be used as a startup disk and with Time Machine backups. However, APFS drives will be read-only on Windows computers [1].
Mac OS Extended (HFS+) is an older format optimized for mechanical hard drives. It supports Time Machine backups but cannot be used as a startup disk on modern Macs. HFS+ drives can be read and written on Windows computers with third party software installed [2].
ExFAT allows an external hard drive to be used across both Mac and Windows computers without any additional software. However, ExFAT does not work with Time Machine and lacks the encryption capabilities of APFS.
Encryption Options
One of the beneficial features of Disk Utility is the ability to encrypt your external hard drive to add a layer of security (Apple Support). Encrypting your drive will protect your data from unauthorized access by scrambling the information using 256-bit AES encryption. This is especially important if storing sensitive files or taking your drive on the go.
To encrypt your external hard drive on Mac:
- Open Disk Utility
- Select your external drive on the left side panel
- Click “Erase” along the top menu
- Choose a name and format (APFS or exFAT)
- Select “Security Options”
- Choose a type of security like 128-bit AES encryption
- Enter and verify a password
- Click “Erase” to confirm
This will encrypt your entire drive. Just make sure to remember your password, as losing it means losing access to all data with no way to recover it (UVM).
How To Partition An External Hard Drive
Partitioning divides the storage space on your external hard drive into separate volumes that function independently. This allows you to organize your data and optimize your drive’s performance. For example, you may want to create separate partitions for Time Machine backups, Windows, and general storage.
To partition an external drive on Mac:
- Open Disk Utility, located in Applications > Utilities.
- Select the external drive from the sidebar.
- Click the Partition button in the toolbar.
- Specify the number of partitions you want to create.
- Adjust the size of each partition as needed by dragging the dividers.
- Give each partition a name and format.
- Click Apply to partition the drive.
This will divide the external drive into the specified number of partitions. You can use one partition for Time Machine backups, another for Windows compatibility via exFAT or FAT32 format, and additional partitions for general document and data storage.
Troubleshooting Initialization Issues
There are a few common errors you may encounter when trying to initialize an external hard drive on your Mac.
One issue is getting an error message that the drive is unable to be erased or partitioned. This could mean the drive has failed or is failing, or there is a serious file system problem. You can try to ignore the error and proceed, but the initialization may fail.
Other times, your Mac may not even recognize the external hard drive at all. First, try restarting your Mac and reconnecting the drive to see if that fixes the issue. You can also try connecting the drive to a different USB port on your Mac. The USB port may be bad or not providing enough power to run the drive. An external powered USB hub may help in this situation.
If you’ve tried on multiple ports and Mac restarts with no luck, the drive itself may have failed. You can scan for and remove any viruses on your Mac in case malware is preventing access to the drive. As a last resort, you can attempt data recovery software to rescue files before reformatting the external drive.
Following general troubleshooting steps like verifying physical connections, trying different ports, restarting your Mac, and scanning for malware can help identify and fix common initialization problems.
Using Disk Utility vs Terminal
The easiest way to initialize an external hard drive on Mac is by using the built-in Disk Utility application. Disk Utility provides a graphical user interface to format, partition, and perform other disk management tasks.
However, more advanced users may prefer to use the Terminal, which allows initializing a disk with more customizable options. Here are some Terminal commands for initializing an external drive:
- Format drive as APFS:
diskutil apfs createContainer /dev/diskX - Format drive as exFAT:
diskutil eraseDisk exFAT "DriveName" /dev/diskX - Format drive as FAT32:
diskutil eraseDisk FAT32 "DriveName" /dev/diskX
The main advantage of using Terminal is that you can specify the exact file system type, partition scheme, drive name, and other low-level disk settings. Disk Utility provides less fine-grained control. However, Terminal does require more technical expertise.
For most users initializing a new external drive for basic usage, Disk Utility will be the simpler option. But power users may want to unlock the flexibility of the Terminal for more customized disk management.
Tips For Using Your New External Drive
Properly caring for and using your external hard drive is important to get the most out of it. Here are some tips:
Always eject the external drive before unplugging it. On Mac, click the eject icon next to the drive name or right-click the drive icon and select “Eject”. Failing to properly eject can lead to data loss or drive corruption.
Be gentle with the USB cable when plugging and unplugging. Wiggling or excessive force can damage the port. Consider using a dedicated USB hub to minimize wear and tear on your Mac’s ports.
Store the drive in a cool, dry place and avoid shocks, drops, and vibration. External hard drives are mechanical devices and can be damaged by mishandling.
Consider using your external drive with Time Machine for easy automated backups of your Mac’s system disk. Time Machine will continually update changes so you have regular snapshots to restore from if needed [1].
Use your fastest external drives for things like video editing scratch disks and games. Slower drives are fine for general file storage and backups.
For ultimate flexibility, format and partition the drive so you have separate volumes for different purposes like backups, media storage, bootable drives, and general everyday file storage.
With some minor setup, external drives can even be used as startup boot drives for your Mac [2].
Conclusion
Initializing and preparing an external hard drive for use with your Mac is a straightforward process using Disk Utility. The key steps include:
- Connecting the new external drive and launching Disk Utility
- Selecting the external drive and clicking “Erase”
- Choosing a format like APFS or Mac OS Extended
- Optionally enabling encryption and partitioning
- Clicking “Erase” to initialize the drive
Encryption provides an extra layer of security for sensitive data stored on the external drive. Partitioning allows you to create separate volumes on the same drive for different uses or types of files.
Be sure to eject and safely disconnect your external drive when not in use. Our guides on managing permissions, troubleshooting connectivity issues, and optimizing external drive performance can help you get the most out of your new external storage.