What is an unallocated disk?
An unallocated disk refers to disk space that does not contain a file system or partition. This means the space has not been formatted to use a file system like NTFS or ext4, and hasn’t been partitioned to separate it into logical drives. An unallocated disk is essentially raw disk space.
Unallocated disks differ from unformatted disks and unpartitioned disks in the following ways:
– Unformatted disk: The disk has been partitioned but the partitions do not contain a file system yet. The disk space has defined boundaries but needs to be formatted before use.
– Unpartitioned disk: The entire disk space is treated as one drive. It has no partitions dividing it into logical sections. The space needs to be partitioned first before formatting individual partitions.
– Unallocated disk: The disk is completely raw with no partitions or formatting. It cannot be accessed by the operating system until it is initialized, partitioned, and formatted (Source).
When do unallocated disks occur?
Unallocated disks can occur for a few common reasons:
Deleting a partition – If you delete a partition on your hard drive, the space that partition occupied will become unallocated. The data is removed but the physical space is left blank and available to be used again. Using Disk Management, you can easily delete a partition, resulting in unallocated space.
Disk errors – If the disk has errors or corruption in the partition table or file system structures, it may show the space as unallocated even when partitions still exist. Errors could occur from sudden power loss, hardware failure, or virus/malware activity. Running chkdsk or a disk repair utility may fix this.
Buying a new disk – Brand new internal or external hard drives you purchase will start completely unallocated. No partitions or filesystem will exist until the disk is initialized and formatted.
According to iBoysoft, other potential causes include outdated disk drivers, incorrectly disconnected disks, or even accidentally re-initializing the disk.
Initializing vs formatting
Disk initialization prepares the drive for use by Windows and chooses the disk partition style, while formatting a partition prepares it to store files. Initialization is a one-time setup process, and formatting can be done multiple times.
There are key differences between disk initialization and the two types of formatting:
- Initialization: Sets up the partition table on the disk so Windows can recognize it. The two options are Master Boot Record (MBR) for BIOS/legacy systems or GUID Partition Table (GPT) for UEFI systems.
- Quick format: Erases all existing data on the partition by deleting the file table. It sets the partition as active but does not scan for bad sectors.
- Full format: Performs everything quick format does and also scans the disk for bad sectors to avoid using them for storage. Takes much longer than quick format.
In summary, initialization puts a partition table and makes the disk visible while formatting preps a partition for usage by erasing data and, in the case of full format, checking for disk errors.
How to check for unallocated disks
The easiest way to check for unallocated disks on Windows is to use the built-in Disk Management utility.
To open Disk Management, right-click the Start menu and select “Disk Management.” This will open a window that displays all the disks connected to your computer.
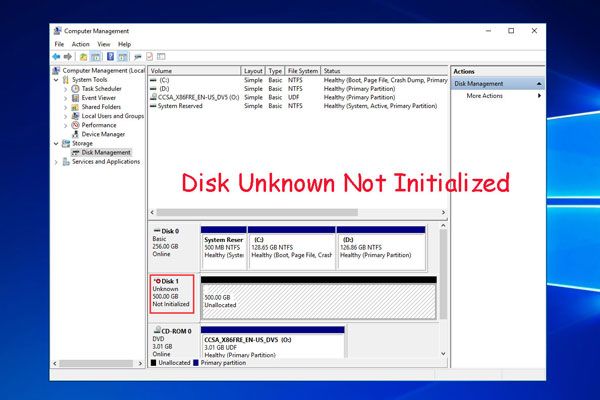
Unallocated space will appear labeled as “Unallocated” and the space will be black. Allocated disks will show up as colored blocks for the space that has been partitioned and formatted.
You can also scan for unallocated disks using the command line tool Diskpart. To do this, open the Command Prompt as Administrator and run the “list disk” command. This will show information about all the disks connected to your system. Unallocated disks will appear with the status “No Media.”
Disk Management provides a graphical way to easily identify unallocated disks, while Diskpart enables scanning from the command line. Both tools are built into Windows and handy for checking for and finding unallocated space.
Sources:
https://www.microcenter.com/tech_center/article/10800/how-to-partition-unallocated-space-with-disk-management-in-windows-10
https://answers.microsoft.com/en-us/windows/forum/all/recover-unallocated-disk-space/fab332ab-883e-4f73-8645-d70c16d8728b
Initializing the Disk with Disk Management
Disk Management is a graphical tool included in Windows that allows you to initialize disks. Here is a step-by-step guide to initialize a disk using Disk Management:
- Open Disk Management by pressing Windows Key + R, typing “diskmgmt.msc”, and hitting Enter.
- Right-click on the disk you want to initialize and select “Initialize Disk”.
- Select either MBR (Master Boot Record) or GPT (GUID Partition Table) partition style. MBR is compatible with older operating systems while GPT supports larger disk sizes.
- Check the checkbox to overwrite existing data if you want to erase all data on the disk.
- Click “OK” to confirm.
The disk will now be initialized and show as “Unallocated”. You can then create new volumes on the disk and format it before using it to store data. Initializing the disk with Disk Management provides a simple GUI for initializing disks in Windows.
Source: https://learn.microsoft.com/en-us/windows-server/storage/disk-management/initialize-new-disks
Initializing using Diskpart
Diskpart is a command line tool built into Windows that allows you to initialize disks. Here is a step-by-step guide to use Diskpart to initialize a disk:
- Open the Command Prompt as an administrator. Search for “cmd” in the Windows search bar, right click on the Command Prompt app, and select “Run as administrator”.
- Type “diskpart” and press Enter to start Diskpart.
- Type “list disk” to view a list of all disks.
- Select the disk you want to initialize by typing “select disk X” where X is the disk number. For example, “select disk 1”.
- Type “clean” to remove any existing partitions on the disk.
- Type “create partition primary” to create a primary partition on the disk.
- Type “format quick fs=ntfs” to quick format the partition with NTFS.
- Type “exit” to close Diskpart.
And that’s it! Those commands will completely initialize your disk so it is ready to use. You can then assign a drive letter in Disk Management if needed. Refer to the Microsoft documentation for more details on using Diskpart commands.
Choosing between MBR and GPT
When initializing an unallocated disk, you need to choose between the Master Boot Record (MBR) or GUID Partition Table (GPT) partitioning style. This decision depends on the pros and cons of each approach:
The MBR style has been around since the early days of PCs. Its main advantages are compatibility with older systems and simple disk structures. However, MBR has some major limitations:
- MBR disks can only support up to 2 terabytes (TB) of storage space. Any space beyond 2TB will show as unallocated and unusable.
- MBR only allows up to 4 primary partitions per disk.
GPT was designed more recently to overcome MBR’s limitations. GPT provides:
- Support for disk sizes up to 9.4 zettabytes (9.4 billion TB) with no unallocated space.
- Capability for a nearly unlimited number of partitions.
- Enhanced reliability due to CRC32 checksums on the partition table.
- Improved GUID partition identifiers instead of MBR’s 32-bit logic.
The downside of GPT is mainly just lack of compatibility with some older PCs and operating systems. However, all modern versions of Windows, Mac OS, and Linux support GPT partitioning.
In summary, GPT is generally recommended for initializing unallocated disks unless you need compatibility with legacy BIOS/MBR-based systems. MBR should only be used for disks under 2 TB or if you specifically require an MBR layout.
Partitioning and formatting
After initializing a disk, the next steps are optional but recommended – creating partitions on the disk and formatting it. Partitions divide the disk into separate logical sections that can have different file systems. Formatting prepares the disk partitions to store files by creating a file system.
On Windows, you can use Disk Management for partitioning and formatting. Right-click each partition you want to create on the initialized disk and select New Simple Volume. Go through the wizard to specify the partition size, drive letter, and file system (e.g. NTFS or exFAT).
To format the partition, right-click it in Disk Management and select Format. Choose the file system, allocation unit size, and volume label. Click OK to format the partition.
On Mac, you can use Disk Utility to partition and format an initialized disk. Click the Partition tab, select the number and sizes of partitions, and click Apply. Then select each partition, choose a name and format, and click Erase to format it.
Formatting erases all existing data, so be sure to back up first if the disk contains important files. After formatting, the disk partitions will be ready to use for storage.
For more details, refer to the Microsoft and Apple support documentation: Partition and format a disk on Windows, Partition a disk on Mac.
Troubleshooting Issues
There are a few common errors and problems that may occur when trying to initialize an unallocated disk:
You may receive an “Incorrect Function” error in Diskpart or Disk Management when trying to initialize the disk. This typically means there is an issue with the disk itself that is preventing initialization. Try disconnecting and reconnecting the disk or using a different SATA cable or port on the motherboard [1].
If you see a “Disk Unknown Not Initialized” error, the disk is likely failing or corrupt. You can try restarting your computer and reconnecting the disk to see if it self-corrects. Otherwise you may need to replace the disk if it is faulty [2].
An I/O device error points to the disk having bad sectors or physical damage. You can attempt to repair the disk with CHKDSK or a disk repair utility, but a severely damaged disk may need to be replaced.
Always backup your data first before initializing a disk, as the process can cause data loss. If the disk already contained data before becoming unallocated, initializing will likely overwrite it.
If the disk continues to show as unallocated after initializing, try reformatting it to create a new partition.
Initializing disks on Mac
On Mac computers, unallocated disks typically occur when connecting a new external hard drive or SSD that has not been initialized and formatted yet. To initialize an unallocated disk on Mac:
1. Open Disk Utility, located in Applications > Utilities.
2. Select the unallocated disk on the left side panel.
3. Click the “Initialize” button at the top. This will launch the initialization options.
4. Give the disk a name if desired.
5. Select the disk format – typically APFS is best for SSDs and macOS Ventura. HFS+ is also an option for older OS versions.1
6. Select the scheme – GUID Partition Map is recommended for most users.
7. Click Initialize. This will quickly initialize the disk.
The disk is now ready to be partitioned and formatted using Disk Utility before use.
