Initializing and formatting a new hard drive is an important process that prepares the drive for use with your computer’s operating system. By following some simple steps, you can get your new drive ready to store files in no time.
What is initializing a hard drive?
Initializing a hard drive erases any existing partition and file system information on the drive and prepares it for use with a particular operating system and file system. The initialization process writes new partition and file system structures to the drive, essentially creating a blank slate.
Initializing is an essential first step when setting up a new hard drive, as it configures the drive to work with your computer’s operating system and BIOS. The operating system cannot access or store data on the new drive until it has been initialized.
When to initialize a new hard drive
You should initialize a hard drive under the following circumstances:
- When installing a new internal or external hard drive
- When connecting a hard drive from another computer and want to use it as external storage
- When repurposing an old hard drive for a new use
- If you get an error message telling you the drive needs to be initialized
Initializing removes any existing data on the drive, so you should only initialize drives that are blank or drives that you no longer need the data on.
How to initialize a hard drive in Windows
Follow these steps to initialize a new hard drive in Windows:
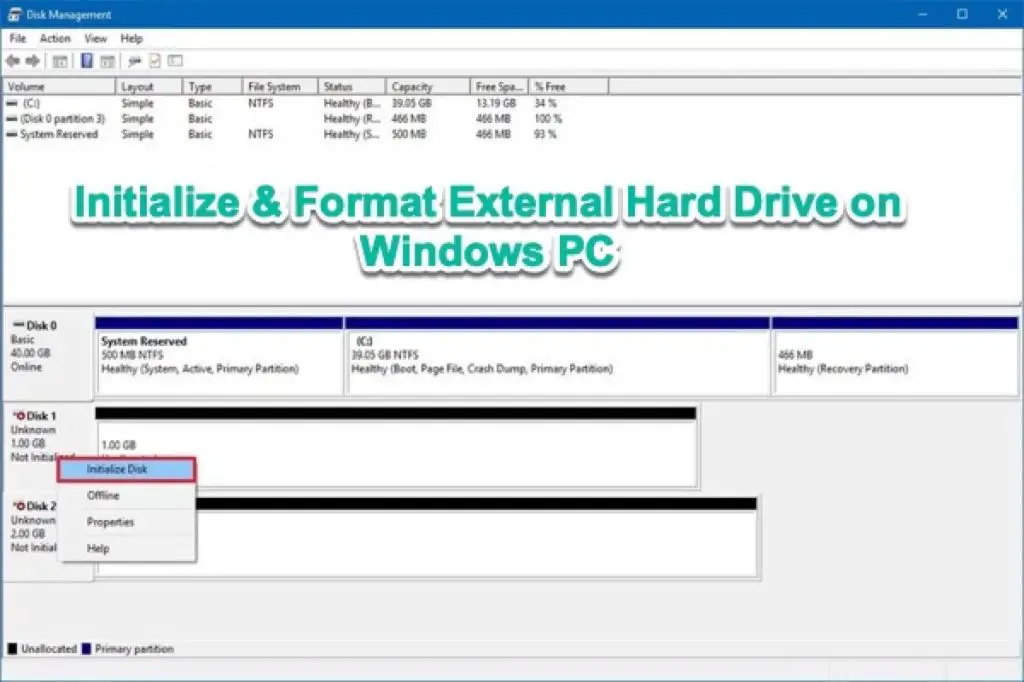
- Open the Disk Management utility. You can access this by right-clicking the Start menu and selecting “Disk Management”.
- The new hard drive should appear in the list of disks in the lower half of the Disk Management window. It may be labeled as “Unknown” and “Not Initialized”.
- Right-click on the disk and select “Initialize Disk”.
- In the Initialize Disk dialog box, select either MBR or GPT partitioning. MBR is compatible with older operating systems while GPT works better for newer versions of Windows and drives larger than 2TB.
- Click “OK” to confirm. The disk status should now change to “Online”.
The hard drive is now initialized but does not yet have a file system or assigned drive letter. Keep reading to learn how to format the drive.
How to initialize a hard drive on Mac
Here are the steps for initializing a drive on Mac OS X:
- Open Disk Utility, located in the Applications/Utilities folder.
- Select the new hard drive from the list on the left side. It may be labeled as “External” or something similar.
- Click the Erase tab.
- Give the drive a name and select a format like Mac OS Extended (Journaled).
- Click Erase. A progress bar will appear showing the initialization status.
Once completed, the drive will be ready for use. You can now format the drive and assign a file system.
What is formatting a hard drive?
Formatting a hard drive writes a file system to the drive, which allows an operating system to organize and access the data on the drive. Formatting divides the drive into logical sections that can hold files, folders, and other data.
Some common file system formats are:
- NTFS – Default system for recent versions of Windows
- exFAT – Compatible with both Windows and Mac
- EXT4 – Used by Linux operating systems
- HFS+ – Used by macOS
Choosing the right file system depends on what operating systems you plan to use the drive with.
When should you format a hard drive?
You should format a drive in these scenarios:
- After initializing a brand new drive
- If you want to completely erase all data on a used drive
- If you want to switch file systems for compatibility reasons
- If Windows detects file system errors on the drive
Formatting erases all data on a drive, so you should only format drives that you no longer need the data on or new drives that have already been initialized.
How to format a hard drive in Windows
Here are the steps to format a hard drive in Windows:
- Open Disk Management utility.
- Right-click the disk you want to format and select “Format”.
- Choose the file system – NTFS is recommended for Windows-only drives. Select exFAT for cross-platform compatibility.
- Give the drive a descriptive label if desired.
- Check the Quick Format box to format the drive quickly.
- Click Start and then OK to begin formatting.
The formatting process may take several minutes to complete depending on drive size. Once done, the drive will show the new file system and have a designated drive letter.
How to format on Mac
Follow these steps to format on macOS:
- Open Disk Utility.
- Select the drive you want to format.
- Click Erase at the top.
- Provide a name and select Mac OS Extended (Journaled) as the format.
- Click Erase to start the formatting process.
That’s all there is to it! Now you can start storing files on your freshly formatted drive.
Tips for initializing and formatting drives
Keep these tips in mind when initializing and formatting hard drives:
- Back up any important data before initializing or formatting!
- Use Disk Management on Windows or Disk Utility on Mac – avoid third-party tools.
- Choose the right file system – exFAT offers wide compatibility.
- Quick formatting is fine for personal use.
- Format drives before using them for backup.
Frequently Asked Questions
Is initializing a hard drive the same as formatting it?
No, initializing and formatting a drive are two distinct processes. Initializing first erases any partitioning and file system information and prepares the drive for formatting. Formatting then writes a specific file system to the drive.
Do I have to initialize a brand new hard drive?
Yes, initializing is a crucial first step when installing a new hard drive. It configures the drive to work with your computer’s operating system.
What happens if I initialize a drive that already has data on it?
Initializing a drive erases all existing data on the drive. So only initialize drives that are blank or that you no longer need the data from.
When would I need to reformat a hard drive?
Reasons to reformat a drive include wanting to completely wipe the drive, switch to a different file system, resolve file system errors, or repurpose the drive for a new operating system.
Is exFAT compatible with Mac and Windows?
Yes, exFAT is a universally compatible file system that works with both Windows and macOS. It’s a good option for external drives used across different operating systems.
Should I use quick formatting or regular formatting?
Quick formatting is usually sufficient for personal hard drive use. It’s much faster but less thorough than regular formatting. Regular formatting does a more in-depth scan for errors.
Conclusion
Initializing and formatting are crucial first steps when installing new hard drives or repurposing existing ones. Always be sure to back up important data first before initializing or formatting, as both processes erase data. Use the native disk utilities in Windows and Mac, and choose a file system like exFAT if you need cross-OS compatibility. Refer to this guide anytime you need to initialize or format a drive!