If you have connected a new SSD and it is not showing up in Disk Management, there are a few steps you can take to get it initialized and accessible. The most common reasons an SSD may not appear in Disk Management include:
Quick Answers
– The SSD is not properly connected or seated in the motherboard/enclosure
– Missing or outdated storage drivers
– The SSD is set to offline in Disk Management
– The disk signature is missing or corrupted
– The disk partition style is not supported
Ensure Proper Physical Connection
First, you’ll want to check that the SSD is properly physically installed and connected. Here are some things to verify:
- The SATA data and power cables are securely attached to the SSD and motherboard/enclosure.
- The SSD is properly seated in the M.2 or drive bay slot (if applicable).
- The storage enclosure and connection ports are working correctly if using an external enclosure.
- Try connecting the SSD to another SATA port and rebooting if using a SATA SSD.
Carefully reseat connections and ensure nothing is loose or damaged. SSDs are delicate and poor connections are a common reason an SSD may not appear.
Update or Install Storage Drivers
If the physical connections are fine, the next thing to check is whether you have the latest storage drivers installed for the SSD. An incompatible, missing or outdated storage driver can prevent Disk Management and your system from detecting a connected SSD.
To update your storage drivers:
- Open Device Manager in Windows.
- Expand the Disk drives category.
- Right click on the SSD driver and select Update driver.
- Select Search automatically for updated driver software.
- Reboot after the driver is updated.
If the SSD is not listed in Device Manager, try installing the latest chipset driver package for your motherboard. You can also visit the SSD manufacturer’s website and download the latest storage driver for the model SSD you are using.
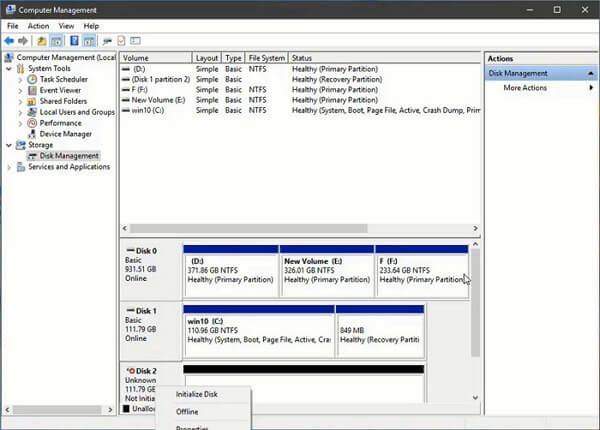
Check SSD Status in Disk Management
The next step is to check for the disk in Disk Management. SSDs may show in Disk Management but appear offline or with no drive letter assigned. Here’s how to check:
- Open Disk Management (press Windows + R and type diskmgmt.msc).
- Check the bottom panel for any disks in the Offline status.
- Right-click the disk and Select Online to bring it online.
- Right-click and choose Initialize Disk if prompted.
- Right-click the volume and choose Change Drive Letter and Path to add a drive letter if needed.
This will make the SSD accessible in Windows Explorer if it shows in Disk Management but is currently offline or without a drive letter.
Reassign Drive Signature
If the SSD still isn’t showing up in Disk Management, the drive signature may be corrupted or missing. Here is how to reassign the signature:
- Open an elevated Command Prompt window.
- Type diskpart and press Enter.
- Type list disk and press Enter to show all disks.
- Select the disk number that matches your SSD size.
- Type clean and press Enter to remove all existing partitions and formatting.
- Type create partition primary and press Enter to create a new primary partition.
- Type format quick fs=ntfs and press Enter to quick format the partition.
- Type assign and press Enter to give the partition a drive letter.
- Type exit and close Command Prompt when finished.
The diskpart clean command will remove the drive signature and allow Windows to reassign a new signature when the partition is created. This will make the SSD detectable in Disk Management again in many cases.
Check Partition Style
Another potential cause is an incompatible partition style on the SSD. For example, some tools default to creating GPT partitions that may not be recognized by certain BIOS versions.
To check the partition style:
- Open Command Prompt as administrator.
- Type diskpart.
- Type list disk.
- Select the SSD disk number.
- Type detail disk.
This will show you the current partition style of the SSD. If it is showing as GPT, you may need to switch it to MBR for better compatibility:
- Type clean to remove all partitions.
- Type convert mbr to convert to MBR.
- Create a new primary partition.
- Format the partition quick.
- Assign a drive letter.
Converting to MBR can allow BIOS and Disk Management to properly detect the SSD in some problematic scenarios.
Initialize In Another Computer
If you have tried the above steps and the SSD still does not show up in Disk Management, one last option is to connect it to another computer. Sometimes Disk Management on one PC may not detect a drive properly while it is recognized on a different system.
Connect the SSD to another computer and see if it is detected in Disk Management there. If it is detected, you can initialize it, create a partition, assign a drive letter, and format it. This should allow the drive to be detected in the original computer as well once moved back.
Other Potential Fixes
There are a few other things you can try if the above solutions do not work:
- Update BIOS/firmware to the latest version.
- Try a different SATA cable and port.
- Disable hot swap if enabled in the BIOS for SSD.
- Connect the SSD before booting rather than hot plugging.
- Use diskpart to clean or create a new simple volume.
Initialize In Disk Management
Once your SSD shows up in Disk Management, you can easily initialize it:
- Right-click space representing the drive and choose Initialize Disk.
- Select a partition style – MBR or GPT.
- Click OK to confirm.
After initializing, the SSD will show as Unallocated space. You can create a new volume on it:
- Right-click the unallocated space.
- Select New Simple Volume.
- Go through the wizard to create a volume.
Format the new volume with NTFS file system and assign a drive letter. The SSD will now be accessible for storage in Windows Explorer.
Conclusion
In summary, if your SSD is not showing up in Disk Management, first ensure it is properly connected physically to the PC. Update storage drivers, check the disk status in Disk Management, reassign the disk signature if needed, and convert the partition style to MBR for better compatibility. If still not detected, try initializing the SSD on another PC. With the SSD showing in Disk Management, you can easily initialize it and create a new NTFS volume to start using the drive.