What is RAID 5?
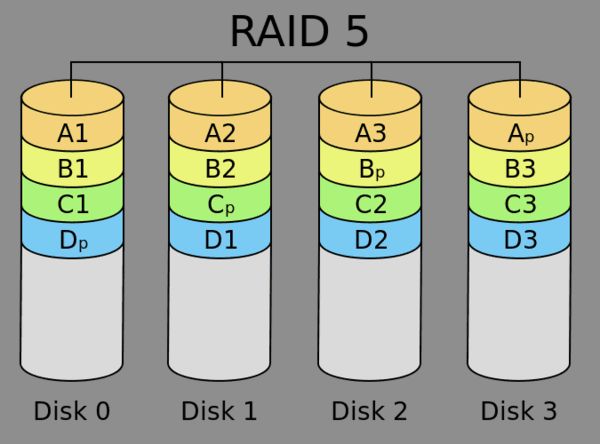
RAID 5 is a form of redundant array of independent disks (RAID) that uses distributed parity to provide fault tolerance and improve performance (Definition of RAID 5). In RAID 5, data is striped across all the disks in the array, similar to RAID 0. However, it also reserves space on one disk for parity information that safeguards the data in case of failure (Definition of RAID 5).
The parity information is distributed across all the disks rather than being stored on a dedicated parity disk. This distribution provides performance improvements by avoiding disk bottlenecks when writing parity information (Definition of RAID 5). If one disk in the array fails, the parity blocks from the remaining disks can be used to rebuild the data on the failed drive (Definition of RAID 5).
RAID 5 requires a minimum of three disks, but it is commonly implemented with five disks. The benefits of RAID 5 include better performance, capacity efficiency, and fault tolerance compared to RAID 1 mirroring. However, write performance suffers due to parity calculation and there is risk of data loss with multiple disk failures (Definition of RAID 5).
Overall, RAID 5 provides a good balance of affordability, capacity, and reliability for many applications (Definition of RAID 5). It protects against data loss from single disk failures and allows rebuilding of failed drives. But for mission critical data, RAID 6 or 10 may be preferable for greater fault tolerance.
Checking RAID Configuration
There are a few different ways to check your RAID configuration depending on your operating system and server hardware.
Most server hardware will have a built-in RAID configuration utility that can be accessed during boot or by pressing a key during POST. This will show the current RAID setup and status. For example, LSI and Broadcom RAID cards have the MegaRAID Configuration Utility.[1]
In Windows, you can use the Disk Management utility to view your RAID volumes and status. On Windows Server, you can also use the Server Manager to check storage pools and disks.[1]
On Linux, the mdadm utility can show RAID array status and configuration details. The /proc/mdstat file also contains RAID info.[2]
For macOS, the Disk Utility application or command line utilities like diskutil can show RAID configuration.
In addition to OS tools, most server OEMs like Dell, HP, and Lenovo have their own software utilities that can check RAID status and health on their server hardware.
Viewing RAID 5 in Windows
There are a few different ways to view your RAID 5 configuration in Windows, including using Disk Management, DiskPart, and PowerShell.
To view RAID configuration in Disk Management:
- Open Disk Management (diskmgmt.msc)
- The disks in the RAID 5 array will be shown with a stripe across them
- Hover over each disk to see if it says “RAID-5” in the tooltip
To view RAID configuration using DiskPart:
- Open a Command Prompt as Administrator
- Type “diskpart” and press Enter
- Type “list disk” to see disks in the RAID array
- Select each disk and type “detail disk” to view RAID status
To view RAID in PowerShell:
- Open PowerShell as Administrator
- Type “Get-Disk” to list all disks
- Check “IsManualAttach” and “NumberOfColumns” for RAID status
- Type “Get-PhysicalDisk” for more details
Using any of these tools in Windows can help verify that RAID 5 is configured correctly. Always check for a healthy status and be sure all drives in the array are present.
Viewing RAID 5 in Linux
There are a few different utilities that can be used to view RAID 5 configuration information in Linux. The most common tools are mdadm and cat /proc/mdstat.
The mdadm utility provides detailed information about Linux software RAID devices. To see information about all arrays, you can use:
sudo mdadm --detail --scan
This will show the RAID level, number of disks, status, and other details for each array configured on the system [1]. To query a specific array, provide the array name or UUID.
The /proc/mdstat file contains a summary of active RAID arrays. It can be viewed by running:
cat /proc/mdstat
This will display information like the RAID level, number of active and failed disks, recovery status, and more in a compact overview [2].
Other utilities like megacli, graid, and lsblk can provide additional RAID status information as well. Overall, mdadm and /proc/mdstat offer the most comprehensive details needed to verify RAID 5 configuration in Linux.
Viewing RAID 5 in macOS
There are a few ways to view your RAID 5 configuration on macOS:
Using Disk Utility
Disk Utility is the primary tool for managing disks and volumes on macOS. To view your RAID 5 configuration:
- Open Disk Utility (located in Applications > Utilities)
- Select the RAID volume in the sidebar
- Click the Info button to see details like the RAID Type and number of disks
This will confirm the RAID level and which physical disks make up the array. Disk Utility can also be used to monitor disk health and activity (source).
Using system_profiler
The system_profiler command in Terminal can provide in-depth hardware details. To see RAID info:
- Open Terminal
- Run
system_profiler SPStorageDataType - Scroll to the RAID section to view the RAID 5 configuration
This will show the disks in the array, capacity, status, and other technical details (source).
Using diskutil list
The diskutil command also provides storage info. To see RAID details:
- Open Terminal
- Run
diskutil list - Look for the RAID volume and its parameters
This provides a quick overview of all disks and volumes including the RAID configuration (source).
Verifying Parity
Verifying parity consistency is an important part of maintaining the integrity of a RAID 5 array. Parity information is used to rebuild data in case of a disk failure, so it’s crucial that parity is accurate and up-to-date.
Most RAID controllers include built-in tools to check parity. For hardware RAID controllers, this can usually be accessed through the controller’s configuration utility. The process typically involves the controller calculating the parity across all disks and comparing it to the stored parity data. Any inconsistencies will be reported.
For software RAID solutions like mdadm in Linux, the parity can be verified by running the check operation. This reads all data blocks and parity blocks to validate consistency (1).
Parity checking places additional load on the disks, so it’s best done during periods of low activity. It’s recommended to perform parity verification regularly, such as monthly or quarterly, to catch any issues early.
Monitoring RAID 5
Ongoing monitoring of RAID 5 arrays is important to help identify issues before they cause problems. There are several tools available for monitoring RAID 5 performance and status on Windows, Linux, and macOS systems:
On Windows, Disk Management can provide a basic view of your RAID 5 array’s status. More advanced utilities like StorMagic SvSAN or Intel Matrix Storage Manager allow monitoring performance metrics like read/write speeds, I/O latency, and more. These can help identify problems like a drive failure or performance bottlenecks.
Linux systems can use mdadm to monitor RAID status and events. The tool smartctl checks drive health statistics to predict failure. Monitoring utilities like Munin or Nagios can track RAID performance over time.
On macOS, Disk Utility provides high-level RAID monitoring. For more advanced metrics, utilities like Apple System Monitor or third-party tools can track detailed performance data.
Regularly monitoring RAID 5 arrays helps identify problems early before they cause issues. Tracking performance over time also helps optimize and tune arrays for ideal throughput.
Troubleshooting Issues
Common issues with RAID 5 arrays include disk failures, data corruption, and performance problems. When a disk in the array fails, the RAID configuration will switch to a degraded mode, indicating the failed disk. This can be verified by checking the status in the RAID configuration utility. However, the array will remain functional in a degraded state thanks to the parity data (source: IBM).
If multiple disk failures occur, this can lead to data loss as the parity information is no longer sufficient for recovery. Trying to rebuild the array in this state may result in irrecoverable corruption (source: Spiceworks Community).
Other issues like mismatches between the expected RAID configuration and the actual physical disks can also occur. This is usually checked by verifying the RAID metadata during initialization. If mismatches are found, it may require resetting the configuration or recreating the array (source: Stellar Data Recovery).
Performance can degrade substantially during rebuilds after a disk failure. The controller has to read all surviving disks to reconstruct the data for the replacement drive. On larger arrays, this can take hours or days, during which performance is reduced (source: Spiceworks Community).
Rebuilding Degraded Arrays
If you lose a hard drive in a RAID 5 array, the array will become degraded but remain functional. This is because RAID 5 uses distributed parity, where the parity information is spread across all the drives. So if one drive fails, the array can still operate in a degraded state.
To restore full redundancy, you will need to replace the failed drive with a new, identical drive and rebuild the array. The rebuilding process uses the parity information to reconstruct the lost data onto the replacement drive. Here are the main steps:
- Replace the failed drive with a compatible new drive.
- Initiate a rebuild operation through the RAID configuration utility.
- The controller scans drives, re-calculates parity, and reconstructs missing data.
- Rebuilding completes when the new drive is 100% rebuilt and synchronized.
The length of time to rebuild depends on the size of the drives and the load on the array. It could take several hours to over a day. During rebuilding, the array is exposed to failure if another drive fails. Some RAID controllers support hot spare drives, which will automatically rebuild the array, reducing downtime.
It’s critical to use identical drives when replacing failed drives in RAID 5. If you use a non-identical drive, rebuilding may fail or you may lose the entire array. Refer to your storage device documentation for proper drive replacement and rebuilding steps specific to the hardware.
Source: QNAP Forums
Migrating or Changing RAID 5
If you need to change your RAID 5 configuration or migrate it to a new system, there are several steps you should take to do so successfully:
First, back up any critical data on the RAID 5 array. This provides a safety net in case anything goes wrong during the migration process. Use a backup solution like tape drives or external hard drives to create backups.
Next, assemble the new system and RAID controller that you plan to migrate to. Ensure the new system has enough SATA ports and space to accommodate the full RAID 5 array. The new controller should be the same brand and model as the old one if possible.
Install any required RAID management software and drivers on the new system, and connect the RAID 5 drives to the controller ports. The existing RAID 5 configuration should be detected automatically in most cases. You can verify it is detected properly in the RAID BIOS or management utility.
If you need to change the RAID level during the migration, this can be done through the controller’s software. Take care to select the right options to convert the array to the new RAID level without destroying data.
Finally, confirm the array is fully operational and healthy on the new system. Rebuild any degraded disks if needed. With the data intact and fully accessible on the new hardware, your RAID 5 migration is complete.
For more details, see this excellent guide on moving a RAID array to new hardware. Migrating RAID systems requires care, but is achievable if done methodically.
