There are a few different ways to lock an external hard drive in Windows 10 to restrict access and prevent unauthorized use. Locking the drive is a good idea if it contains sensitive information you want to protect.
Some methods are built into Windows, like BitLocker encryption, while third-party software solutions like folder lockers also exist. The best method for you depends on your specific needs and preferences.
Quick Overview of Methods
Here is a quick rundown of some of the main ways to lock an external drive in Windows 10:
- Use BitLocker encryption – This is built into Windows and creates a password protected, encrypted drive.
- Use folder/file locking software – Third-party programs like Folder Lock can password protect files and folders.
- Edit permissions – You can remove user access permissions for the drive letter in Windows.
- Enable write protection – Use attribute tools in Windows to make the drive read-only.
- Physically lock the drive – Use a lock slot if available to prevent physical access.
We’ll go into more details on these methods next.
Method 1: Use BitLocker Encryption
The most robust built-in way to lock an external drive on Windows 10 is to use BitLocker encryption.
BitLocker allows you to encrypt the entire drive so no one can access its contents without entering a password. This protects your data even if the drive is removed from your PC and connected elsewhere.
Here are the steps to enable BitLocker encryption on an external drive:
- Connect the external drive to your Windows 10 PC.
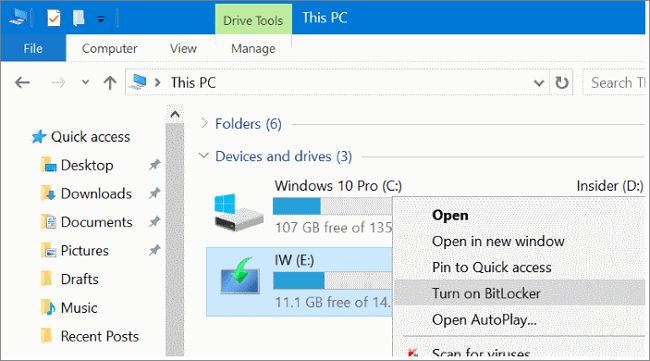
- Open the Start menu and search for “BitLocker”. Click on the “Manage BitLocker” result.
- In the BitLocker Drive Encryption window, click “Turn on BitLocker” for the external drive you want to lock.
- Check the “Use a password to unlock the drive” box and enter a strong password. Click Next.
- Choose your encryption method. For external drives, “New encryption mode” with AES-256 is recommended.
- Click “Start encrypting” to enable BitLocker encryption on the drive.
The drive will now encrypt in the background. This may take some time for large drives. Once finished, the drive will lock automatically whenever you disconnect it. You’ll need to enter the password again on any PC you connect it to in order to access the contents.
BitLocker is a good option for ultimate data protection. However, the encryption/decryption process can slow down drive speeds. Also, if you forget the password, you won’t be able to access the drive.
Pros
- Robust encryption protects drive contents
- Drive locks automatically when disconnected from PC
- Free built-in Windows feature
Cons
- Encryption can slow down drive speeds
- Forgotten password results in data loss
- Not available in all editions of Windows 10
Method 2: Use Folder Locking Software
If you only need to lock certain sensitive files and folders on the external drive, a folder locking program may be ideal.
Folder lock software allows you to password protect specific files and folders on your drive. The rest of the data remains accessible as normal.
Here are some popular folder lock programs:
- Folder Lock – Paid software with robust features. Can password protect folders, encrypt contents, auto-lock files, and shred contents.
- Lock Folder XP – Free open source folder locking program. Supports XP through Windows 10.
- AxCrypt – Free and paid versions available. Simple drag-and-drop encryption for files and folders.
The steps to use folder lock software vary by program but generally involve:
- Downloading and installing the folder lock program.
- Selecting the files/folders on your external drive you want to lock.
- Right click and choose “Lock” or “Encrypt” from the context menu.
- Creating a password that will be required to unlock the protected items.
The advantages here are that you can selectively lock sensitive data while keeping other files unlocked. It’s also faster than full drive encryption.
The downside is that these programs rely on being installed within Windows to work properly. The locks may be bypassed if the drive is connected directly to a different OS.
Pros:
- Selectively lock certain files/folders only
- Faster performance than full disk encryption
- Some utilities are free
Cons:
- Locks may not work if connecting drive externally
- Paid programs can get expensive
- Requires software installation on each PC
Method 3: Edit Drive Permissions
Drive permissions in Windows allow you control access to an entire drive letter. You can use this to lock an external drive.
Here are the basic steps:
- Open File Explorer in Windows and locate the external drive letter.
- Right click the drive and choose “Properties”.
- Go to the “Security” tab and click “Edit”.
- Remove all permissions for users and groups except “Administrators”.
This will prevent anyone except Admin accounts from accessing the drive. You can optionally disable the Admin permissions too if you want the contents completely inaccessible.
The advantages of this method are that it is simple, built-in to Windows, and takes just a few clicks.
The downside is there are ways around it if other users know the tricks. For example, they could take ownership of the drive letter and restore access. So it’s not the most secure lock.
Pros:
- Simple set up with only built-in Windows tools
- Totally locks down drive access if you remove all permissions
- No additional software required
Cons:
- Not the most robust security, permissions can be bypassed
- Locks entire drive including non-sensitive content
- Requires admin rights to set permissions
Method 4: Enable Write Protection
You can leverage the write-protection attributes in Windows to effectively make an external drive read-only.
Here are the basic steps:
- Open Command Prompt as Administrator
- Type “attrib +r /s /d F:” replacing F with the actual drive letter.
- Press Enter. The attribute will be set recursively on all files/folders.
This will enable the read-only attribute on the drive letter specified, preventing files from being modified or deleted.
To later remove write protection, open Command Prompt again as Admin and use:
attrib -r /s /d F:
Making the drive read-only can be a quick way to prevent changes. However, it isn’t the most robust protection. An admin could use that same Command Prompt method to remove the attributes.
Pros:
- Very quick and simple to enable read-only attribute
- No extra software, uses built-in Windows commands
- Allows drive contents to still be viewed
Cons:
- Not the most robust security, attributes can be removed
- Requires admin Command Prompt access
- Makes entire drive read-only including non-sensitive items
Method 5: Physically Lock the Drive
Some external hard drives and enclosures include physical lock slots for security cables.
If your drive has such a feature, you can use a locking cable to physically secure the drive and prevent removal or theft when it’s connected to your PC.
This doesn’t prevent digital access if the drive is still connected and unlocked. But it provides a baseline physical deterrent and makes it harder for the drive itself to be stolen.
You can buy lock cables that fit the slots for fairly cheap. Just make sure you get the right size connector.
The downsides are that not all drives feature a lock slot, and determined thieves could still find ways to break the lock and steal the drive if they have physical access.
Pros:
- Physically secures the drive from removal/theft
- Cheap cables are available for drives with slots
- Prevents physical access which is a baseline of protection
Cons:
- Doesn’t prevent digital data access if connected
- Locks can potentially be broken/cut by determined thief
- Not all external drives have lock slots
Comparison of Major Locking Methods
Here is a quick comparison table summarizing the main external drive locking approaches we’ve covered:
| Method | Security Level | Difficulty | Downsides |
|---|---|---|---|
| BitLocker Encryption | Very High | Moderate | Slows performance, forgotten passwords lock out data |
| Folder Lock Software | High | Easy | May not work externally from installed OS |
| Edit Drive Permissions | Medium | Very Easy | Can be bypassed with admin access |
| Set Read-Only Attribute | Low-Medium | Very Easy | Attributes can be removed |
| Physical Lock Slot | Low | Very Easy | No protection if drive unlocked & connected |
As you can see, each method has different pros and cons when it comes to security level, ease of use, and potential downsides. Think about which capabilities are most important for your specific situation when deciding on the best way to lock your external Windows drive.
Conclusion
There are a number of ways you can go about locking an external hard drive on Windows 10, but some of the best options include BitLocker encryption, third party folder lock software, editing drive permissions, enabling read-only attributes, and physical lock slots.
The right method for you depends on your specific security needs balanced with usability requirements. The strongest protection is found using encryption, but this can be overkill if you only need to secure a portion of the drive and can impact performance.
Folder locking programs provide robust protection for selected files/folders while keeping full access to other data. Or you can rely on simple permissions/attributes if you just need to quickly prevent access on a limited basis.
Ideally use multiple layers of protection when securing sensitive external drives. Physical locks prevent theft of the drive itself while digital protections like encryption and folder locks protect the actual data if the drive is stolen.
Following best practices for drive security provides important protection against threats like data theft or exposure of confidential information.