If you want to move your photos and videos from Google Photos back to your device’s gallery, there are a few easy ways to do it. Here are some quick answers to common questions about moving content out of Google Photos:
Can I download photos from Google Photos to my gallery?
Yes, you can download photos and videos from Google Photos back to your device’s local storage. The Google Photos app and website allow you to select content and download it to your device.
How do I save Google Photos to my iPhone camera roll?
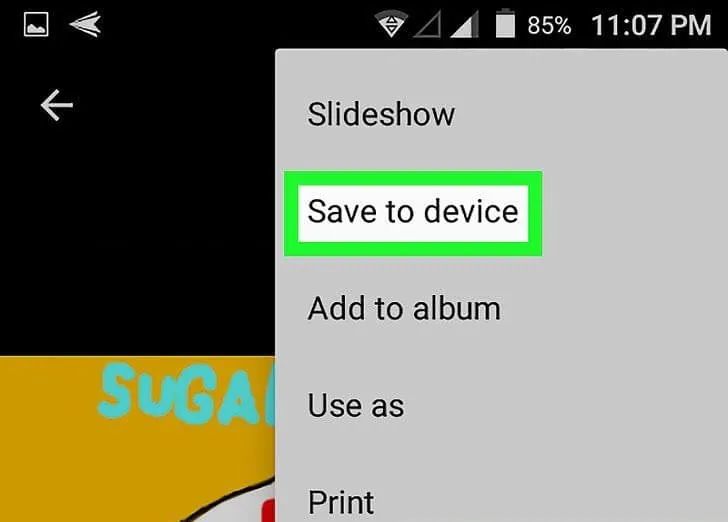
On your iPhone, open the Google Photos app and select the photos or videos you want to move. Tap the three dot menu in the upper right and choose ‘Save to Device’ or ‘Save to Roll’. This will save a copy of the selected content to your iPhone’s camera roll.
Does Google Photos have an export tool?
Yes, Google Photos includes a ‘Takeout’ tool that allows you to export all your Google Photos content. You can download everything at once or select just the content you want. This downloads your photos and videos in their original quality.
Here are the step-by-step instructions for using Google Takeout to export your photos and videos from Google Photos:
- Go to takeout.google.com and sign in to your Google account if prompted.
- Deselect all services except for Google Photos.
- Choose whether you want to export all your photos or just a date range.
- Select the file type, size, and frequency for your export.
- Click ‘Next’ and then ‘Create Export’ to start your Takeout export.
- When the export is ready, download the files to your device.
- Import the downloaded photos and videos into your device’s local gallery.
How can I move photos from Google Photos to my Samsung Gallery app?
For Samsung Galaxy devices, follow these steps:
- Open the Google Photos app and select the photos you want to move.
- Tap the three dot menu and choose ‘Save to Device’ or ‘Save to Gallery’.
- Open the Gallery app on your Samsung device.
- Tap the three line menu button and choose ‘Settings’.
- Go to ‘Sync with Google Photos’ and turn it off.
Turning off the Google Photos sync will remove the photos from the cloud and keep them only in your Samsung Gallery.
Can I transfer Google Photos to my computer?
Yes, you can download photos and videos from Google Photos to your computer:
- On the Google Photos website, select the images you want to download.
- Click the three dot menu and choose ‘Download’.
- Choose to download the original size files.
- Save the photos to your computer once the download completes.
You can also use Google Takeout to export your entire Google Photos library to your computer. This allows you to backup and transfer all your content at once.
Why are my Google Photos not showing up in my gallery?
If your Google Photos are not appearing in your device’s gallery app, here are some possible reasons and fixes:
- The Google Photos sync or backup setting needs to be turned on. Check your device and app settings.
- Your device storage may be full. Check its available storage space.
- The app needs updated or reinstalled. Update Google Photos or reinstall it.
- Your device OS needs updated. Check for any available operating system updates.
- Google Photos may have errors indexing your photos. Try refreshing and reloading the app.
How can I get my Google Photos back to my iPhone camera roll?
To move Google Photos back to your iPhone’s camera roll:
- Open the Google Photos app on your iPhone.
- Tap ‘Library’ and select the photos you want to move.
- Tap the share icon (the box with an arrow pointing up) at the bottom.
- Choose ‘Save to Device’ or ‘Save to Roll’ to save the photos.
- Open the Photos app to view the photos in your camera roll.
You can also use the Google Takeout export method mentioned above to download all your Google Photos to your computer. Then sync or transfer them to your iPhone’s local storage.
What is the fastest way to transfer Google Photos to my PC?
The fastest way is to use the Google Takeout export tool. Follow these steps for a quick export and transfer:
- Go to takeout.google.com and select only Google Photos.
- Choose the file type (JPEG or PNG are fastest).
- Select High Definition as the size option.
- Choose Export Once and generate the export file.
- When ready, download the file directly to your PC.
- Extract the photos and videos on your computer.
This provides an automated batch export at original quality so you can quickly transfer all your content.
Should I use Takeout or Google One to download my photos?
If you want to download a few specific photos, the apps may be faster. But Takeout is preferable for mass exports:
- Google Takeout exports your entire library.
- It maintains original quality and metadata.
- The export process is automated once started.
- Google One only allows individual downloads.
So Google Takeout scales better for large transfers. But the apps can be easier for individual downloads.
How do I sync Google Photos to my Android device gallery?
To sync Google Photos to an Android device’s native gallery app:
- Open the Google Photos app settings.
- Make sure backup and sync is enabled.
- Check the ‘Sync photos & videos from Google Photos’ option.
- Tap on the ‘Synced folders’ option.
- Choose which folders from Google Photos you want to sync.
This will automatically populate the selected Google Photos content into your Android device’s gallery. New photos added to those folders will also sync across.
Can I integrate Google Photos into Windows folders?
Yes, on Windows 10 and 11 you can integrate and sync Google Photos using the built-in Photos app:
- Open the Photos app and click the settings icon.
- Go to ‘Sources’ and click Add a source.
- Choose Google Photos and sign into your Google account.
- In the sidebar, choose which Google Photos albums to sync.
This will sync your photos and videos into the native Photos app so they appear like local Windows folders. Any changes will sync across devices.
Conclusion
To summarize, here are some quick ways to transfer Google Photos back into a local photo gallery:
- Use the Save to Device option in the Google Photos app.
- Turn off Google Photos sync in your device’s gallery settings.
- Export your entire library using Google Takeout.
- Sync select Google Photos albums to Windows or Android.
Moving photos out of Google Photos allows you to free up cloud storage and retain local backups. Carefully manage sync and backup settings to avoid losing data. With the right export and sync methods, you can seamlessly integrate Google Photos with your device’s native gallery.
| Method | Advantages | Disadvantages |
|---|---|---|
| Save to Device | – Quick for individual photos – Keeps original quality |
– Manual selection required – Time consuming for many photos |
| Turn off Google Photos sync | – Frees up cloud storage – Automatic sync removal |
– Loses cloud backup benefits – Doesn’t transfer photos |
| Google Takeout export | – Transfers all photos – Maintains original quality |
– Slower than manual exports – No sync integration |
| Sync albums | – Automatic sync and backup – Integrates cloud and local |
– Requires platform support – Selective album sync only |
Trying different methods allows you to find the optimal balance of cloud connectivity and local storage for your specific needs. With smart photo management, you can enjoy the perks of Google Photos while still retaining control over your gallery.
Are you deciding between Google Photos and more conventional storage for your image library? Be sure to weigh how you use your photos before committing fully to any one solution. A hybrid approach may give you the best of both worlds.
With so many choices, it helps to narrow your priorities first—things like quality, accessibility, sharing features, editing tools, search functions, privacy controls and integrations should guide your decision. Reflect on your photo habits and needs.
Here are a few key advantages of Google Photos to factor in:
- Unlimited free storage for “high quality” images.
- Powerful search based on content, labels, dates, people, and more.
- Built-in editing features and filters.
- Simple sharing capabilities.
- Syncing across devices when logged into your Google account.
And some potential drawbacks to consider:
- Requires high quality uploads for storage benefits.
- No local photo file access.
- Lacks more advanced editing tools.
- Privacy concerns of data hosted by Google.
- Possible glitches with syncing or crashes.
Local gallery storage avoids some of these limitations but comes with its own potential issues like storage capacity limits, disorganized folders, lack of search, and no cross-device access.
One idea is to use Google Photos for its strengths like search, sharing and cloud access—but then periodically transfer desired content back into a local gallery for editing, backups and long term storage. This blended workflow keeps your entire library accessible in the cloud temporarily while still maintaining a curated collection of your best shots locally.
Try using Google Photos for these purposes:
- Initial photo uploads for cloud backup.
- Organizing a vast image collection with search.
- Quick sharing of selected photos.
- Accessing your photos anywhere when traveling.
Then retrieve your best and most edited images to store locally for things like:
- Creating finished projects and photo gifts.
- Personal archiving of highlights.
- Advanced editing and adjustments.
- Local backups under your control.
This type of selective syncing gives you the convenience of Google Photos combined with the reliability and control of a personal gallery. Test different workflows to optimize the strengths of each system based on your specific needs.
With a few tweaks to your process, you can enjoy automated cloud photo management along with the personal touch of a hand-curated permanent collection. Find the right balance and your photos will be accessible, backed up, edited, and treasured for many years to come.
