With many Android devices, you may find yourself running out of internal storage space. Luckily, if your device has an SD card slot, you can use the external SD card to store photos, videos, music and other files that take up space. Moving these files from internal storage to the SD card can free up a good amount of space on your device. Here are some tips on how to move internal storage to an SD card on your Android phone or tablet.
Check if Your Device Supports Moving Data to SD Card
The first thing you’ll want to do is make sure your Android device actually supports moving files from internal storage to the SD card. This ability was very common on older Android phones, but some newer devices do not allow this due to how internal storage is partitioned. Here are a few ways to check:
- Go to Settings > Storage on your device. If you see an option called “Change” or “Migrate Data” under your SD card listing, then moving data is supported.
- Look for an app called “Migrate” or “Move to SD Card” pre-installed on your device. Having this app means moving data is enabled.
- Check your device manufacturer’s website for specifications on whether your model supports moving files to SD card.
If you cannot find any evidence that your device supports moving data to the SD card, unfortunately that means this feature is not enabled on your phone or tablet.
Ensure You Have an SD Card Installed
Before moving any files, you’ll want to make sure your Android device actually has an SD card installed. Here’s how to check:
- Go to Settings > Storage. You should see a listing for an SD card with details on total and available space.
- Physically remove the SD card tray and verify there is an SD card present.
- Check that the SD card is properly detected by your device. It should appear in File Explorer.
If you don’t see signs of an SD card in Storage settings or File Explorer, then you’ll need to install one before proceeding. Compatible SD card capacities and speeds depend on your specific Android device. Consult your device manufacturer’s documentation for SD card requirements.
Free Up Storage Space on Your Device
Before moving files from internal storage to your SD card, it’s a good idea to first free up as much existing storage space as possible. Here are some tips for freeing up space:
- Uninstall unused apps
- Remove downloaded files you no longer need, like PDFs or ebooks
- Transfer photos and videos to your computer or cloud storage
- Clear app cache and data through your device Settings
- Delete text messages, especially conversations with media attachments
The more you can delete and remove from internal storage, the more room you’ll have left to move files to your SD card after.
Use File Manager to Move Files to SD Card
Once you’ve confirmed your SD card is installed and freed up internal storage space, you can begin transferring files over. The easiest way is to use your device’s File Manager or File Explorer app. Here are the steps:
- Open the File Manager app on your device.
- Navigate to folders on internal storage containing files you want to move, like DCIM for photos/videos.
- Long press on a file or tap the dropdown menu icon to select files.
- Tap the “Move to” or similar icon to begin transfer.
- Select your SD card as the destination.
- Confirm the transfer to begin moving files.
Depending on how much you are transferring, the process may take some time. Be patient and let the transfer fully complete.
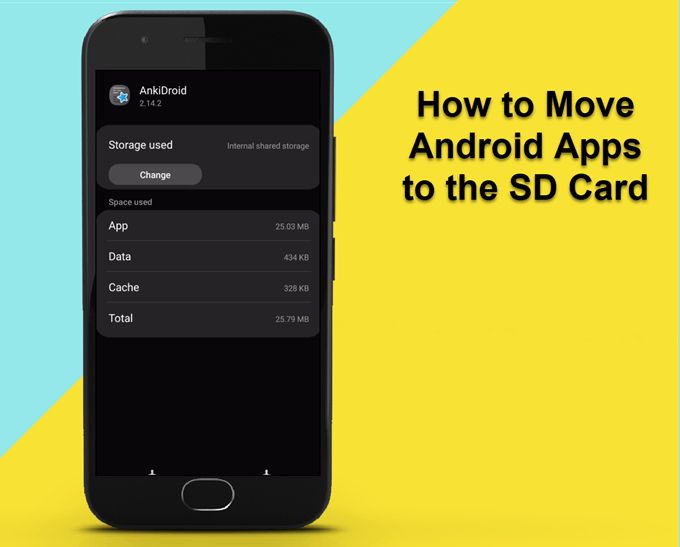
Use App Settings to Move App Data
Some apps allow you to move their data files from internal storage to an SD card through the app’s settings menu. For example, Spotify has an option to change the storage location for downloaded music. Here is how to move app data to an SD card:
- Open the app and look in its Settings or Storage menu.
- Look for options like “Change Storage Location”, “Move to SD Card” or similar.
- Select the SD card as the new storage location.
- Follow any additional prompts to begin moving app data.
Keep in mind not all apps support this feature. But for apps like music, video or photo apps with large data sets, being able to store their data on SD can free up a lot of internal storage space.
Use Migrate Data Settings
Some Android devices have a dedicated “Migrate Data” or “Change Storage” option in the Settings app that lets you easily move files and app data. Here is how to use it:
- Go to Settings > Storage.
- Select your SD card.
- Tap the “Migrate Data” or “Change Storage” button.
- Select which photos, files and app data to move.
- Tap Move to begin transferring to the SD card.
This method makes it easy to migrate multiple types of files in one go. The only downside is that not all devices have this dedicated migrate data setting.
Move Photos and Videos
Photos and videos take up more storage space than any other type of file for most users. Here are some techniques to move these files to your SD card:
- Open your Camera folder in File Explorer, select all photos/videos, and use the steps above to move them to an SD card folder.
- Designate your SD card as the default camera storage location. New photos/videos will automatically save there.
- Use a file manager app to batch migrate camera photos and videos.
- Manually move photos and videos to SD card after importing them from your camera.
Always keep backups of important photos and videos before moving them off internal storage in case anything goes wrong with the SD card.
Move Downloaded Files and Media
Files you download from the internet as well as streamed media can also be redirected to save to your SD card by default:
- Music/podcasts – Change download location in app settings to SD card
- Movies/videos – Use app settings to change storage location
- Books/PDFs/documents – Open file manager after downloading, then move files to SD card
- Email attachments – Change download folder to SD card in email settings
This will prevent your internal storage from quickly filling up with these large files over time.
Transfer Games to SD Card
Many Android games allow you to transfer the game data files to an SD card, although the core app still needs to remain on internal storage:
- Check for a “Move to SD Card” option in the game’s settings.
- Follow any prompts to transfer game data files to the new location.
- Note: some games do not support this feature and must remain on internal storage.
While not every game supports this, it’s a handy option for large games like Asphalt, Modern Combat, and others. Moving the game data can free up significant storage space.
Swap Internal Storage Partitions
Some devices that ship with very little internal storage allow you to essentially “swap” internal storage partitions between the actual internal storage and an SD card. Here’s how it works:
- From Settings, choose to mount your SD card as internal storage.
- Reboot your device and reformat the SD card to be used as internal storage.
- The original internal storage will now be mounted as a portable storage partition.
After swapping the partitions, your SD card becomes the new internal storage and is encrypted. The original internal storage acts like removable storage for transferring files. Apps can now be installed to the new “internal” SD card storage partition.
Reset App Preferences to SD Card
If you are moving app data to your SD card, it’s important to also reset the app preferences to use the new SD card location for storing data. Here’s how:
- Go to Settings > Apps.
- Tap the app you moved to the SD card.
- Choose Storage.
- Tap Clear Data and Clear Cache to reset app preferences.
- Reopen the app to create new data files on the SD card.
These steps clear the old references to internal storage and ensure the app will now save data on the SD card path.
Make Sure Apps Work After Moving
It’s very important to test that apps still function normally after you have migrated their data to your SD card. Here are some steps to test apps:
- Open every migrated app and confirm core functionality works.
- Check that media like music/videos still load properly in the app.
- Make a test post in a social media app and confirm it uploads successfully.
- Play a game for a few minutes and check that saved data is intact.
- Take a photo with a camera app and verify it saves new photos to the SD card.
Catching any issues right away can help you identify and troubleshoot any problems from the app data migration process.
Make Sure Nothing Was Left Behind
After you have moved data to your SD card, it’s worth double checking that you didn’t accidentally leave anything important behind on internal storage. Here is how to check:
- Browse folders like Downloads, DCIM, WhatsApp media etc on internal storage.
- Check Settings > Storage to see if any apps still show large amounts of data usage.
- Search File Manager for very large files (>250MB) that should probably be on SD card.
- Open apps and look in their Settings > Storage/Data Usage screens for anything unexpected.
Catching stray data you didn’t move earlier can allow you to transfer that last bit of data and eke out the maximum free space from your internal storage after the migration.
Remove SD Card Safely
Once you have moved data over to your SD card, you’ll want to safely eject it for removal to avoid any corruption. Here are some tips for safe SD card removal:
- Unmount your SD card in Settings > Storage before removing.
- Be very careful when handling the SD card after moving large amounts of data.
- Do not remove the card during transfers or when apps are accessing data on it.
- Consider using cloud backups or dual SD card slots if you swap cards frequently.
Physically removing an SD card when data is still being written can lead to file system corruption or data loss in some cases. Always unmount the card first and be very careful when swapping them out.
Conclusion
Moving data from your Android device’s internal storage to an SD card can be a great way to free up space for apps, photos, videos, music and more. Carefully follow the steps for your specific device and double check that everything transferred correctly. Remember to move data strategically in chunks to avoid storage bottlenecks. And be very cautious when physically removing the SD card after transferring data. With some time and patience, you can safely move important files to expand your total storage capacity.
