iTunes is a popular media player developed by Apple for organizing and playing digital music and video files. With iTunes, you can easily open and play various music file formats such as MP3, WAV, AIFF, Apple Lossless, and more. Here are some quick tips on how to open and play music files using iTunes on both Windows and Mac platforms.
What file formats does iTunes support?
iTunes supports a wide range of audio file formats that you can add to your iTunes library. The most common music file formats that work with iTunes include:
- MP3 (.mp3) – The most popular digital audio format. iTunes fully supports MP3 files.
- AAC (.m4a) – iTunes’ default audio format when importing CDs or purchasing from the iTunes Store. AAC files offer better sound quality than MP3.
- Apple Lossless (.m4a) – An Apple lossless format that preserves all music data for excellent sound quality.
- WAV (.wav) – The standard uncompressed audio format for Windows PCs.
- AIFF (.aiff) – An uncompressed audio format commonly used on Mac computers.
- Apple Music (.m4p) – DRM protected music files purchased from the iTunes Store.
As long as your music files are in one of these common formats, iTunes will be able to open and play them without any issues.
How to open music files on Windows
If you are a Windows user, here are step-by-step instructions to open and play music files in iTunes:
- Launch iTunes on your Windows PC. iTunes should open to the Music library view by default.
- Click on File > Add File to Library from the menu bar. A file explorer window will open.
- Browse to the location of your music files. iTunes can open files from your computer hard drive, external storage devices, network locations, etc.
- Select the music files you want to import. You can select multiple files at once. Supported formats include MP3, M4A, WAV, AIFF among others.
- Click Open. The selected music files will start importing into your iTunes library.
- Once the import is completed, you can find the music files under the Music library. Just double click on a file to start playing it.
Instead of using File > Add File to Library, you can also directly drag and drop music files from File Explorer into the iTunes window to quickly import and play them.
Opening music CDs
To open music tracks from a CD in iTunes on Windows:
- Insert an audio CD into your computer’s CD/DVD drive.
- Open iTunes if it doesn’t launch automatically.
- The CD tracks should automatically be imported into your iTunes library. If not, click File > Import CD.
- The CD import may take a few minutes depending on the length.
- Once completed, you can find the CD tracks in your library under Recently Added.
- Double click on any track to play it directly within iTunes.
How to open music files on Mac
The process for opening music files is quite similar in iTunes on the Mac platform:
- Open iTunes app on your Mac. It can be launched from the Applications folder.
- Go to File > Add to Library or use the keyboard shortcut Command+O.
- An Add To Library dialog box will appear. Navigate and choose your audio files here.
- You can select multiple music files together. Click Open.
- iTunes will start importing the music into your library.
- Once added, double click on any music file to play it back in iTunes.
You can also simply drag and drop music files from the Finder into the iTunes window to quickly import them.
Importing from CD
To import tracks from a CD:
- Insert a music CD into your Mac’s optical drive.
- Open iTunes if it doesn’t launch automatically.
- The CD tracks should automatically show up in the iTunes window. If not, click File > Import CD.
- iTunes will begin importing the CD. This may take a few minutes.
- When finished, you can access the CD tracks under Recently Added.
- Double click on a track to play it back.
How to adjust import settings
When importing music files into your iTunes library, the app makes a copy of the files at the location specified in your import settings.
Here is how to adjust import settings in iTunes:
- Open iTunes Preferences from the Edit (Windows) or iTunes (Mac) menu.
- Go to the General tab > Import Settings.
- Under Import Using, choose the format and setting for your imported files:
- AAC Encoder – Saves imported tracks as AAC files.
- MP3 Encoder – Imports songs as MP3 files.
- WAV Encoder – Stores added tracks uncompressed as WAV files.
- AIFF Encoder – Imports to uncompressed AIFF format.
- Apple Lossless Encoder – Imports in Apple Lossless format for high-quality.
- Under Import To, select the folder location where imported files will be stored.
- Click OK to save the changes.
This will determine the folder location and format of music files when you import them into iTunes library.
How to play imported music files
Once you’ve imported your music tracks into iTunes, here is how you can access and play them:
- Imported files are by default saved under the Music section of your iTunes library.
- Go to Music > Songs to see all imported tracks.
- If the import was recent, check under Recently Added.
- You can also search or browse for music under Playlists, Artists, Albums, Genres etc.
- To play a track, simply double click on it.
- Click the playback controls like Play, Pause, Next/Previous to control music playback.
- Adjust the volume slider to increase or decrease volume level.
You can also right-click on music files and choose Play to quickly begin playback. Drag files into the play queue or playlists to line up tracks.
How to customize playback in iTunes
iTunes provides various options to customize your playback experience for imported audio files. Here are some useful settings you can adjust:
- Equalizer – Boost bass, midrange, treble as per your taste under View > EQ.
- Volume leveling – Automatically adjust track volumes under Playback.
- Sound enhancer – Improve clarity and quality under Playback.
- Sound Check – Normalize volume across songs under Playback.
- Crossfade – Smooth transitions between adjacent song tracks.
- Playback speed – Play songs faster or slower.
- Repeat mode – Choose repeat all or single track from File menu.
- Shuffle mode – Enable shuffling of songs under File menu.
Take some time to go through the various options in the Playback and Edit menus to customize iTunes to best suit your music listening preferences.
How to add album artwork
Adding appropriate album artwork can enhance the visual appeal of your music library. Here is how you can add album covers in iTunes:
- Select the album or songs which you want to add artwork to.
- Right click and choose Get Info or use Command/Ctrl+I shortcut.
- Go to the Artwork tab in the info window.
- Click Add Artwork to add your own image file.
- You can also right-click on a track and select Get Album Artwork to fetch artwork automatically.
- For entire albums use Get Album Artwork from File menu.
- JPEG, PNG, BMP and GIF image formats are supported.
- Click OK to apply the new artwork.
Album covers are a great way to spruce up your music library and also help identify songs and artists faster.
How to edit music file information
You can edit metadata like artist name, album title, genre, year etc. for your imported music files in iTunes. Follow these steps:
- Select the file/album/songs you want to edit.
- Bring up Get Info window – Right click > Get Info or Command/Ctrl+I.
- In the info window you can edit the metadata tags as needed.
- Change the artist, album name, song titles, genre, year of release etc.
- Enter track numbers or change the Disc number for multi-disc sets.
- Click OK to save the changes.
Updating metadata ensures your music library is organized with proper track details and allows you to find songs easily later.
How to delete music files from library
If you wish to remove tracks from iTunes, here is how to delete music from your iTunes library:
- Find and select the tracks you wish to delete.
- Press the Delete key on your keyboard.
- Alternatively right-click and select Delete from the menu.
- Confirm the deletion when prompted.
Note that deleting music from your iTunes library only removes the track from your iTunes catalog. The original music file continues to exist on your computer or device storage.
To delete the associated file as well:
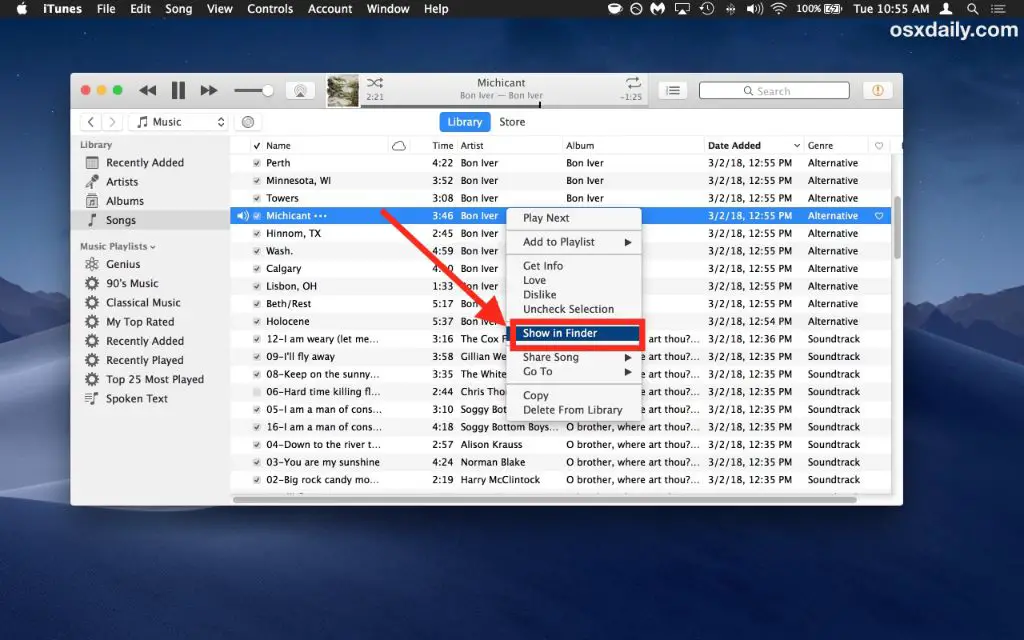
- Right click song and choose Show in Windows Explorer (Windows) / Show in Finder (Mac).
- Select the file and press Delete key to move it to Trash.
How to create playlists
Playlists allow you to organize songs into custom collections that can be accessed easily later. Here is how to create playlists in iTunes:
- Click + button at the bottom left and select New Playlist.
- Alternatively, go to File menu > New Playlist.
- Enter a name for the playlist and press Enter.
- To add songs, drag tracks from your library onto the playlist.
- Right-click on tracks and select Add to Playlist > ‘Your Playlist’.
Use playlists to arrange songs based on mood, genre, artist or your own custom ordering. You can access them quickly from the Sidebar.
How to burn audio CDs
You can burn music from your iTunes library onto CDs to listen on CD players. Here is how to burn songs to an audio CD:
- Create a playlist with the songs you want to burn.
- Insert a blank CD-R/RW disc into your computer.
- Click on the Burn Playlist to Disc icon at the bottom.
- Alternatively, go to File > Burn Playlist to Disc.
- Customize settings if needed – disc name, song gaps, playback speed.
- Click Burn.
- The songs will start getting burned to the CD.
The process is very similar if you wish to burn MP3 CDs. Simply add MP3 files instead of regular songs while creating the playlist. Burning audio CDs allows you to listen to your custom playlists in any regular CD player.
How to share your imported music
Once you’ve imported your music library into iTunes, you can easily share tracks and playlists with friends and other devices using these methods:
- Home Sharing – Share iTunes library over local WiFi with Home Sharing.
- Burn CD – Burn songs onto a CD to share offline.
- iTunes Gift – Purchase iTunes gifts to send tracks via email or messaging.
- AirDrop – Wirelessly transfer songs between Apple devices using AirDrop.
- Share Playlist – Share playlists online that others can follow.
- Apple Music – Add songs to your Apple Music profile to share.
Using options like Home Sharing and Share Playlist make sharing songs seamless so you can access your music anywhere.
How to sync iTunes music onto devices
You can transfer your imported iTunes music onto iOS devices like iPhones and iPods with just a couple of steps:
- Connect your iPhone/iPod Touch to computer using the USB cable.
- Select the device icon from top right corner of iTunes.
- Go to Music section and turn on Sync Music option.
- Select ‘Entire music library’ or ‘Selected playlists, artists, albums…’
- Check Manually manage music if you wish to drag songs individually.
- Click Apply to start syncing music onto the device.
For non-Apple devices, systems like Music Manager allow syncing iTunes music with other phones and MP3 players.
Conclusion
In summary, iTunes provides a great platform for organizing, playing, sharing and syncing your music library across Apple devices. By importing your music files into iTunes using the supported audio formats, you can build up an extensive music collection with playlists, album arts and metadata. Features like Home Sharing, Gift and AirDrop make it seamless to access your music anytime, anywhere. So go ahead and import your favorite songs into iTunes to create the ultimate personal music library.
