Quick Summary
Partitioning an external hard drive allows you to divide the drive into separate logical sections that function as independent drives. This allows you to store different types of data in different partitions, keep your data organized, and even run different operating systems. The basic steps are:
- Back up your drive data.
- Connect the drive to your computer.
- Use Disk Management or Disk Utility to shrink the existing partition.
- Create new partitions in the newly available space.
- Format the new partitions.
Partitioning does erase all data on the drive, so it’s crucial to back up your data first. The partitioning process will differ slightly depending on whether you use Windows, Mac, or Linux.
Why Would You Want to Partition an External Drive?
There are a few key reasons why you may want to partition an external hard drive:
- Organize different types of data – Partitioning allows you to separate different types of files, like documents, photos, videos, and music. This can make it easier to find things later.
- Separate operating systems – Partitioning lets you install different operating systems on different partitions. You could have Windows on one partition and Linux on another.
- Enhance security – Sensitive files can be stored on one partition that is encrypted, while public files are on a separate unencrypted partition.
- Isolate high-demand data – Putting high-demand files like games, video files or operating systems on their own partition can improve performance.
- Store backups – Having a dedicated backup partition makes it easier to regularly back up your important data.
The key consideration is that partitioning divides the storage capacity of your drive. So each partition will be smaller than the full size of the physical drive.
How Partitioning Works
Partitioning divides a physical hard drive into logical sections that function as separate volumes. This division is done at the file system level, not the hardware level. The physical drive remains intact but the way data is organized on it changes.
Some key facts about partitions:
- You can divide a drive into multiple partitions.
- Each partition gets its own drive letter or mount point.
- Partitions function as separate volumes, with their own file systems.
- The data on each partition is isolated from other partitions.
- The available storage capacity is shared across partitions.
So partitioning doesn’t physically alter the hard drive – it simply changes how the drive space is allocated and used by your operating system.
Limitations of Partitioned Drives
There are a few limitations to keep in mind:
- Each partition is smaller than the full drive size.
- Partitions can’t span multiple physical drives.
- There is a limit to the number of partitions allowed.
- Data recovery is more complex from partitioned drives.
- You can’t resize partitions without potentially losing data.
- Partitioning erases all existing data on the drive.
Because of these limitations, partitioning may not be the best solution in some cases. For example, if you need to frequently resize partitions or regularly move data between them.
Planning Partitions
Before partitioning a drive, it helps to think about:
- What you will use each partition for.
- The types and amount of data to store on each.
- The required capacity for each partition.
- Which partitions need which file system (ex: NTFS, FAT32, etc).
Determine if you’ll need 2, 3, 4 or more partitions. Most operating systems have a limit of 4 primary partitions. You can work around this by creating logical partitions within an extended partition.
Also decide if you’ll need space for growth on any partitions, or if you can allocate all available space up front. Allowing growth space avoids having to resize partitions later.
Back Up Your Drive First
Before altering partition structure, it is absolutely vital that you back up all data on the external drive.
Partitioning will erase all data on the drive. So you’ll lose everything if it’s not backed up.
To back up the drive:
- Copy all data to another drive or devices.
- or create a full disk image backup to another sufficiently large drive.
With a full backup in place, you can proceed to partitioning with confidence.
Partitioning Methods by Operating System
The tools and exact methods for partitioning a drive differ between operating systems:
On Windows
- Use Disk Management utility.
- Shrink the existing partition to create unallocated space.
- Create new partitions in the unallocated space.
- Assign drive letters to the new partitions.
- Format the partitions with desired file system.
On Mac
- Use Disk Utility application.
- Shrink the existing partition.
- Click the + button to create new partitions.
- Select volume format for each partition.
On Linux
- Use fdisk, gparted or other command line tool.
- Delete original partition and create new ones.
- Set partition type code for each partition.
- Format partitions with file system like ext4.
We will now cover the step-by-step process for partitioning your external drive on Windows 10.
How to Partition an External Drive on Windows 10
Here is an overview of the Windows 10 partition process:
- Connect the external drive to your computer.
- Use Disk Management to shrink the existing partition.
- Create new partitions in the newly created space.
- Assign drive letters to the new partitions.
- Format the new partitions.
Now let’s look at these steps in more detail:
Step 1: Connect the External Drive
Attach your external hard drive to your computer via USB, Firewire, Thunderbolt or other connection type.
Most external drives will be automatically detected by Windows. Confirm that the drive appears in Windows File Explorer.
Step 2: Shrink the Existing Partition
Next you’ll shrink the existing partition on the external drive to free up space. This is done in Disk Management:
- Open the Disk Management utility.
- Right-click the external drive partition and select Shrink Volume.
- Enter the amount of space to shrink by.
- Click Shrink to reduce the partition size.
This space now becomes unallocated space on the drive.
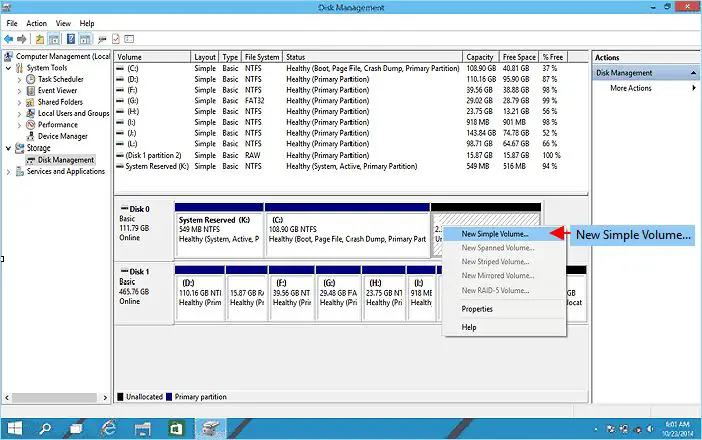
Step 3: Create New Partitions
In the newly created unallocated space, you can create new partitions:
- Right-click inside the unallocated space.
- Select New Simple Volume from the menu.
- Walk through the new partition wizard.
- Enter partition size, assign drive letter, and format.
- Click Finish when complete.
Repeat these steps to create multiple partitions as needed.
Step 4: Assign Drive Letters
By default, Windows will assign the next available drive letter to new partitions. But you can change the assigned drive letters:
- Right-click on the partition.
- Select Change Drive Letter and Paths.
- Click Change and choose a new drive letter.
- Click OK to assign the new drive letter.
Repeat for each partition as desired.
Step 5: Format Partitions
The new partitions will need to be formatted with a file system before you can store files on them:
- Right-click on the partition.
- Click Format from the menu.
- Choose volume label, file system, and cluster size.
- Check Perform a quick format.
- Click OK to format the partition.
Repeat the formatting process for all new partitions.
The external hard drive is now successfully partitioned and ready to use! Be sure to update your backups as needed.
Partition Alignment for Optimal Performance
Partition alignment refers to organizing partitions so that the starting and ending points align with block boundaries on the physical drive. Proper partition alignment avoids performance degradation:
- Unaligned partitions can incur a 2-3x performance penalty for read/write speeds.
- Optimally aligned partitions ensure maximum throughput speed.
- Misalignments cause added strain when the OS divides requests between partitions.
Windows automatically aligns partitions for best performance. But you can verify alignment in Disk Management by checking that partitions start and end on 1MB increments.
On Mac or Linux, you may need to manually align partitions when creating them. Set 1MB partition offsets to ensure optimal alignment.
Tips for Successful Partitioning
Follow these tips for a smooth partitioning process:
- Close all programs accessing the external drive before partitioning.
- Backup data completely before making any partition changes.
- Delete the original partition first when creating multiple partitions.
- Create extended partitions before logical partitions if needed.
- Align partitions properly for best performance.
Avoid errors by dismounting and disconnecting the drive prior to altering partitions. And never interrupt the partitioning process after it begins.
Frequently Asked Partitioning Questions
Here are answers to some common questions about partitioning external drives:
Is partitioning safe for my drive?
Yes, partitioning is a safe operation for hard drives when done properly. It simply divides the filesystem – the physical drive remains untouched.
Can I undo partitioning?
Not easily. Partitioning erases all data, so backups are essential. Merging partitions requires erasing them.
How many partitions can I create?
There’s typically a limit of 4 primary partitions. You can create more using extended partitions with logical drives inside.
Can partitions be different sizes?
Yes, partitions can vary in size according to your needs, as long as they fit within the drive capacity.
How do I access files on partitions?
Each partition gets its own drive letter and functions as a separate volume. Access them like you would external drives.
Can I install software on each partition?
Yes, partitions function as independent drives, so you can install OS, programs, and games onto them.
Will partitioning speed up my external drive?
It can! Isolating demanding data on its own partition avoids performance lag when accessing other data.
Conclusion
Partitioning allows you to divide an external hard drive into separate logical sections or volumes. This enables you to store different types of data and operating systems on the same physical drive.
The key steps are using Disk Management or Disk Utility to shrink the existing partition, then creating new partitions in the free space. This process erases data, so backing up first is crucial. Aligning partitions properly maintains optimal performance.
With partitions, you can organize your data, run multiple operating systems, enhance security, isolate intensive processes, and even conduct backups more easily. Just be aware of the limitations like partition size and numbers. And take precautions like closing open applications before partitioning.
Used strategically, partitioning your external hard drive allows you to make the most efficient use of your storage space. Dividing your drive into organized, high-performing partitions keeps your data tidy and accessible.