What is a SATA hard drive?
SATA, or Serial ATA, is a type of hard drive interface that connects storage devices like hard disk drives and solid-state drives to a computer’s motherboard. SATA was designed as the successor to the older Parallel ATA (PATA) interface, also known as IDE.
Some key characteristics of SATA hard drives include:
- Serial data transfer instead of parallel – SATA sends data serially over a cable one bit at a time rather than multiple bits at once like PATA. This allows for thinner cabling and faster transfer speeds.
- Faster transfer speeds – SATA interfaces operate at speeds up to 600 MB/s, while the fastest PATA speeds were 133 MB/s.
- Point-to-point connections – Each SATA device connects directly to the SATA host adapter rather than sharing a data cable with other devices.
- Smaller cables – SATA uses much thinner cables compared to PATA ribbon cables, improving airflow and allowing for smaller computer cases.
Overall, SATA represents an evolution in hard drive interfaces, offering faster speeds, simpler cabling, smaller connections, and better performance compared to older PATA/IDE drives. SATA has become the most common hard drive interface used in desktop and laptop computers today.
Why read a SATA drive externally?
There are a few key reasons to connect a SATA hard drive externally rather than installing it internally:
Access data from old hard drives – When a hard drive is removed from a computer or external enclosure, the only way to access the data is to connect it externally again. This allows you to retrieve files and recover data from old SATA hard drives that are no longer in use.
Diagnose drive issues – Connecting a SATA drive externally to a working computer is helpful for diagnosing problems with the drive itself. Issues like bad sectors, corruption, or mechanical failure can be identified by connecting the drive externally and running scans and tests.
According to Quora, external drives allow easier access to data from multiple computers compared to internal storage. External enclosures also offer portable storage and the ability to quickly switch between drives.
Requirements
To read a SATA hard drive externally, you will need the following equipment:
- External SATA (eSATA) enclosure – This is a special enclosure designed to house internal SATA hard drives and connect them to a computer externally via USB. Examples include the TerraMaster D4-300 USB 3.1 Type-C Storage External Hard Drive Enclosure.
- USB cable – The eSATA enclosure will require a USB cable, usually USB 3.0 or USB-C, to connect to your computer. Make sure you have the proper cable for your enclosure.
- Power supply – Most eSATA enclosures require an additional power supply to power the drive itself. This is usually included with the enclosure.
So in summary, you will need an eSATA enclosure made for housing SATA drives externally, a USB cable to connect the enclosure to your computer, and a power supply to power the drive inside the enclosure.
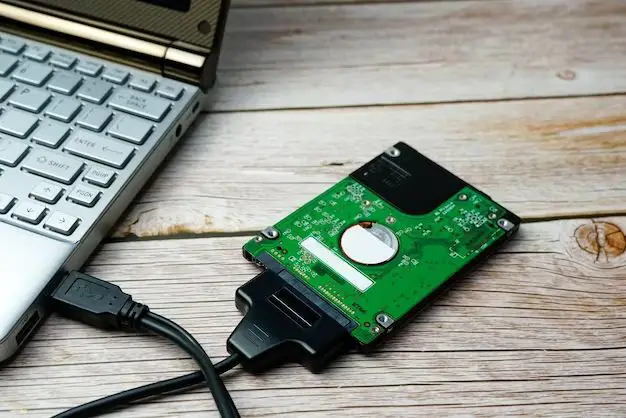
Connecting the drive
Connecting the SATA drive to the enclosure is a straightforward process. First, open up the external enclosure by removing the screws and taking off the cover. Refer to the enclosure’s manual for specifics on how to open it properly. Inside the enclosure will be a SATA connector and likely also a power connector if it’s a 3.5″ drive enclosure.
Next, take the SATA hard drive and match up the SATA data and power connectors to the corresponding connectors inside the enclosure. Gently insert the SATA data cable into the drive connection port, making sure the connectors are fully seated. If necessary, connect the drive to the power connector as well. Handle the drive carefully and do not force any connections.
With the drive connected, replace the enclosure cover and screw it back together securely. The external enclosure should now have the SATA drive installed and ready to connect to a computer.
For step-by-step instructions with images, refer to this guide: Connecting SATA drives to a PC via a USB enclosure
Connecting to Computer
Once the hard drive is connected to the enclosure, the next step is to connect it to your computer. This allows your computer to detect, access and transfer files to and from the external hard drive. There are two components for connecting the enclosure to your computer:
Connect USB Cable
The enclosure will have a USB cable attached, usually USB 3.0 for faster data transfer speeds. Plug this cable into an open USB port on your computer. Make sure the cable is fully inserted for a secure connection.
Plug in Power Cord
Most enclosures require an external power source, so will include a power adapter that plugs into a wall outlet. Connect the power cord to the back of the enclosure and plug it into a nearby electrical outlet. The drive should power on once connected.
With both USB and power connected, your computer will recognize the external hard drive and install any necessary drivers. You can then access and transfer files to and from the drive through your computer’s file manager.
Accessing the Drive
Once the external SATA drive is connected to your computer, it should automatically appear in your file manager (Finder on Mac or File Explorer on Windows). This allows you to access the contents of the drive like you would with an internal drive.
On some systems, you may need to manually mount the drive before it shows up. On Mac, open Disk Utility and find the external drive in the sidebar. Select it and click “Mount” at the top. On Windows, go to Disk Management, locate the external drive, and change its status from Offline to Online. This will mount the drive and add it to File Explorer.
If the drive does not appear after connecting and mounting, try a different USB port or cable. Rebooting your computer may also help detect the newly connected hardware. Rarely, you may need to initialize the drive by right-clicking it in Disk Management and selecting Initialize Disk.
Overall, accessing an external SATA drive is straightforward on both Windows and Mac. With the drive plugged in and mounted, you can browse and transfer files just like you would with an internal hard drive.
Sources:
https://discussions.apple.com/thread/7414173
https://www.seagate.com/support/kb/moving-data-between-two-systems-using-an-external-hard-drive-for-macos-004188en/
Transferring files
Once the external SATA hard drive is connected and mounted, you can copy files to and from it like any other drive. Simply open File Explorer (Windows) or Finder (Mac), navigate to the drive, and drag and drop or copy/paste files as needed.
However, transfer speeds may be slower compared to an internal drive, especially for very large files or batch transfers. This is because the external drive connects over USB, which has much lower bandwidth than an internal SATA connection. According to Crucial, external SSDs max out around 500 MB/s for sequential reads and writes, while a good internal SSD can reach over 2,000 MB/s.
So for large backups or moving gigabytes of data, the transfer could take noticeably longer than with an internal drive. Be patient and consider transferring in chunks if needed. Also make sure to safely eject the external drive before disconnecting.
Safely removing the drive
It is important to properly eject the external SATA drive before physically disconnecting it from the computer. Simply unplugging the drive while it is still mounted can potentially corrupt data or damage the drive.
On Windows, right-click on the external drive icon in File Explorer and select “Eject”. Wait for the notification that it is safe to remove the hardware before unplugging the USB cable.
On Mac OS, click the up arrow next to the external drive icon on the desktop or in the Finder sidebar. Select “Eject” and wait for the disk to unmount before disconnecting it.
On Linux distributions like Ubuntu, right-click the mounted drive icon and select “Safely Remove Drive”. Wait for the unmount process to finish before removing the drive.
Physically disconnecting the drive before properly ejecting/unmounting it can lead to file system corruption or lost data. Always eject SATA drives safely first according to your operating system’s steps. Refer to this guide for a more detailed walkthrough of this process.
Troubleshooting
If you encounter issues accessing your SATA drive through the external enclosure, there are some troubleshooting steps to try:
Drive Not Detected
If your computer is not detecting the external drive, try the following:
- Check the USB cable is securely connected at both ends. Detach and reattach the cable. Hard Drive Enclosures General Troubleshooting
- Try connecting the enclosure to another USB port on your computer.
- Check the power supply and cables to the enclosure are properly connected.
- Make sure your computer meets the minimum system requirements for the enclosure.
- Check if the drive is detected in Disk Management on Windows or Disk Utility on Mac.
- If still not detected, remove the drive and reconnect it to the enclosure.
Slow Transfer Speeds
If file transfers to/from the external drive are slow, try the following:
- Connect the enclosure to a USB 3.0 port if available.
- Use a shorter USB cable and avoid USB hubs.
- Check for USB conflicts with other devices and disconnect if necessary.
- Update USB and chipset drivers on your computer.
- Disable USB power saving settings in Power Options.
- Test the drive speed using Disk Benchmarking software.
Alternatives
Instead of using an external hard drive enclosure, there are some other options for connecting a SATA drive externally:
USB to SATA Adapter
A USB to SATA adapter allows you to connect a bare SATA drive directly to your computer’s USB port. This provides a simple, low-cost way to access data on a SATA drive without an enclosure. Most USB to SATA adapters are powered via USB so no external power supply is required. Examples include the StarTech USB3S2SAT3CB and the Sabrent USB 3.0 to SATA adapter.
Docking Station
An external drive docking station allows you to easily connect and swap SATA drives by plugging them directly into the dock. This provides quick access to data without having to mount the drive inside an enclosure. Docking stations come in single-bay and multi-bay options and typically support both 3.5″ and 2.5″ SATA drives. Examples include the Thermaltake BlacX Duet 2-bay dock and the ICY DOCK MB884SKP-B 4-bay dock.
