It’s easy to accidentally delete an album or your entire music library from iTunes. With just a few clicks, years of curated playlists and purchased music can vanish. Many iTunes and Apple Music users have experienced the sinking feeling of losing their music libraries. The good news is that with a few tried and tested techniques, it’s often possible to recover or restore deleted albums. This guide provides step-by-step instructions to help you get back lost albums using iTunes itself, iCloud backups, playlists, account re-downloads, and third-party software. With some effort, you can likely recover or rebuild much of your lost music library.
Check Recently Deleted
The first place to check for deleted albums is the Recently Deleted section in your iTunes library. This acts as a temporary holding place for items removed from your library, similar to the Recently Deleted album on your iPhone or iPad.
To view Recently Deleted on iTunes, go to the Music section in your library and scroll all the way down. You should see a Recently Deleted section at the bottom. Any albums or songs deleted within the past 30 days will be located here.
To restore a deleted album from Recently Deleted, simply right-click on it and choose “Restore”. This will move the album back into your main iTunes library. You can also click “Restore All” to recover everything in Recently Deleted.
Keep in mind that items removed from your library are only stored in Recently Deleted for 30 days. After that time, they will be permanently deleted. So check this section as soon as possible after an accidental deletion.
Restore from Backup
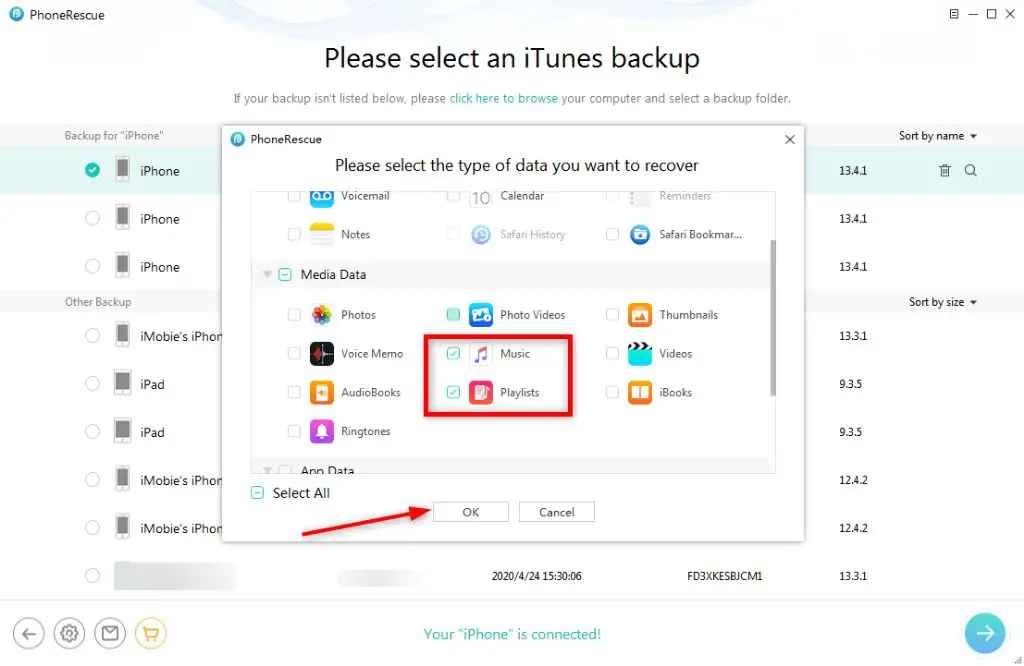
One of the easiest ways to recover a deleted album in iTunes is to restore your library from a backup. iTunes creates backups automatically, either saving them to an external drive or backing them up to iCloud. You can restore your entire iTunes library or choose a specific backup date to recover the deleted album.
To restore from a backup on an external drive, quit iTunes on the computer you want to restore to. Connect the external drive containing the backups and open iTunes while pressing and holding Shift. This will launch iTunes in recovery mode. From here, you can select the backup you want to restore from the external drive. iTunes will then restore your library from that backup point. https://blog.syncios.com/how-to-restore-itunes-from-backup-on-an-external-hard-drive/
If you use iCloud Music Library, you can also restore your iTunes library from an iCloud backup. Go to iTunes Preferences > Devices and choose Restore Library. Then sign in with your Apple ID and iTunes will download your iCloud backup to restore your library. This makes it easy to recover deleted albums, as your iCloud Music Library automatically backs up iTunes.
Use iCloud Music Library
One way to potentially recover deleted albums is through iCloud Music Library. This is Apple’s cloud-based music storage system that keeps copies of your iTunes music purchases and uploads. When you enable iCloud Music Library, it automatically stores a copy of your music library in the cloud. This includes any songs, albums, playlists, etc. that you’ve added to your library.
So even if you accidentally delete an album locally on your Mac or PC, the iCloud Music Library still has another copy stored. You may be able to restore the deleted album from iCloud as long as it hasn’t been more than 30 days. To do this, go to Music app > Preferences > General and make sure “Sync Library” is enabled. Then tap the cloud icon next to any greyed out albums to re-download them from iCloud.
One caveat is that any music purchased outside of iTunes will not be automatically stored in iCloud. You’ll have to manually upload those tracks first before they are included as part of your iCloud Music Library backup. So this method only works reliably for albums bought via iTunes.
Try iPhone/iPad Copy
One way to potentially recover deleted music from your iTunes library is by syncing your iPhone or iPad. Your iOS device likely has a copy of some of the music that used to be in your iTunes library. By syncing your iPhone/iPad, you can copy that music back into your iTunes library on your computer.
To sync your iPhone/iPad with your computer and copy the music:
- Connect your iPhone/iPad to your computer using the USB cable.
- Open iTunes on your computer.
- Click on your device icon in iTunes.
- Go to the Music section.
- Make sure “Sync Music” is checked.
- Click “Apply” to sync the music.
This will copy any music stored locally on your iPhone/iPad back into your iTunes library on your computer. Any tracks you’ve downloaded or synced previously should transfer back. While you may not recover your full library, it’s a good way to restore at least some of your lost music.
Use Playlists as Archive
One way to keep a copy of your music as a backup is to create playlists in iTunes or Apple Music. When you add an album or songs to a playlist, it creates another instance of that music that won’t be affected if you delete it from your library.
To use playlists as archive copies:
- Create a new playlist in iTunes or the Music app and give it a name like “Archive”
- Drag full albums or specific songs into the playlist to add them
- Even if you delete those albums/songs from your library, the playlist will still contain them
Playlists essentially act as archives or backups of music. As long as you don’t delete the playlist itself, you’ll always have access to the songs in it. This can be a useful way to free up space by deleting albums you own physical copies of, while still maintaining a digital archive.
The downside is that if you delete a playlist, the music archive will be lost. So maintain multiple playlist archives if possible. You can also use services like iCloud Music Library to back up your full collection.
Re-download Purchased Music
If you purchased the deleted album directly from the iTunes Store, you may be able to re-download it. All purchases made through your iTunes account are stored in your purchase history. To access your purchase history and re-download purchased albums on a Mac:
1. Open the Music app (formerly called iTunes) on your Mac.
2. Click on Account > Purchased from the menu bar at the top.
3. This will show your purchase history. Find the deleted album and click on the download icon next to it to re-download.
If you have an iOS device, you can also re-download purchased albums directly from the iTunes Store app. Tap on your profile, select Purchased, find the album and tap the download icon.
If you accidentally deleted the files locally, but did not remove the downloads from your account, this should allow you to restore the music. However, if you requested iTunes Support to fully remove the album from your purchase history, you will no longer be able to re-download it.
Try Third-party Software
If the previous methods don’t work, you may need to use third-party software specifically designed to recover deleted iTunes music. Software like Cisdem or EaseUS MobiSaver can scan your iTunes library and recover deleted songs, even if you’ve emptied the Trash.
These programs work by scanning your Mac’s hard drive and retrieving music files that have been marked as deleted but not yet overwritten. They can recover music purchases, ripped CDs, and synced iPhone music that may no longer show up in your iTunes library.
The recovery process involves selecting your iTunes media folder, choosing a scan mode (quick or deep), and letting the software search for missing files. Once the scan is complete, you can preview found files and selectively recover the music you want back in your library.
Using dedicated recovery software is typically successful in getting back accidentally deleted albums, songs, or entire libraries – provided the deleted data hasn’t already been overwritten. Just make sure to avoid further modifying your iTunes files until the recovery process is complete.
Contact Apple Support
If you are unable to recover your deleted iTunes music using the methods above, it may be time to directly contact Apple Support for assistance. According to their community discussions, Apple Support can potentially help restore accidentally deleted songs in some cases.
Before reaching out to Apple, make sure you have prepared the following information:
– Apple ID used for purchases
– Invoice numbers for any purchases of the deleted music
– Details on when and how the music was deleted
– Device types and iOS versions affected
You can contact Apple Support via phone, chat, or email. Phone support is available 24/7, while chat and email may have longer response times. When describing the issue, provide as many details as possible and clearly state that you are seeking help recovering accidentally deleted music purchases.
While Apple cannot guarantee restoring all lost music, their support team will review your account and purchases to try to help get your music library back to its original state. Contacting them promptly after deletion and providing complete information gives you the best chance of successful recovery.
Prevention Tips
There are a few ways to help avoid accidentally deleting albums from your iTunes library in the future:
Turn on the setting to “Show https://discussions.apple.com/thread/5055238 Recently Deleted” in iTunes. This will give you a window of time to restore anything you may have deleted by mistake before it is permanently erased.
Be very careful when selecting albums/songs to delete. Double check you are deleting only what you intend. It can be easy to accidentally select the wrong album.
Back up your iTunes library regularly. This gives you a restore point in case of any accidental deletion. You can back up to an external HD, Time Machine on Mac, or use iTunes Match.
Use playlists as archives. Even if you delete the original album, as long as the playlist remains, you can reconstruct it by re-adding the songs https://discussions.apple.com/thread/2642663.
Turn off automatic iCloud Music Library deletion. This prevents music from being deleted from your other devices if accidentally removed from one device. See https://discussions.apple.com/thread/253779544.